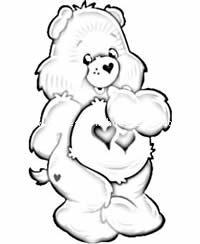
Take a look at these cool homemade Care Bear cakes shared with us by cake decorators from around the world. Along with the birthday cakes here, you’ll also find loads DIY birthday cake-making ideas and how-to tips to inspire your next birthday cake project. Enjoy!
And don’t forget… if you end up with a cool cake, have great tips to share or pictures of awesome birthday cakes you’ve made in the past, share them here and be a part of our coolest birthday cake community.
Latest Care Bear Cakes
- Coolest Care Bear Cake Ideas
 This Care Bear cake is made out of fondant and painted. The rest of the cake is drawn on and … Read more
 - Awesome 3D Care Bears Cake
 For those that haven’t seen my other cakes, I’m an Australian Dad who makes his children their birthday cakes. I … Read more
 - Awesome (But Easy) Care Bears Cake
 The first thing I always do when designing a birthday cake is to look at lots of ideas and then put together … Read more
 - Easy Care Bear Cake and Rainbow
 For our daughter’s 4th birthday, all she wanted was a Carebear cake. So needless to say we decided to give … Read more
 - Cool Homemade 3D Care Bear Birthday Cake
 I decided to make my daughter’s 1st birthday cake and wanted to do a Care Bear theme. I used a … Read more
 - Coolest Homemade Care Bear Cakes 3I made this cake for my 15year old niece. She wanted a care bear cake. I just used butter flavored … Read more
- Cool Homemade Care Bears Birthday Cake
 I made this Care Bears birthday cake for my daughter’s 1st Birthday. It was a Care Bears theme. The big … Read more
 - Coolest Homemade Care Bear Cakes 4My two-year-old niece really likes Care Bears so I made this cake for her. The pans I used were 6in, … Read more
- Coolest Care Bears Birthday Cake
 I made this Care Bears Birthday cake for my daughter’s 3rd birthday. She had 2 requests, it had to be … Read more
 - Coolest Care Bear Cake Photos and How-To Tips 1For this care bear cake I used the Wilton Panda Bear form and two round pans served as a cloud … Read more
- Coolest Homemade Care Bear Cakes 5I used one pound cake mix and one strawberry mix in the Wilton stand-up bear pan for my care bear … Read more
- Coolest Care Bear Birthday Cake Made With Wilton Cake Pan
 I used a Wilton cake pan to create this Care Bear Birthday Cake and made homemade butter cream icing to … Read more
Featured Cakes
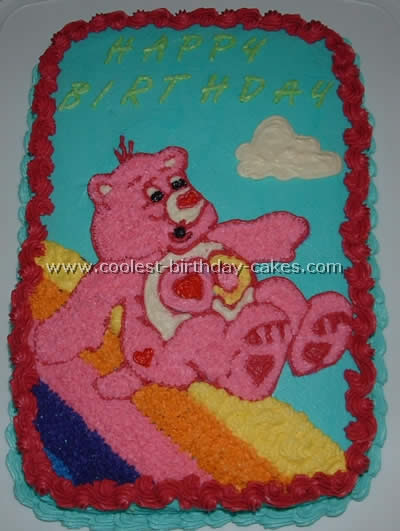
Cake by Ann B., Wellsville, NY
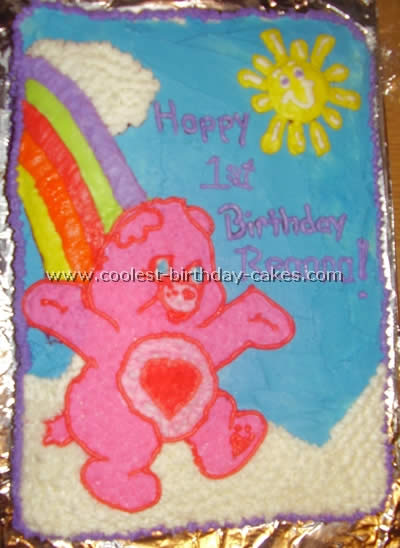
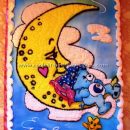
I got the idea for this cake from a coloring book. I used one cake mix in a 9×13 pan. I left the top rounded. After the cake cooled I spread on the blue buttercream frosting for the sky and the rest with white. Then I traced the coloring book picture of the care bear onto wax paper. I then flipped over the wax paper and traced the outline with the writing gel that you buy at the store. I pressed the wax paper onto the cake and then filled in the shapes with colored buttercream.
I used a star tip for the care bear and the clouds and a flat tip for the rainbow. The sun was made from a large round tip then flattened. I put a star edging around the perimeter of the cake at the base and at the top. I sporadically placed small stars around the sides of the cake for a little added color.
All in all Care bear cake are very simple to do, just very time consuming with all the different colors.
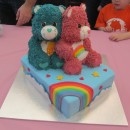
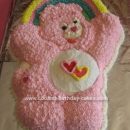
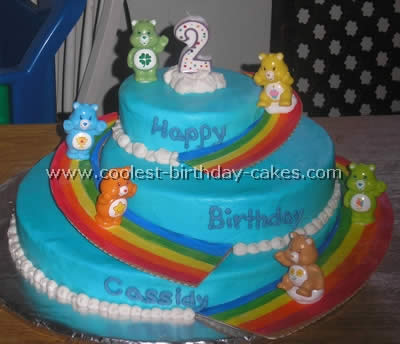
Cake by Sara W., Virginia Beach, VA
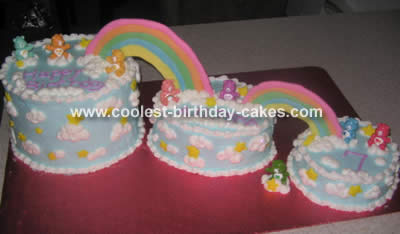
I wasn’t sure how I was going to pull off Care Bears cakes especially when I went all over the place looking for a simple Care Bear decoration. I finally found the figurines on eBay and they were just perfect to put on the cake. The tallest cake is an 8″ round layer (three layers torted to make six). The center is a 7″ oval (two layers torted to make four) and the smallest is one is a single 6″ layer (torted to make two.)
The rainbows are made out of fondant and I had never used it before so I didn’t really know what to expect. I used the Wilton pre-made stuff and colored it with my gel colors. I made the rainbows the night before and expected them to be dry enough to stand on their own the next day but they weren’t so I put them on a cookie sheet on parchment in the oven for about 20 minutes at 250 degrees.
That hardened them up but only after they had fully cooled. I had also made some extra small ones for the extra cupcakes that I had and those were very thin so they dried up enough to use in 12 hours.
I frosted the cake with light sky blue icing and then stuck the rainbows in and piped a tip #16 border on the top and bottom of each cake. Then I wrote the message in purple. I used a #12 tip to pipe in the clouds and added the color flow stars I had made using a pattern out of a Care Bears coloring book. I added the Care Bears while doing most of the clouds because I wanted it to look they were sitting on them. I went back after the clouds had crusted over and tried to push all the little dimples back in so they clouds weren’t pointy.
I sprinkled everything with edible glitter that I got at the local cake decorating store which wasn’t over powering and really made it look magical. If I were to make Care Bear cakes again I would make sure I didn’t put it all on one cake board. It made it very difficult to ice because I am used to using a turn table. Three separate rounds would have been better but I was worried about assembly when I got to the party. I used a sheet cake box that had a fully detached top and then I added some cardboard to make the bottom tall enough to make the top not hit the cake.
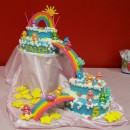
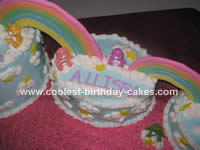
Cake by Rebecca W., West Monroe, LA
I merged several ideas I found from the Wilton yearbook and this website for Care bear cakes. I baked three two layered cakes 6, 8 and 10 inch. I frosted all over with regular decorator frosting that I colored with sky blue. I used a marshmallow fondant recipe to make fondant for the rainbows and stars. I made a rainbow pattern out of cardstock and cut each outline with that.
I then cut strips of the colors and used icing to “glue” them onto the fondant. I also stuck toothpicks between the cardstock and the fondant. After they dried I glued cardboard to the back so they would be sturdy. I then wrote my words on there and stuck them in the cake. I used a #12 tip and dotted my white icing clouds on. It was a hit at my daughter’s fifth birthday party!
I made this cake for my 15year old niece. She wanted a care bear cake. I just used butter flavored box cake mix. I used a 9×13 pan to bake it in. I iced it in buttercream.
I have never made Care Bear cakes so found the picture on the internet and printed it out. I used the gel transfer method to put it on the cake. I didn’t like the way the hearts came out but she loved it.
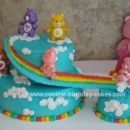
Cake by Melissa V., Oklahoma City, OK
My two-year-old niece really likes Care Bears so I made this cake for her. The pans I used were 6in, 10in and 14in round. The layers of the Care bear cakes are offset when stacked so that the top layer is centered over the bottom layer.
I made cardboard arcs for the rainbow slides coloring the rainbows on paper and then gluing the paper to the cardboard. I attached inexpensive figurines to the slides with icing. The cake is iced in buttercream. I let it set then I used a plain paper towel to smooth it out.
I used one pound cake mix and one strawberry mix in the Wilton stand-up bear pan for my care bear cakes. I decorated the care bear with tip #18 stars tinted pink. I iced the ears, belly, eyes and feet smooth with white icing. The bottom cake was chocolate made with a 16″ petal pan.
I iced the cake with a blue and white icing mixture to resemble the sky. I used the star tip with white icing to make the cloud around the Care Bear and to make the border. I then placed candy stars and edible glitter on the top of the cake. This cake was for my daughter’s 1st birthday. All the icing I used was Wilton ready-to-use icing.
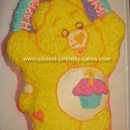
Cake by Kristine M., Herndon, VA

For my daughter’s 6th birthday, she wanted to have a Care Bear party, so I decided to make her a Care Bear cake. It was a special “caring” party, but since it was right before dinner, I wanted the option of each child taking a piece home with them to enjoy later instead of spoiling their dinner. So I made two cake mixes, one chocolate, and one butter. I divided the mixes into two round cake pans and some Care Bear cupcake liners.
To build it, I cut half circles out for where arms and legs would be out of one round for the body, and cut two indents out of the other for the head and a moon shape out for where it attached to the body. Then I added two humps for ears and attached them with icing. I also cut out a circle in the middle of the head and replaced it with a cupcake to give the nose a little height.
Then to decorate, I frosted the body white, and the head and 9of the cupcakes pink. Then I frosted all the rest of the cupcakes blue to make a contrasting background. Then I added the details and outlined the bear and put a few sprinkles on the cupcakes. The children all loved taking them home, and it was super easy!
Cake by Kimberly S., Wisconsin

I baked two 9 inch cakes and a batch of cupcakes. I took one of the cakes and cut a moon shape out of the bottom of it and placed it on the top of the bottom one. I took the cupcakes and placed them on the side for ears, arms and legs.
Before placing the Care Bear cakes and cupcakes, I used a string over the top of the pan cutting away the extra to make it flat. I picked one of the top of the cupcakes to use for the nose. I then laid the frosting out and used paint brush to brush through the frosting to make it look furry. I had fun doing this.
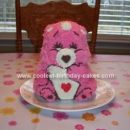
Cake by Kristen H., Lenoir, NC
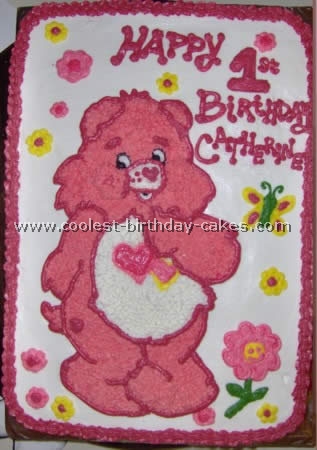
I made this on a 1/4 sheet cake using homemade cake and buttercream icing. I used the template for the Care Bear (I got from a coloring page online).
I printed and cutout the template then laid it on the icing (after the icing had set for a few minutes to “crust” over). The template left an imprint for me to outline the care bear in icing on the cake.
I outlined the rest free-hand then filled in with a lighter pink with a star-tip. I added flowers and a butterfly to make the care bear cakes match the Care Bear 1st Birthday girl party plates/napkins that were being used for the party.
Related cakes:
 1000+ Coolest Homemade Animated Character Cakes
  100+ Coolest Teddy Bear Cakes and Creative Baby Cakes
  1000+ Birthday Cake Decorating Ideas and How-To Tips
  1000+ Coolest Homemade Movie and Book Character Cakes
  Coolest DIY Panda Bear Picture Cakes
  1000+ Awesome Animal Cakes and Lots of Inspiring Cake Photos
  700+ Coolest Web Series and Television Character Cakes
 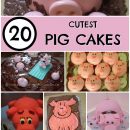 55+ Coolest DIY Pig Birthday Cake Ideas
Your comment has been sent successfully.