This cake takes some time to make, so be patient.
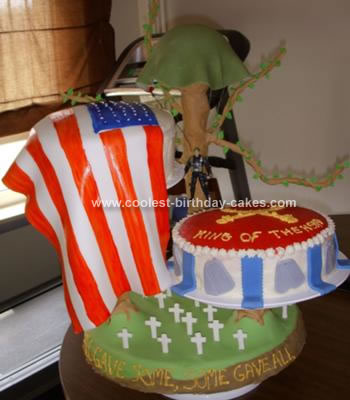
I first purchased the staggered tier cake stand from Wilton. The first day I took Wilton fondant (white) and colored the fondant green and rolled it out to make the grass. Then I carefully placed it over the bottom of the stand (prior to putting the pillars in place.)
Next I rolled out another portion of white fondant (thick enough that you can insert a tooth pick in it so it does not show) I then began placing tooth picks in a section and cutting out crosses around them by hand with a sharp kitchen knife.
I then placed the crosses in an air tight container to dry over night. Next I placed the pillars in place. The very back pillar I used covered copper wire to construct branches coming off of the pillar. I then took more white fondant and colored it brown making sure to leave streaks so that it would give that wood illusion to it and began covering all the pillars in it. This is easiest done by hand and with gloves on. It is okay if it is not even, trees are not perfectly smooth anyway.
Once completed I covered it lightly and placed the stand somewhere safe to dry over night (this will make the fondant hard so make sure you are happy with your results so far, because they cannot be altered once dry).
The next day I began making leaves. Just color your fondant green (I used gel colors) and mold them by hand, it is much easier than trying to rolling it out and cutting out leaves.
Take out the crosses to be placed on the bottom portion of the stand and then you can use the same container to store your leaves. Once again put the stand in a safe place and allow to sit over night (don’t worry no one is eating this part!). Also color 4 pieces of dental floss string green and tape them to the top of your tier and allow to dry.
The next day is the long one! Carefully mix up a batch of green buttercream or royal frosting and begin using it as glue to place your leaves on your branches. Then take a portion of fondant to color green to make the parachute. I used 4 parts green, 1 part black, 1 part brown for mine. Roll out thin and add lines in it with a toothpick for detail.
I used one half of a Wilton ball cake pan as the base for the parachute. I then taped the dental floss strings to the under support portion of the cake stand and placed the half ball shell cake pan on top of it. I then covered the cake pan with the fondant to make the parachute. Tie your man figure onto the strings.
Now bake your cakes. I used 2 layers for each of my round cakes. I did a 9 inch and 10 inch pan size. Once they have cooled you want to cut them so they are even and flat and then coat them lightly in buttercream frosting and place them in the fridge for at least 20 min. (this allows the frosting to harden and contain all of the crumbs so that when you frost it later you will not have to worry about crumbs getting in your frosting).
Begin coloring another portion of fondant with black until your fondant turns a nice gray color. Roll out the fondant and once again hand trace the dog tag shapes you see on the sides of the lower cake. You can use a toothpick to add the top hole in it along with letter markings in the dog tags (you need 8 of these).
Then color another portion of fondant with royal blue (you may have to add a touch of black to get the blue a darker color). Once this is done, roll out the fondant and use one of the fondant cutters (I used the zig-zag shape) to carefully cut out 8 ribbons.
Now it’s time to officially frost your cakes. I am not going to lie to you, I had to buy the red frosting you see on the top portion of the lower cake. I have yet to find a way to make red icing at home, it always seems to turn pink! I then waited for it to harden a little before I added the white on the sides, to keep it from running together. Once I frosted the sides I carefully placed the ribbons around the homemade army patriotic cake and then the dog tags in between the ribbons. I then took a bag with the Wilton 133 number tip and made the design around the top portion to hide where the red and white meet.
I then made gold buttercream frosting for the lettering and cannons on the top portion of the cake. You can put whatever you like on this portion. To make gold simply use 3 parts yellow and 1 part orange.
Now take another large portion of fondant and roll it out thin but not too thin as to cause ripping when dangling from the homemade army patriotic cake. Once this is done trace out your flag design in a toothpick and cut out the rectangular shape with either a knife or a fondant cutter. Once you have done this, take two bowls, one with blue gel coloring and the other with red and add a tiny bit of vodka to them for dilution. Take a thin paint brush and begin painting the flag onto your fondant (wear gloves, this is messy and takes a while to dry).
Once you are done, take your other cake out of the fridge and cover it as evenly as you can in white buttercream frosting. Then place the cake on the pillar and drape the flag from it and your done! (make sure when you drape your flag it has not dried, otherwise it will be stiff and will not give the draping effect).
Related cakes:
 15+ Coolest Graduation Cakes – Awesome Graduation Cake Ideas!
  7 Cool Graduation Cake Ideas for Med School Graduates
 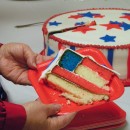 Coolest Patriotic Flag Cake
  Most Delicious and Easy American Flag Cake
  Coolest Witch Cauldron Birthday Cake
  Coolest Demon Halloween Cake
 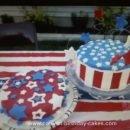 Coolest 4th of July Cake
  4 Easy Easter Egg Cake Ideas
I love this cake Great work!!