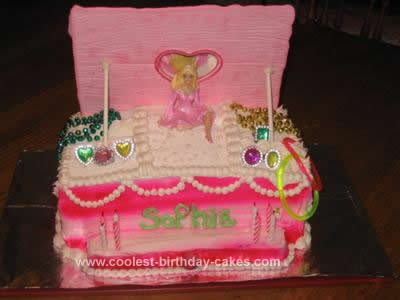
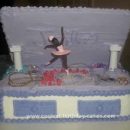
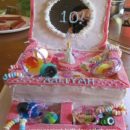
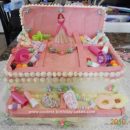
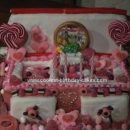
My granddaughter asked for a “really pretty girl’s cake” for her 8th birthday, so I decided to do a Homemade Ballerina Jewelry Box Cake, since she’s all into Bling!
I first decided how big to make the cake. I needed an 8″x10″ lid, which I made out of pink royal icing. I cut a paper template to size, laid it on the counter, covered it with a larger piece of waxed paper, which I taped down so it wouldn’t slide around. Using a large icing tip, Wilton #789, I piped rows of royal icing onto the waxed paper, using the paper template as a guide. I over-lapped each row slightly, so there wouldn’t be any gaps between rows. Then, I embedded white edible pearls while the icing was still wet.
After drying for a week, I turned the cover over, and let dry another week. (I actually made 2, just in case one broke). When completely dry, I attached a heart-shaped mirror from the party store to the inside of the cover, attached with melted white chocolate (I used white chocolate chips from the grocery store).
I baked the cake in a half-sheet pan, 15″x11″x2″. When cool, I cut it in half, to make two 7 1/2″ x 11″ layers, leveled the cakes, frosted the top of one with vanilla buttercream, and put the other layer on top. I doweled them with plastic drinking straws, and put in the freezer overnight.
When I was ready to finish the cake, I removed from freezer and immediately iced the sides. Since the cake had cut edges, icing them frozen cuts down on the crumbs.
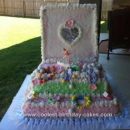
For the drawer, I used 2 store-bought chocolate snack cakes, centered them on the bottom front of the cake, and iced them. I sprayed the sides of the whole thing with pink food color. About an inch in from the back top edge of the cake, I used a sharp knife point to hollow out a “ditch”, about 1/2″ deep, and 1/4″ wide. Then, I iced the top with white icing, but not icing the “ditch” and the edge behind it. I piped white shell dividers on the top, using Wilton tip #22, and scattered some white edible pearls on top. I then did tip #10 “pearl” garlands around the sides of the cake.
To attach the cover, I melted white chocolate, filled in the “ditch” on the top of the cake with it, and immediately positioned the edge of the cover into the melted chocolate. Used lollipop sticks on the front, stuck into the cake, and the tops dipped in melted chocolate to attach those to the box cover, to help support the cover. I then piped a white pearl border all around the top and bottom edges, added a dum-dum pink lollipop drawer pull, inserting the lollipop stick into the cake, wrote the birthday girls name above the drawer, added the costume jewelry from the party store, and finished with a ballerina figurine.
The hardest part was figuring out how I should do it, and time management- I wanted to make sure the royal icing cover had ample time to dry.
I am pleased with the results – and hope the birthday girl will like it also.
Your comment has been sent successfully.