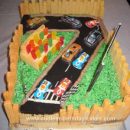
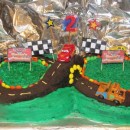
My nephew just turned six. His latest obsession is racing his BMX bike, and he honestly is quite good! He wanted a really cool BMX cake my sister contemplated buying a cake from a bakery but she knew it would get quite pricey. So we Googled some images of BMX cakes and thought we could definitely handle this one. Personally I feel we surpassed most of the home made images, maybe not a bakery but it’s still pretty darn good.
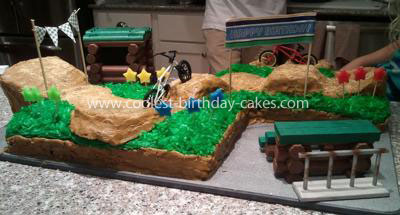
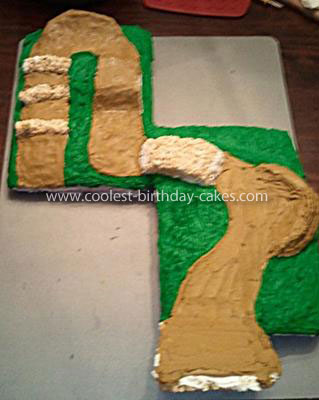
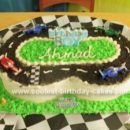
Here is what I did… I baked 2 chocolate cakes (straight from a box) in 13×9 rectangle pans. We had previously drawn up a sketch of what we wanted our track to look like. (It is almost a replica of the track where my nephew races.) We placed the two cakes diagonally from each other on a large cutting board, you could use plywood or any other type of board. All of the raised features of the cake my sister and I molded out of rice crispy treats. We had originally thought we would be carving into the cake but it was MUCH easier to build up off of the sheets with the treats. Once we had all the burms and jumps placed we “crumb coated” the entire cake with store bought frosting.
The decorative frosting is Wilton’s butter cream recipe (thin version) we used Wilton’s brown food coloring and also leaf green. We wanted the brown to be light as the dirt track is usually light. It ended up resembling peanut butter but it’s not, just frosting. (A lot of our guests asked if we used peanut butter) The main difference with our cake to most of the ones featured online is the grass. It gives our cake so much more dimension. We were talking about buying a grass tip for the pastry bag and then the thought of dying coconut occurred to me. Now if you don’t like coconut you could just pipe green with a grass tip but the coconut is SO much faster and gives a cool 3D effect. To dye coconut you use the same food coloring as the frosting (I think it needs to be something strong like Wilton’s to get the desired color). Take food coloring and add 1Tsp. of warm water until you get the desired shade. Place coconut into large Ziploc bag and add food coloring and then shake until all coconut is colored. Then place coconut on a paper towel to dry. I would dye the coconut before you start with any other details as it really does take a long time to dry. (For what it’s worth it can be scraped off pretty easily, some kiddos did that.)
Anyhow we piped green frosting first everywhere the grass would be. We used just a large circle tip so that it would be fast and there isn’t too much detail. Then we went back and did the brown with the same large tip. After the brown frosting had set we started smoothing out parts wearing a glove and just using our finger. We then sprinkled the coconut on top of the green and then graham cracker crumbs on the brown. **NOTE** if I were making this cake again I would actually sprinkle the graham cracker first before the coconut. We had wanted to use more graham cracker but it was really hard to get it out of the coconut. It would have been easier to pick stray coconut pieces up if they got on the brown. All in all we were quite impressed with this cool cake!!
P.S. The accessories (almost forgot) Bikes are Flick Trix (can be found at Target/Walmart etc. Happy Birthday banner is cut from wrapping paper and flags printed from the computer. We used BBQ skewers and string to assemble them and just stuck into the cake. Bleachers and gate house were made from Lincoln Logs! Stars are candles.


Your comment has been sent successfully.