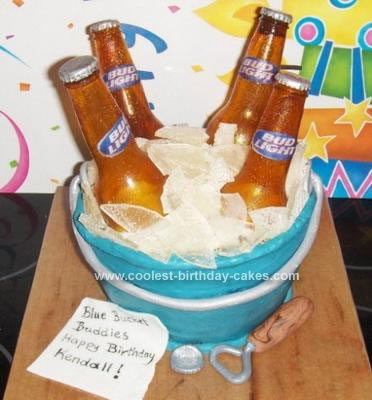
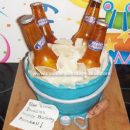
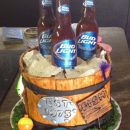
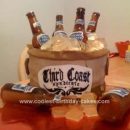
This Bucket of Beer cake was made for a friend/coworker’s husband for his birthday. He and his friends like a local restaurant that serves blue buckets filled with ice and bottles of beer on their deck during the summer months.
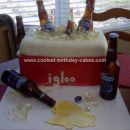
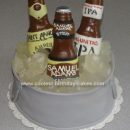
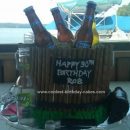
I’ve made beer bucket cakes and wine bucket cakes for my husband and a few close friends and always get the same reaction. No one can believe that those aren’t real beer bottles in the cake!
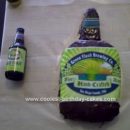
I saw beer bottle cakes online, and contacted one of the bakers to ask her how she made them. The process is simple, it just takes a lot of time. The mold for the beer bottles were made using “Amazing Molding Putty.” Follow the directions on the box. Half of the package is enough to make one beer bottle mold. Wrap the putty around the top half of a beer bottle (including the cap) and allow it to set. Carefully remove the putty, and you have your mold.
To prevent burns, I wrap the outside of the mold in foil, and place it inside a thick glass. A beer mug works well for this because it has a handle.
The recipe for the beer bottles and the ice is the same – half sugar and half light corn syrup. I use 1/3 cup of each to make a beer bottle. Put the ingredients in a glass measuring cup and stir until it’s well mixed. Heat it slowly in a microwave (30 seconds at a time), and stir each time that you check on it. The sugar/syrup mixture will start to boil, and turn an amber color. The sugar continues to cook and darken after being removed from the microwave. Remove the measuring cup from the microwave, and pour the hot sugar mixture into the mold. CAUTION: this mixture will be HOT, and will cause severe burns if it comes in contact with your skin. Rotate and turn the glass slowly to coat the inside of the mold with the hot sugar mixture. Don’t worry about air bubbles – they look like beads of moisture on the bottle when the sugar cools. Dump the excess sugar mixture into a paper cup to dispose of it. Plastic will melt.
Allow the sugar to cool completely before removing the mold. Carefully run a thin knife between the mold and the sugar beer bottle to loosen the mold. Twist the mold slightly, and the beer bottle should release from the mold.
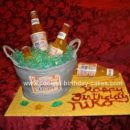
To make the sugar “ice”, cook the sugar/syrup mixture after it reaches a boil, and pour it onto a jelly roll pan that has been coated with foil and dusted with powdered sugar. Allow to cool completely, and break up the sugar into smaller pieces.
The ice and bottles must be stored in airtight containers. I usually wrap the bottles in parchment paper before placing them in Ziploc bags or plastic container with tight lids.
The bottle caps are painted with silver luster dust (Wilton makes silver, gold, and pearl) mixed with vodka. Vodka dries faster than water – and you really don’t want to add water to your sugar bottle.
The labels are beer bottle labels that have been scanned and printed onto rice paper or wafer paper. Moisten the backs of the labels slightly with a damp paint brush, and they stick right to the bottles. The labels are NOT edible because of the ink. The bottles are edible, but taste terrible, because they’re make from burnt sugar.
The cake itself is 3 layers of cake stacked and slightly carved. The bucket handle, loose bottle cap, and note are made from fondant. The fondant elements should be made at least a day in advance so they dry and harden.
The beer bottles and ice should be added to the cake no more than an hour before serving the cake. Once the sugar is exposed to air, it starts to get sticky . . . then mushy. It’s like unwrapping a sucker or a a piece of hard candy and leaving them unwrapped.
Your comment has been sent successfully.