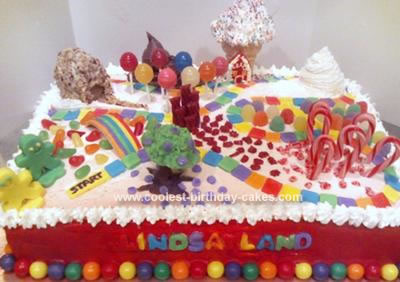
I made this Candyland Game Cake for my daughter’s friend from school. She was celebrating her fifth birthday and let’s face it what five year old doesn’t like Candyland! It was the hit of the party! The great thing about this cake is that it would work for a girl or a boy.
I started with three boxes of cake mix. Two devils food and one golden butter. I used a quarter sheet pan and baked only one box at a time so, when they were baked they came out thin; this saves time from having to slice the cake in half to tort the cake. I took a small jar of fruit preserves, added a little bit of water and in bowl microwaved for one minute. I stirred and with a fork mashed up the fruit. I strained it into another bowl while continuing to mash the fruit. I then took a pastry brush and brushed each layer. I allowed cake to dry for about half an hour.(You can speed up the drying by putting it in your fridge)
This process helps keep moisture in and crumbs down. It taste pretty good too! Next step was to place one layer of devils food down on my cake board frost the top with white buttercream icing. I repeated the process with the golden butter layer then the other devils food layer on top. This looked great when sliced. I dirty iced the sides and the top then, back to the fridge for another half an hour. This process is really great when you frost the cake because your final icing comes out nice and smooth with no crumbs. which is important especially when you’re working with white icing.
Now the really fun part, decorating! I prepared seven different colors of fondant. You might think this is a lot of fondant but, it’s not. It’s only one batch separated into seven parts then, I kneaded in food coloring. I used red, yellow, blue, green purple, orange and left one part white. Using a small square cutter I cut out the colored tiles for the trail. I made sure to save a little bit of each color that I would need for other details. I used red foodcoloring mist spray to cover the sides.(make sure to hold something up to not spray the top)
The game pieces were small gingerbread men cut outs and they stood on a small flower cut outs. I cut out two green and two yellow men, placed a toothpick in between and sandwiched them using a tiny bit of royal icing to keep them together. I dotted the bottom of their feet and placed them on the flower. The toothpick sticks out from the bottom and helps keep them steady on the cake.
The gingerplum tree was made with yellow fondant that I added brown food coloring to. I rolled the trunk longer than I wanted on purpose. After rolling the fondant I took a toothpick and laying the trunk down sliced the end to make roots for the tree. I bent them and shaped them a little. I poked the toothpick in the center,only coming out of the top a little bit. Using another toothpick I dipped it in the brown food coloring and added detail to the tree. I twisted the truck a little to make it more realistic.
For the top I took green fondant formed a ball. Then with some more green fondant I shaped a hat and using a dot of royal icing placed it on the ball. I cut tiny leaves into the hat using small metal scissors. I used the end of one of my round Wilton tips to cut the plums out of purple fondant. Royal icing was used to attach them to the tree.
Next was the peppermint forest. I used small candy canes and broke up two of them two sprinkle around. That was was easy!
For the Licorice castle I cut Twizlers different lengths placing the largest in the back working my way to the smallest in the front. I also cut some tiny bits to sprinkle around as well.
Rainbow river took a little bit of work but, was still easy. I cut small thin strips of fondant in all six colors. I snugged them up together and cut the ends straight across so they were even then, I took a small piece of flexible plastic and cut it the same width as the fondant but, a little longer on the ends. I attached the fondant to the plastic using what else but, royal icing. ( I love that stuff. It’s like candy glue!) The plastic on both ends is how I attached it to the cake. I just stuck it in an it stayed. I took some Mike N Ike candy and poked them in the cake different ways on both sides of the bridge.
Lollypop Woods was a snap. My daughter liked helping me with this one. We just stuck different color dum dum pops in the cake.
Gumdrop trail was easy. I cut some yellow fondant at a curve the same width as the tiles and cut the ends at an angle to line up with the trail. I spread gumdrops along both sides.
For the peanut house I took Graham crackers cut them into small squares with a pairing knife and scraped the sides even with the knife. Using royal icing I glued the house together. I used one square on the bottom as a base to keep everything even then, the four walls, two pieces for the roof and finally,I cut one of the squares diagonally to make two tiny triangles. I placed them on the front and back of the roof. I covered one side at a time with royal icing smearing it to cover every bit of the cracker and then pressed it into a small bowl of crushed peanuts. For the front of the house I iced the roof and only the the sides leaving it blank in the center to create the look of a door. When done a tiny dot of icing was placed for a door knob. After allowing to dry I placed it on the cake piped the outside edges of a walkway and sprinkled the center of walkway with more crushed nuts.
The snow frosted mountain was made with a large star tip piping in a circular motion going higher and higher. I recommend you make it a little higher than you want because, it settles down a bit. I spread some icing at the foot of the mountain then, sprinkled clear sparkles all over.
The Chocolate swamp was really easy as well. Same idea as the snow mountain only using a large round tip,fudge icing and raisonets.
Last but, certainly not least, is Candy Castle. I baked a cupcake in a regular ice cream cone placed it in a mini muffin paper cup to protect the bottom and baked it in a mini muffin pan this helps it from toppling over. (Wrapping the bottom of the cone with foil and using a regular muffin pan works too) I recommend filling only two thirds of the bottom part of the cone. These really bake up and can over flow onto the cone and pan. (I found this out the hard way) You may want to make a couple to insure you have a nice one for your cake. I used the large star tip with white icing and just like snow mountain swirled it on high. I topped it with rainbow sprinkles. I took a small dowel and pierced it through the bottom of the cone and then into the cake.
It’s not in the picture but, as a last minute add on I made some playing cards using left over tiles and white fondant. I cut cut cards and placed two tiles of the same color top and bottom with a small gap in between and rolled them lightly together. If your tiles don’t want to stick to the cards you know by now what to use, royal icing! I placed the cards on the cake board, holding them in place with royal icing.
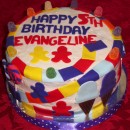
Using the large star tip and white icing I piped stars along the top edge of the cake to give it a nice finished look. The last part was cutting out the letters for the front of the cake. I used the Wilton alphabet cutters and left over fondant.
I know there are a lot of instructions here but, my cakes don’t usually have so much going on. The reaction from the birthday girl and everyone at the party was well worth the time and effort!
I’m sorry, I forgot to mention the bottom trim work is made out of gumballs!
This cake looks absolutely yummy!
your instructions are fantastic!!!!!! And so is that cake!!!!!! Thanks for all the tips.