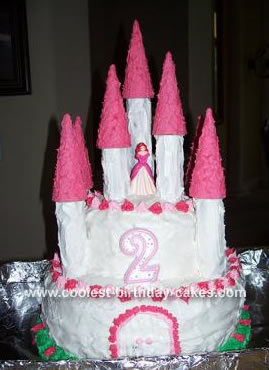
Deciding on a theme for my daughter’s second birthday was the easy part because she loves anything with princesses. Designing and creating the perfect princess castle cake was the challenge.
After searching what seemed like a million websites, I came across an advertisement for a Disney castle cake kit that included the cake pans, multiple sized pillars and other finishing touches (i.e., windows). I immediately fell in love with the design but had my heart set on making the entire cake myself, not from a kit. This is how it was done…
Using 3 boxed cake mixes, I baked the double layered bottom tier with two 12 inch Wilton pans (1 ½ boxes per pan). The top tier also was a double layer cake but required only 1 box of cake mix for the two 8 inch Wilton pans. I frosted each layer with white canned frosting as I stacked them to make the four layered cake. The pillars were pieces of cardboard wrapping paper rolls that I cut in various lengths and pressed gently into the cake. Wooden skewers were then inserted into the center of each roll to provide stability. Once all 7 pillars were placed strategically in the cake, I frosted each with icing and topped them with pink frosted sugar cones (frost the cones the night before to allow the icing to set for easier handling). The cake was completed with pink frosting “flowers,” a door and green “grass” surrounding the bottom of the castle.
The princess figurine was purchased at a store and provided the finishing touch for Kaitlyn’s perfect princess castle cake!
Related cakes:
 12+ Coolest Castle Cake Ideas – Awesome Homemade Castle Cake Designs!
  12+ Original Homemade Princess Castle Cake Ideas
  12+ Coolest Disney Princess Cake Ideas – Awesome DIY Cake Decorating!
  12+ Pretty Homemade Princess Cakes
  12+ Inspiring Homemade Princess Birthday Cake Ideas
  10+ Coolest Princess Cake Ideas
  1st Birthday Princess Castle Cake
  Coolest Pink Princess Castle Cake
Your comment has been sent successfully.