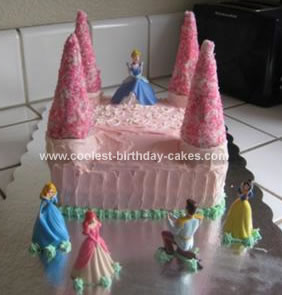
My daughter wanted a castle cake to go with her Cinderella/Princess party for her 4th birthday. I’ve never made a “shaped” cake before, just rectangle and round. I got many good ideas from this website, and then altered them to fit my own cake.
I made two boxes of cake mix. Each mix made one square 9×9 cake and five regular sized cupcakes.
(I had originally planned to make the cake have round rooms on each of the four corners using soup cans. I had read that on some of the write-ups…it didn’t work for me. The cake either wouldn’t come out of the can or it fell and was too short and too fragile to stack.)
I purchased a cake tray at the party store and made sure to put wax paper under the 4 edges of the cake before frosting so as not to get the tray all messy.
I leveled the two squares with a serrated knife and then stacked the two squares on each other with frosting in the middle. I frosted the cake with a crumb coat using white canned icing (NOT whipped, just regular. It stands up better to frosting and piping). I made the rounds using 4 of the cupcakes. I cut off the tops of the cupcakes and then cut the top at an angle so it would rest evenly on the cake and not be at too much of a slant. I crumb coated the cupcakes also with the white icing and then used white round Popsicle sticks as dowels so the cupcakes wouldn’t fall off. I let the crumb coat dry for one hour.
The crumb coat took almost a whole can of white. I tinted another can pink and frosted the whole cake. I used half of a can and tinted it green for the grass (didn’t use all of it). The other half of the can was left white for the words and windows/door. I used a short offset spatula for frosting (works much better at intricate work than the long bendy kind of spatula). I used the spatula to make marks up the sides to make it look like the castle had some depth, and to cover up my inconsistencies in frosting. I used part of a can of chocolate frosting for the middle, but you could probably get away with just 3 cans, I had a lot of leftover.
The BEST part was using the Wilton cake press for the letters. I got it at Michael’s and it has backwards letters you put in a tray and lightly press on the cake and then fill with a small tip. The letters looked so professional and I got tons of compliments on my piping.
The spires are sugar cones dipped in melted chocolate and pink and white sanding sugar. I put them on the cake at the last minute just in case gravity would pull them off, but they seemed secure. I got the figures at the dollar store and the Cinderella/prince from the party store. They were attached to the board using icing and then I added green “grass” around their feet for a more realistic look.
Everyone loved the castle cake and my daughter was so happy. It fed 11 4-year olds and 14 adults (small but ample slices).
Related cakes:
 12+ Coolest Castle Cake Ideas – Awesome Homemade Castle Cake Designs!
  12+ Original Homemade Princess Castle Cake Ideas
  12+ Coolest Disney Princess Cake Ideas – Awesome DIY Cake Decorating!
  Breathtaking Homemade Dragon and Castle Cake
  Coolest Pink Princess Castle Cake
  1st Birthday Princess Castle Cake
 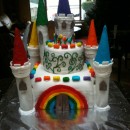 Fabulous, Built-to-Travel, Rainbow Castle Cake
 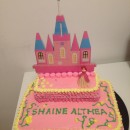 Homemade Princess Castle Cake
Your comment has been sent successfully.