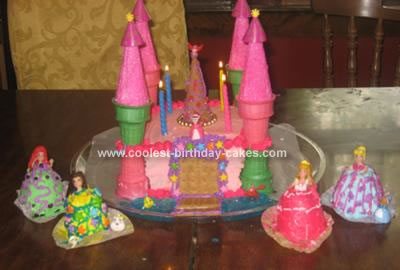
For my daughter’s 4th birthday, my oldest daughter and I set out to make a cake that would be fun and show off the birthday girl’s personality. Using that as our guideline, we knew the cake had to be pink and had to be all about princesses. After seeking inspiration from the birthday girl’s favorite Disney Princesses and pictures of castle cakes we decided on making a big Castle Cake With Mini Princess Doll Cakes.
CASTLE CAKE: First I baked two 9×9 square cakes. I stacked the completely cooled cakes to make a 2 layer cake (before frosting) and carefully cut out each corner of the cake so later I could place the ice cream cone towers at each corner. Use the cones as a guide and cut carefully. I then unstacked the cakes to apply the crumb coat of frosting. The 2 square cakes were stacked again to make a 2 layer cake and then placed back in the fridge to make frosting easier. This only took about 15 minutes.
Once the cake was out, I applied pink buttercream frosting over the entire cake. I purchased colored ice cream cones and stacked two at each corner for the tower making sure to stack them end to end with a dab of frosting as glue. To complete the tower, I frosted four sugar cones and then rolled them in pink sugar and placed them on top of each cake cone tower.
For a final touch, I purchased plastic cone shaped birthday hats and placed one on top of each tower. I made a door and mote out of graham crackers. I made water out of blue tinted piping gel. I decorated around the door with icing and sugar stars. Finally, a fifth cone was placed in the center of the cake after being decorated with icing.
PRINCESS DOLL CUPCAKES: My 11 year old daughter took on this project by herself! Four dolls for the four year old, we used for this project. The dolls were those Polly Pocket type Disney princess dolls. My daughter baked four regular sized cupcakes and four mini cupcakes. She stacked the two to make the dress. After applying a crumb coat they sat in the fridge for awhile. Then she placed the dolls feet first in each cupcake dress. (you can use king size cupcakes or the mini doll pan…we just didn’t have either one). After that she simply had fun decorating each dress!
This was a very fun and easy project!
Related cakes:
 12+ Coolest Castle Cake Ideas – Awesome Homemade Castle Cake Designs!
  12+ Original Homemade Princess Castle Cake Ideas
  12+ Coolest Disney Princess Cake Ideas – Awesome DIY Cake Decorating!
  12+ Inspiring Homemade Princess Birthday Cake Ideas
  12+ Pretty Homemade Princess Cakes
  10+ Coolest Princess Cake Ideas
  1st Birthday Princess Castle Cake
  Coolest Pink Princess Castle Cake
Your comment has been sent successfully.