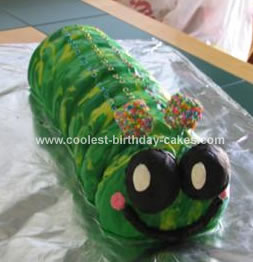
I really don’t know where the idea came from for a caterpillar cake! My daughter and I were trying to think of a theme for her son’s first birthday. I thought some kind of bug would be cute. I thought about a caterpillar. After looking through pictures of cakes, I decided I wanted a three dimensional cake and I wanted it to really look like a caterpillar.
So, I baked 8 six inch round chocolate cakes. I split each layer in half and filled it with chocolate fudge filling. For this, you will need 3 prepared cake mixes. I suggest doing one at a time. For the first 2 layers, use 2 cups of batter for each pan. (These 2 cakes are your head and your rear end.) Set aside remaining batter in a bowl and cover.
For the next 6 layers, use only 1 1/2 cups batter per pan. Add remaining batter to bowl after filling each pan. You should have enough batter left to make 2 cupcakes, filling each muffin holder only 1/2 full. Bake these with your last 2 cakes. The cupcakes will rise in the center, forming an oval top on each one. These are your eyes. When cool, cut the oval tops off of cupcakes and set aside. Eat remaining parts of cupcakes!
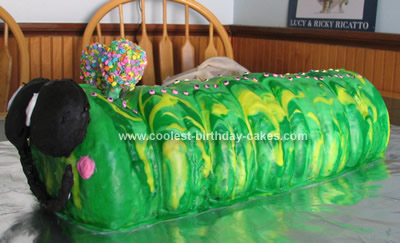
While the cakes are baking, make your antennae. This is the only thing I would have done different. I used 2 pretzel twists, but I would suggest using a pretzel rod broke in half. Impale each rod (the broken end) with a large marshmallow. Cover broken end completely with marshmallow. The 2 pieces do not have to be exactly the same length.
Melt about 1/2 cup white chocolate disks or almond bark. Tint it light green with food coloring. Dip and swirl marshmallow in green chocolate, coating completely. Spread chocolate down pretzel rod to cover. Roll each antennae top (the marshmallow part) in multi colored mini disks. (Get these at a cake decorating shop.) make sure there is no green coming through. Turn each upside down and place in a tall glass and put in fridge to set the chocolate.
TO MAKE THE EYES :
Melt 3/4 cup semi sweet chocolate with 1 teaspoon shortening and 2 tablespoons or so of paraffin wax. Tint chocolate with black food coloring until its black. Place a sheet of waxed paper on work area. Using a small frosting spatula, spread the flat part of each eye with the chocolate. Allow to set, this only takes a few minutes. Pop the chocolate mix back in the microwave for a few seconds until is is melted again. Now spread the rounded part of each eye with the chocolate, making sure you cover the edges so no cake is showing. As the chocolate is setting, take the edge of the spatula and smooth the chocolate. As it cools, you can use more pressure to get a smooth finish.
Once the chocolate is set, you can then melt a little more white chocolate and with a small paintbrush, brush on the white part of the eye. I found it was easier to do this once they were attached to the cake, so you know exactly where you are placing your eyes and which way you want them to look.
FOR THE SMILE:
Put remaining chocolate in a pastry bag and pipe a smile onto the waxed paper. Go over it a few times so you have a thick piece to work with. As it cools, you can smooth and shape the smile with your hands how you want it. Its kind of like clay at this point. Allow to set completely.
FOR THE FILLING—
1- 11 oz. semi sweet chocolate chips
1 stick real butter
1 1/2 teaspoons vanilla
1 TO 1 1/2 pounds confections sugar
evaporated milk
Melt the butter and chocolate together in a large glass microwavable bowl. Stir until well combined. Stir in vanilla. With a mixer, add powdered sugar and evaporated milk alternately. You want a stiff but spreadable fudge filling. It must be thick so it won’t ooze out the sides of the cake. Spread each layer you have split in half with the filling. Do not fill all the way to the edge. Replace the top of the layer and press firmly. Do remaining 7 layers the same way. After all layers are filled, cut off the bottom of each cake about an inch and a half up. ( to have more filling for the cakes, cut the bottoms off BEFORE you fill them ). Set these pieces aside for another use or just to eat!
IMPORTANT NOTE… BE SURE YOU ASSEMBLE THE CAKE ON THE BOARD YOU ARE SERVING IT ON. IT CANNOT BE MOVED SAFELY ONCE THE WHOLE CAKE IS ASSEMBLED.
TO ASSEMBLE THE CAKE:
You will need about 12 to 15 straws. Put one of the bigger cakes ( one of the 2 that were made using 2 cups of batter) on your serving board with the top or rounded part of the cake facing out. Put one of the regular cakes with the bottom or flat side of the cake up against the flat side of the first cake. Take a straw and insert it through the front of the second cake in the middle. Go all the way through the second cake and into the first, but do not go through the front of the first cake. Using 2 more straws, insert into top edge of cake where you see the cakes need to be closer together. Leave the straws sticking out because you will be attaching the next 2 cakes to this. With the next 2 cakes and each 2 after, you will be attaching them the same way, but the bottoms of the cake, meaning the flat parts, will go against the tops or the rounded parts of each cake. So the third layer will have the flat part against the rounded part of the second cake. Attach 2 layers at a time with straws. When you get to the end, you will have the bigger cake that is left for the rear end and the rounded side will be facing outward. Once it is all together, you will need to compress the whole cake together. There may be gaps larger than what is needed. Using both hands, gently squeeze the cake together. You should not be able to see any parts of the straws. I did this by accident because I had the cake off center and had to move it. When I tried to slide it down, I had to squeeze the cake together. Once I did that, I realized it was compressed perfectly and I couldn’t see any of the straws. This is why you need a fudge filling because a frosting filling would have oozed out making a mess.
Okay, you have the body assembled. Now comes the fun part! Making the icing!!
FOR THE ICING
You will need almost a whole 2 pound bag of confectioners sugar. Melt 1 stick of real butter in a microwave safe bowl. Stir in 2 1/2 teaspoons vanilla. Begin adding powdered sugar and remaining evaporated milk alternately. You may need to add some regular milk. What you want is a very very thick but still pourable icing. Divide it into 3 bowls. Tint one dark green, one light green and one neon green.
Place pieces of wax paper up against all sides of the cake. This will catch excess icing puddles.
To ice the cake, pour a thin stream of whatever color you wish down the center of the cake. Follow by using the other 2 colors on either side of the first line. It will start to run together. At this point, you can use an icing spatula to swirl or blend the colors how you like. Make sure you cover all the cake so none shows through. You will need to work somewhat quickly because once the icing starts to set, it will not be a smooth finish. Do all sides of the cake the same way.
NOTE: If you want more icing on the cake than just the icing I am describing, pour a thin layer of one color over entire cake. When set, continue with how I describe icing the cake.
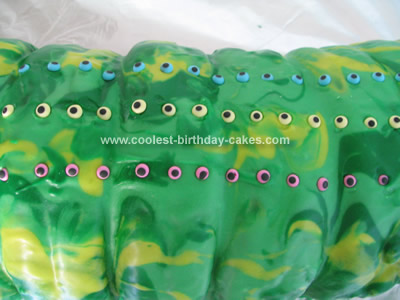
Once you have the colors blended how you want, carefully remove the waxed paper. Before the icing sets completely, place little candy eyes in three rows of different colors down the back of the cake. ( you can purchase these at a cake shop).
You may have to take a damp paper towel and clean up any icing that the waxed paper didn’t catch. When the icing has set completely, attach the eyes by inserting 2 toothpicks into the back of each eye. Gently push into cake. You can then paint the white part of the eye on if you haven’t already. Attach the mouth by using a little melted chocolate dabbed onto the back of the smile. Hold firmly in place until it sets, about a minute. Tint a small amount of white chocolate pink and paint on the rosy cheek circles.
Remove the antennae from the fridge and push down into the cake. And there you have it! A caterpillar cake showing the segments a caterpillar has with a pretty green coat!

Related cakes:
 Coolest Hungry Caterpillar 1st Birthday Cake
  Coolest Halloween Spider Cake
 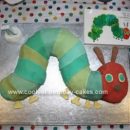 Coolest Very Hungry Caterpillar Birthday Cake
  Coolest Butterfly Garden Birthday Cake
  Coolest Baby Einstein Caterpillar Cake
 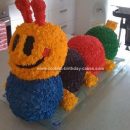 Coolest 3D Baby Einstein Caterpillar Cake
 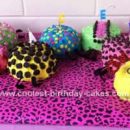 Cool Homemade Colorful Caterpillar Cake
  Cute Homemade Caterpillar Birthday Cake for my Daughter’s 2nd Birthday
Your comment has been sent successfully.