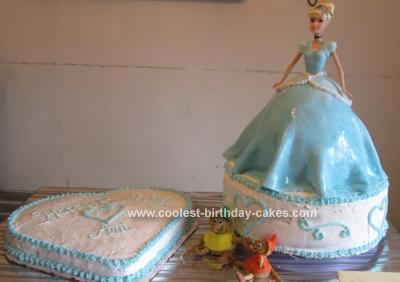
I made this Cinderella cake for my friend’s daughter’s 5th birthday party! I really enjoy making and decorating cakes. This is the fourth character cake I have made so far and I love doing it!!
I decided to make a cake under the doll cake so there was enough for everyone to eat. That one is a 12 inch layered cake. The heart cake was done because I realized that I couldn’t write happy birthday any where. :)
I had never made a 12 inch layered cake before so I didn’t realize how much cake mix it took, about 2 boxes per cake. So if you attempt this, make sure you have enough cake mix or that you make enough. Also I used Wilton butter cream frosting from Michel’s. It is easier than sifting and making it from scratch.
It took three boxes of the frosting just for the 12 inch layered cake. I used two more boxes for the heart and skirt cake. And one more box of frosting for the blue piping. You always want to make plenty of the color you are going to use because it is really hard to replicate the exact color.
The mice and skirt are made out of gum paste. It is really pliable like play dough so it is easy to mold. Although if I were to make another character out of it like the mice I would have glued toothpick or pop cycle skeletons first. Then mold the gum paste over it. :)
This cake took 9 boxes of cake mix. I used 6 boxes of Wilton’s frosting. I ended up using 3 cans of the pre-made gum paste mix. I got the pre made kind because the ingredients were expensive and I didn’t realize I would need so much. Next time I will just get the ingredients. Much cheaper that way.
The heart cake is one square cake and one round cake. What you do is angle the square cake like a diamond in front of you and cut the round cake in half and put the two pieces at the top. And presto you have a perfect heart. Wilton’s also sells these stamps that make piping so much easier. The hearts and swirled piping on the cakes are all stamped it is so easy it feels like cheating!! And yes by the way I love Michel’s… If you go to the frame section they will give you the cardboard pieces that hold the picture’s they frame. Those are perfect for putting the cakes on. I just used wrapping paper to cover it.
I am glad to have gotten more experience making cakes!!


Your comment has been sent successfully.