
This Disney Princess Castle Cake was the first cake I have ever made with Regal icing and all the decorating and I am not going to lie, it took a long time to do. Roughly 10 hours over two days!
The cake is just a basic Victoria Sponge, one big one (3 layers) and one small one (2 layers) which was then cut to have very smooth edges and all edges covered in a thin layer of buttercream which helps the regal icing stick.
The bottom Turrets are normal ice cream cones placed on top of each other, covered in regal icing, with mini marshmallows on the top. As a beginner my icing is not that smooth but I was still chuffed with my efforts. The windows and doors are just pink icing with little pink pearl balls accenting the window structure. The top turrets are a normal ice cream cone base, a continental cone on the top covered in pink regal icing and then wet a little and dipped in edible glitter from Dr Orteker. Easy to do and very effective. I have just sunk the cone into the cake and supported it with cocktail sticks.
Also using the cocktail sticks I made a flag for the top of the turret out of icing and slid it onto a cocktail stick and into one of the turrets. It has a number 5 on it for the age appropriate birthday.
I used green regal icing to make a grass border and blue butter cream to make a small river/moat going round the castle. Perfect for Flounder from Little Mermaid! The characters came from a book I bought but you can add any ones you like. The flowers are the Wafer flowers from Dr Orteker and just some green butter icing for the vines. I just did a border round the cake of pink butter icing to hide some of the icing mistakes I made! Like I said never done this before so it was a learning experience. To get the pink icing windows to stick to the white icing on the cake I just lightly wet the back and placed it on. The 4 main turrets are not connected to the cake and the top ones can come out for easy transportation.
I made a base cake that was 10×9 inches and 3.5 inches high. I needed to use 1.5kg of white regal icing in order to get it rolled out to the correct length and cover the cake, I just used the excess for decorations. There are plenty of videos on the internet showing you how to ice a cake if it’s your first time. I did make a few mistakes, my icing did tear as it was so huge but I covered my mistakes with the flowers and the border! Anything can be hidden with a bit of decoration! That’s my top tip! Also Dr Orteker make a ready rolled round white regal icing sheet which you can buy from cake shops or even some supermarkets but this is for a round cake and I wanted a square but I have seen other castles in a round shape so would suggest using this as it makes life easy! I have tried to stick to a pink and white colour theme so as not to overdo it and keep it looking simple and classy rather than a mishmash of colours and multicoloured sweets. Enjoy if you try it!
Related cakes:
 12+ Coolest Castle Cake Ideas – Awesome Homemade Castle Cake Designs!
  12+ Coolest Disney Princess Cake Ideas – Awesome DIY Cake Decorating!
  12+ Original Homemade Princess Castle Cake Ideas
  12+ Pretty Homemade Princess Cakes
 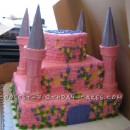 Pretty Pink Princess Castle Cake
 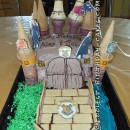 Awesome Hogwarts Ice Cream Cone Cake
  12+ Inspiring Homemade Princess Birthday Cake Ideas
 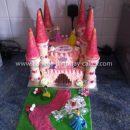 Coolest Disney Princess Castle Birthday Cake
Your comment has been sent successfully.