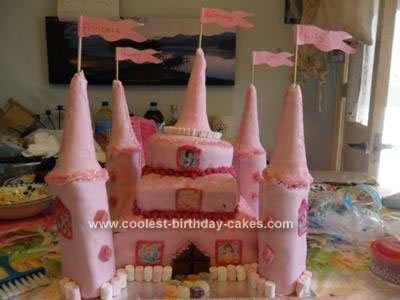
My future stepdaughter is mad on Disney Princess’, so last year I decided to attempt my first ever cake and make a Disney Princess castle cake. It took me 7 backbreaking hours to decorate it, was it worth it. Yes! Lil’s loved it so much that unfortunately for me she’s asked for the same cake again this year, so I’m getting ready to do the whole thing again. This year though I’m a bit more experienced! I didn’t think I’d need the dowels to keep it level, sponge cant be that heavy surely I thought! I’m getting the dowels this year!
I used an 8 inch square tin to bake the bottom and middle tier, and cut the middle tier to size (cheaper than buying a new tin) and I think it was a 5 inch round tin for the top tier. The cake was chocolate sponge. I bought 4 chocolate Swiss roles for the towers and used ice cream cones for the turrets. I eventually got the hang of the sugar paste on the final tier and the Swiss rolls! There were a few little gaps.
I used ready made icing in a tube to decorate and this was great for covering up my little errors and filling the gaps between the tiers neatly! I’d bought Disney princess cake toppers and used these for windows just drawing window frames around them with the ready made icing again. The ‘heavy oak door’ was made from 4 squares of chocolate cut to size and the path out of jelly diamonds. Mini marshmallows and glitter sprinkles covered up the joins of the turrets.
I made some flags to say happy 6th birthday Princess Lily. I made a horse stable for my eldest future step daughter the following month so have had a little more practice with the sugar paste icing so hopefully there wont be so many things that need covering up this year, and I’ll definitely be buying the dowel and boards to keep it level. Lil’s absolutely loved the cake so the pain was worth it!
Related cakes:
 12+ Coolest Disney Princess Cake Ideas – Awesome DIY Cake Decorating!
  12+ Pretty Homemade Princess Cakes
  12+ Inspiring Homemade Princess Birthday Cake Ideas
  12+ Original Homemade Princess Castle Cake Ideas
  12+ Coolest Castle Cake Ideas – Awesome Homemade Castle Cake Designs!
  10+ Coolest Princess Cake Ideas
  Coolest Princess Castle Birthday Cake
  Coolest Castle Disney Princess Birthday Cake
Your comment has been sent successfully.