I am a near novice in cake decorating and really should take a class someday. I’ve decorated 5 cakes in my life (4 birthday cakes for my son and 1 for my daughter) and so far this Homemade Dragon Birthday Cake is my absolute favorite!
My son Evan loves dragons so we decided we would use that for the theme for his 4 year birthday party. I did some searching online for inspiration for the cake, and of course found some great ideas on coolest-birthday-cakes.com.
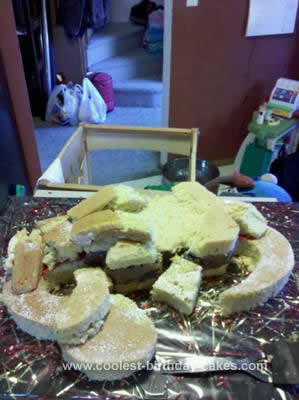
We knew we would have a large number of guests (about 40), so I wanted to make a large cake. I baked 3 13×9 cakes and one 12×18 cake. I used a modified cake mix recipe so I would have a dense cake that would be good for sculpting. For the 12×18 I used 2 boxes of lemon cake mix and stirred in a little extra almond extract and some poppy seeds. For the 13×9’s I made 2 French Vanilla and 1 Milk Chocolate.
After the cakes were baked and cooled it was time to start putting it all together. For the body, I trimmed the cakes and layered them as follows: French Vanilla cake – Chocolate ganache filling – Chocolate cake – Strawberry filling – French vanilla cake.
I used a sharp knife to shape the shoulders and hips on the body. Then I cut the neck, tail, head and feet from the 12×18. I used some miscellaneous pieces to make a good sloping transition from the body to the neck and the same for the tail. This is where the denser cake was wonderful. I had a lot of cut edges, but it stayed together and was very nice to work with.
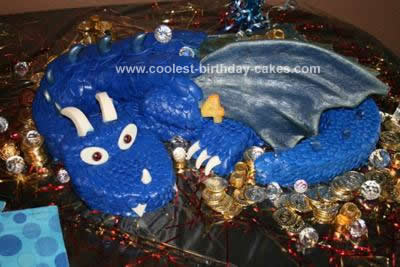
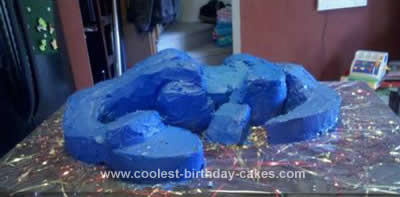
Once I had the shape I covered the entire thing with a layer of blue butter cream frosting. Then came the tedious part. I rolled out my blue fondant a little at a time, keeping the rest covered. I recruited my husband to cut, and I put each scale on the cake, layering in a brick wall type pattern. We used a small oval cookie cutter / fondant cutter for the small scales and worked my way from the tip of the tail up to the hips, then did the feet. Then using a medium oval cookie cutter / fondant cutter for the larger scales, I did along the back and worked my way up just passed the shoulders. I then switched back to the small scales up the neck and the head.
I used my left over fondant to shape the horns for down his tail and back. I dusted them with some yellow shimmer powder and attached them on with a little butter cream.
I used white gum paste to shape the eyes, teeth, claws and the 3 head horns. I put red marbles in the gum paste ovals for the pupils in the eyes. These can be made in advance, as they need several hours to a day or two to dry, depending on how humid it is.
I also built some wire frames for the wings and covered this with blue gum paste. These were pretty brittle and I struggled with getting the wings to stand up. If I were going to do them again I would try and make them stronger somehow (thicker layer of gum paste, different frosting, say to heck with it and use fabric instead..haha, I’m not sure). I hadn’t ever used gum paste before, so I’m sure there are some tricks to this that I don’t know about that would have made this easier.
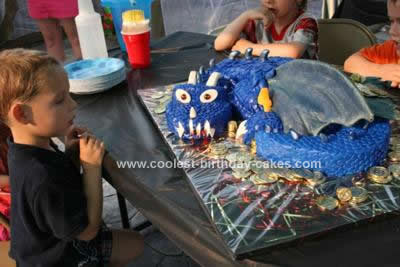
I used gold coins, plastic gems, and gold foil chocolates around the dragon for a little something extra.
When the time came, we placed the candles in the dragon’s mouth so it would appear to be breathing fire. We learned that candles burn really fast when they are sideways and burning fondant smells just like roasted marshmallows!
Overall, the cake was a huge hit! All of the kids wanted to eat the eye balls.
Related cakes:
 12+ Coolest Castle Cake Ideas – Awesome Homemade Castle Cake Designs!
 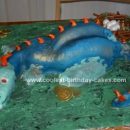 Coolest Homemade 3D Blue Dragon Cake
  12+ Inspiring Homemade Princess Birthday Cake Ideas
  Breathtaking Homemade Dragon and Castle Cake
  Coolest Green Fire Breathing Dragon Cake
  Cool Homemade Puff the Magic Dragon Birthday Cake
  Cool Golden Birthday Dragon Cake
  12+ Pretty Homemade Princess Cakes
Love your dragon cake might attempt next year for my oldest grandson who loves the movie “How to train a dragon”
That is great job on the cake ! u should the classes.u can start selling your cakes!i do the same thing with mind cakes and people love them.but on the fun note the classes are really fun .i took them myself. good luck and keep doing what u do best !