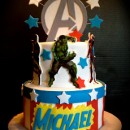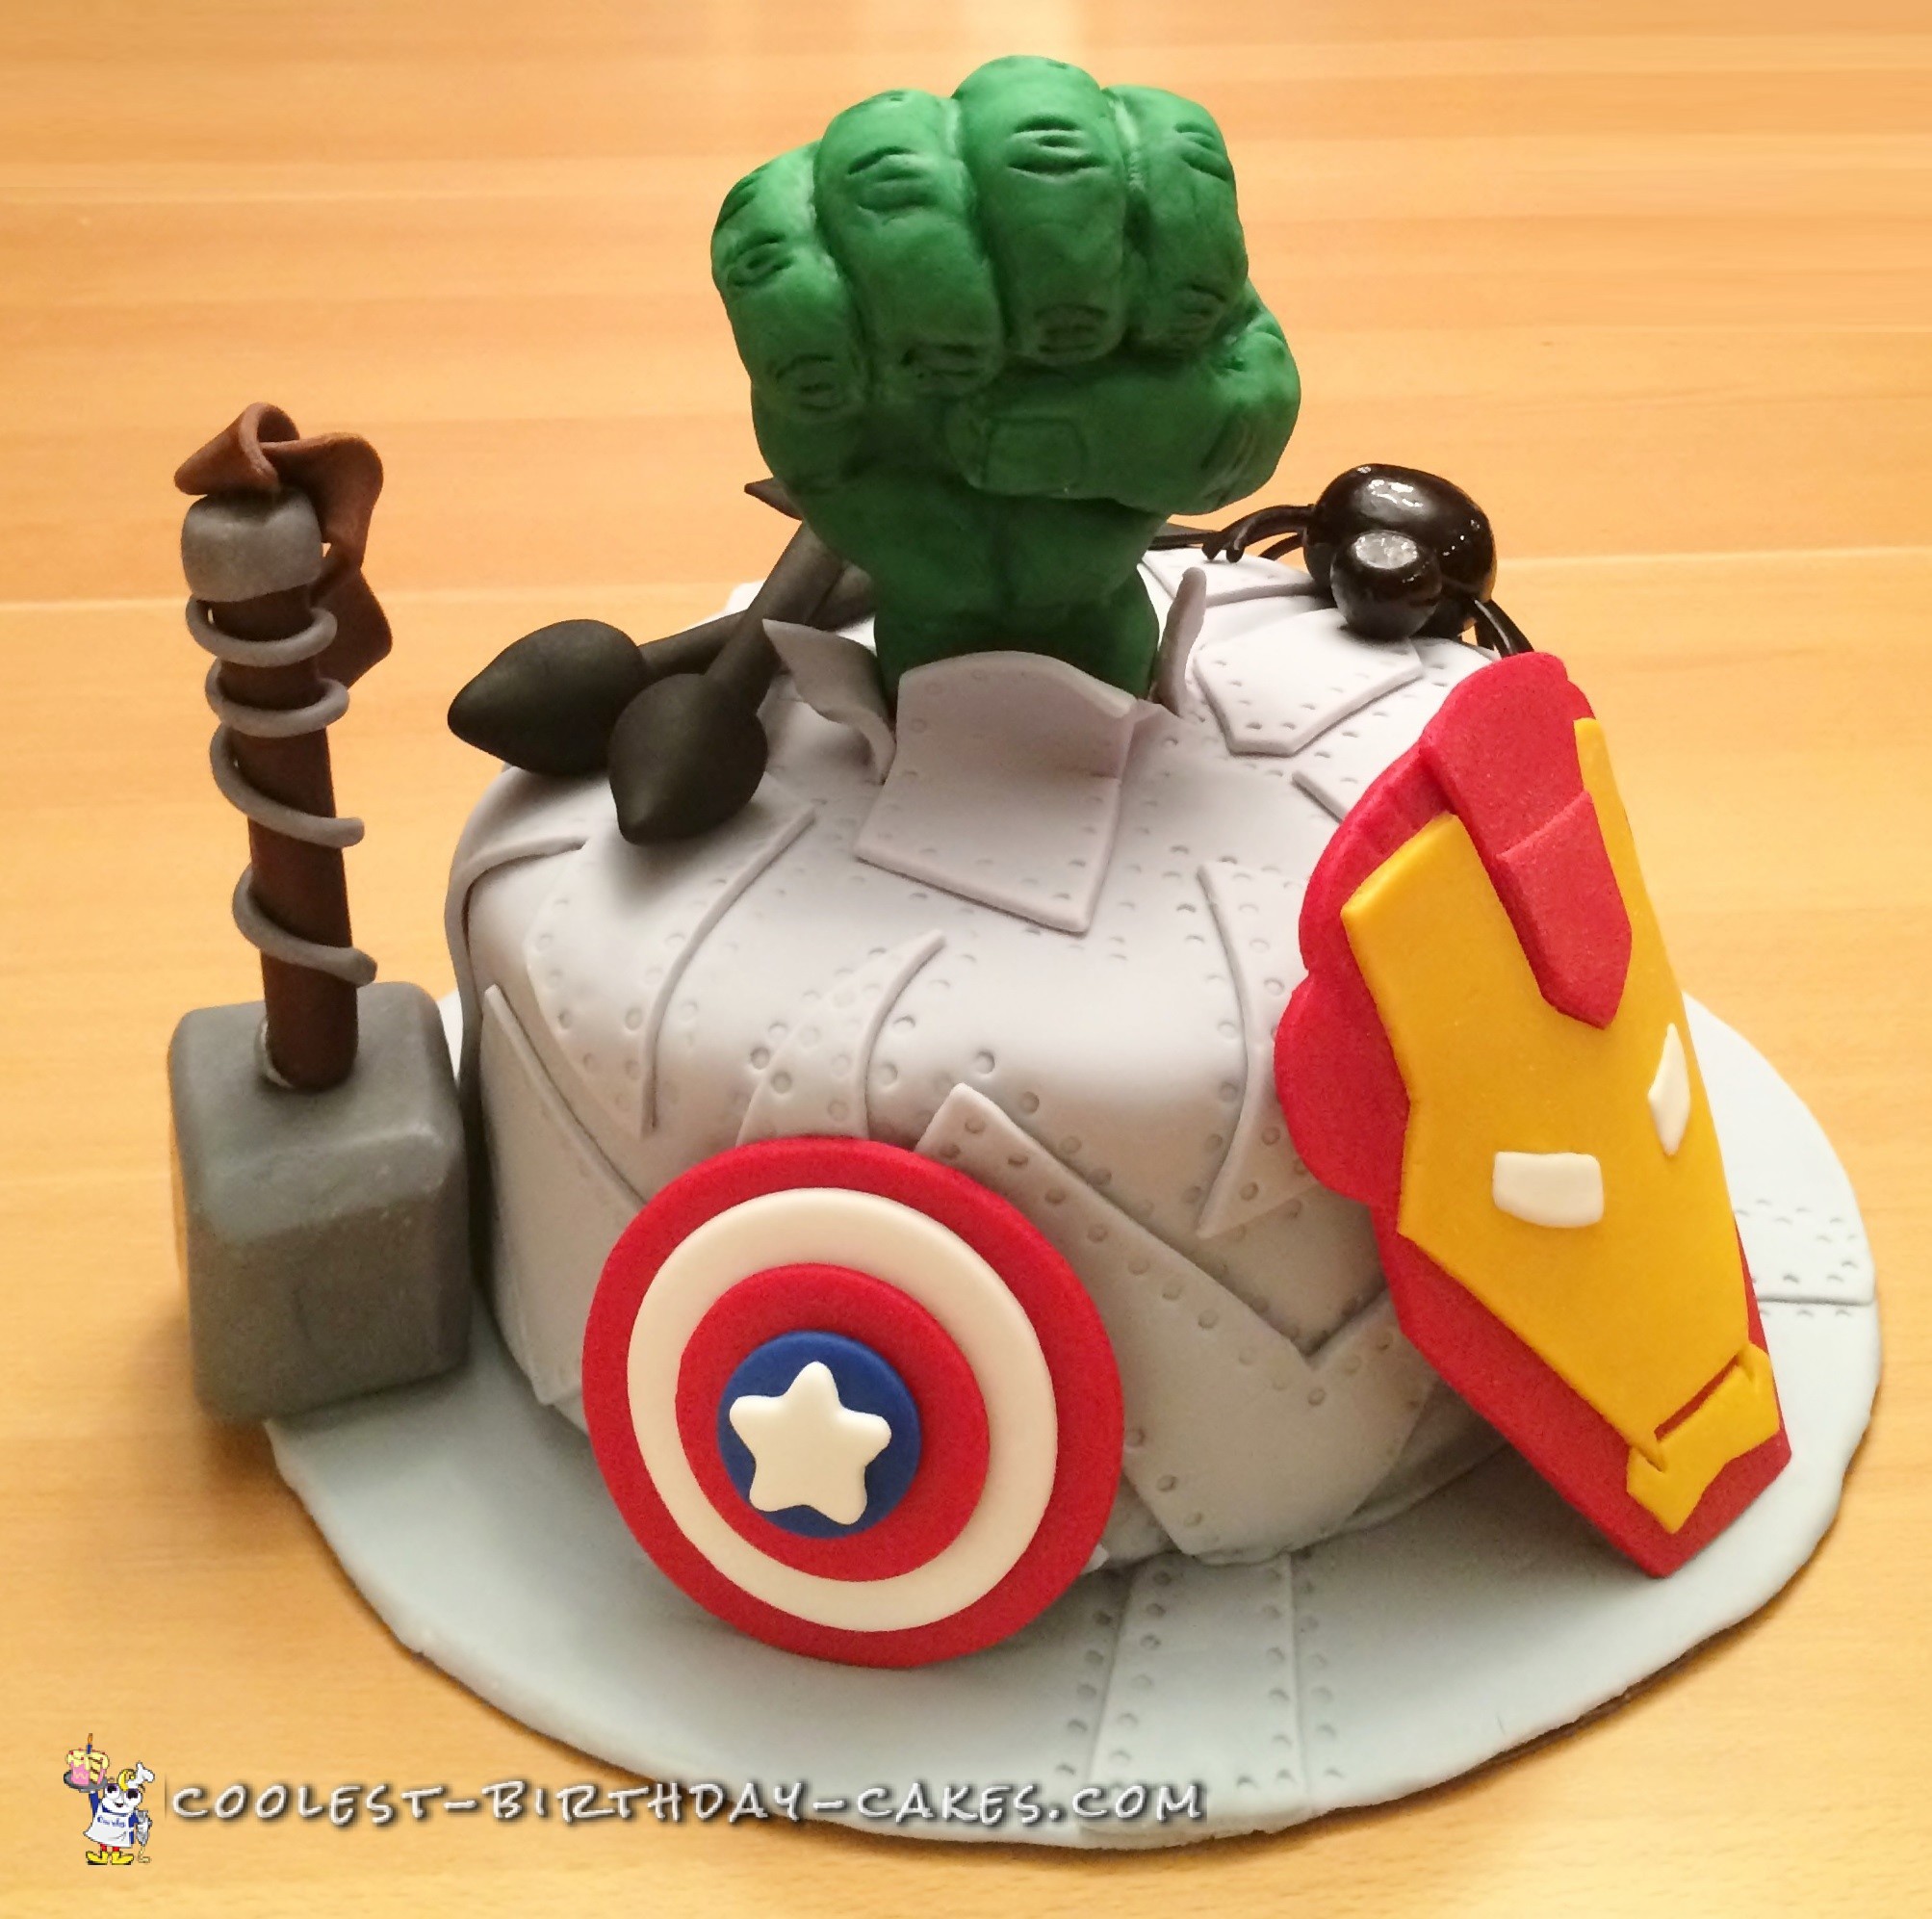
If you need to make a cake for a superhero fan, like I did, it’s only natural to choose the Avengers. It’s a collection of superheroes all in one. Ok, so it’s not always the best or classic superheroes like Spider-Man and Batman, but you’ve got Thor and Iron Man and Captain America! So I set out to make the best Avengers birthday cake for a superhero fan.
Make the Metal Base Layer
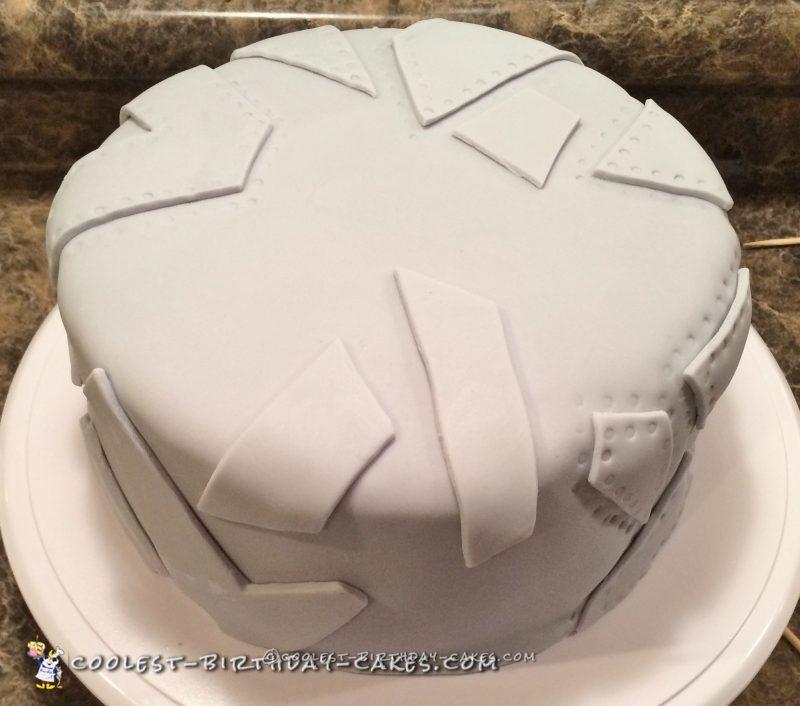
Most importantly, I didn’t want the Avengers birthday cake to be too unevenly weighted towards one of the superheroes. So, I decided to cover the cake in grey fondant with smaller fondant pieces “riveted” on to make it look like metal. I love the way it turned out! This technique could be used for all sorts of cakes.
This metal look is much simpler than it appears. Once the cake is covered in an even layer of fondant, cut out odd shaped pieces of fondant. You can be creative with the shapes and they don’t need to be exact, which means you can move quickly. To attach the pieces to the cake, add water to the back of the fondant shapes. This will make the fondant stick together.
Once you have your pieces in place, use the back of a skewer to make round dots that look like rivets all along the inside and outside edges of the fondant pieces. The best part about this technique is if you have a blemish in the original fondant, just cover it up with a fondant shape!
I had to lift my fondant off the Avengers birthday cake after I laid it down and I didn’t want to have to redo the whole thing. It worked, but I was left with a huge ugly tear. I just covered it up with a riveted metal piece and no one was the wiser!
One issue I ran into with the fondant is it wouldn’t stick to my cake. In all the online tutorials they show you just rolling the fondant over the cake. Simple right? But what they don’t tell you is that fondant doesn’t stick to crusted buttercream! Next time I would put the fondant on directly after icing the cake. Or if that isn’t possible I would spritz the buttercream with just a small amount of water.
The other problem I had with the fondant is that it weighed down my cake. I had wanted to save myself some time and used a box cake mix I had lying around. Big mistake! The first layer of grey fondant was so heavy it start to squish the cake and I ended up with a bulging cake.
Add pieces of grey fondant and make rivet marks
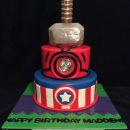
Create Iron Man’s Mask
Once the base layer of fondant is in place it is time to add decorations. I chose to create all of the characters from Avengers: Age of Ultron.
I free handed a mask for Iron Man and then let it dry over an 8″ pot. You could also use a template for this. Then I dusted the entire mask with gold luster dust to give it a gold metal look.

Iron Man’s mask while hardening
Create Thor’s Hammer
For Thor, I created his hammer. The mallet is made out of Rice Krispie treats and covered in grey modeling chocolate. One of the nice things about modeling chocolate is that it stiffens quickly. You don’t need to wait the few days it would take for fondant to dry. It is also very sturdy, so I wasn’t worried about the hammer getting deformed in any way.
For the handle, I snaked out a brown piece of modeling chocolate and then put a skewer all the way through the length of the handle and into the mallet. I then wrapped grey modeling chocolate around the handle for embellishment. I used Wilton Dab-N-Hold to help keep the design where I wanted it. I was so thankful to have this! The chocolate kept slipping down without it. Definitely a life saver.
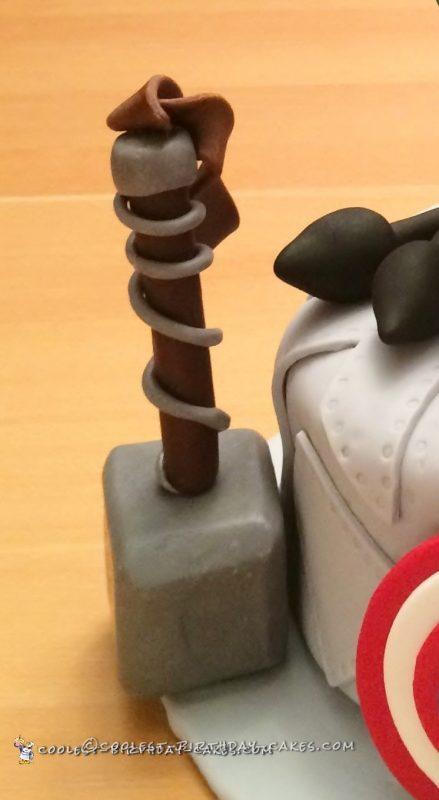
Thor’s Hammer
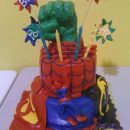
Create Hulk’s Fist
For The Hulk, I made his iconic green fist. First, I molded Rice Krispie treat into a fist. I did this step while the treats were still warm because I could freely form the treats into any shape I wanted. After they have cooled, they are much too hard to mold. Once I was happy with the fist made out of Rice Krispie treats, I left it to harden.
The following day, I covered it in green fondant, making sure to push the fondant into the grooves I had created in the treat. I then added indentations into the fondant such as knuckle lines and the natural folds of the skin. I enhanced these areas with food coloring. I simply mixed gel food coloring and water and brushed it onto the areas I wanted to darken, such as the knuckles and lines on the palms. I also added veins on the back of the hand for character. The water in the food coloring inadvertently made areas of the fist shiny. Oops! I hadn’t quite planned on that. It was a good thing I had a few days before the big reveal. It gave the fist time to lose the shine. Some of the color dulled as well, but not too badly. Next time I would mix vodka and food coloring. This should keep the fondant from getting shiny.
After the colors have dried, you can place the fist on the Avengers birthday cake. I wanted it to look like he had just punched through the metal. To do this, I first needed to lay a circle of parchment paper down on my cake before covering it in the grey fondant. This was the step I almost forgot! I had to lift my fondant to put the parchment paper in and ended up with that large blemish I mentioned earlier. The parchment paper will keep the fondant separate from your buttercream so that when you peel back the fondant, it comes off cleanly. After the cake is completely covered, make 3 long intersecting cuts in the top of the fondant, giving you 6 wedge pieces. You can then peel back the triangle pieces of fondant to reveal to hole for the fist to “pop” through. With a small blade, snag the parchment paper and pull it out before inserting the fist.
I also gave the triangles a twist to make them look like twisted metal. I put 2 long skewers through Hulk’s fist. I measured the cake and cut my skewers to the exact same length as the cake. This prevents sagging in the center of the Avengers birthday cake due to the extra weight of the fist.
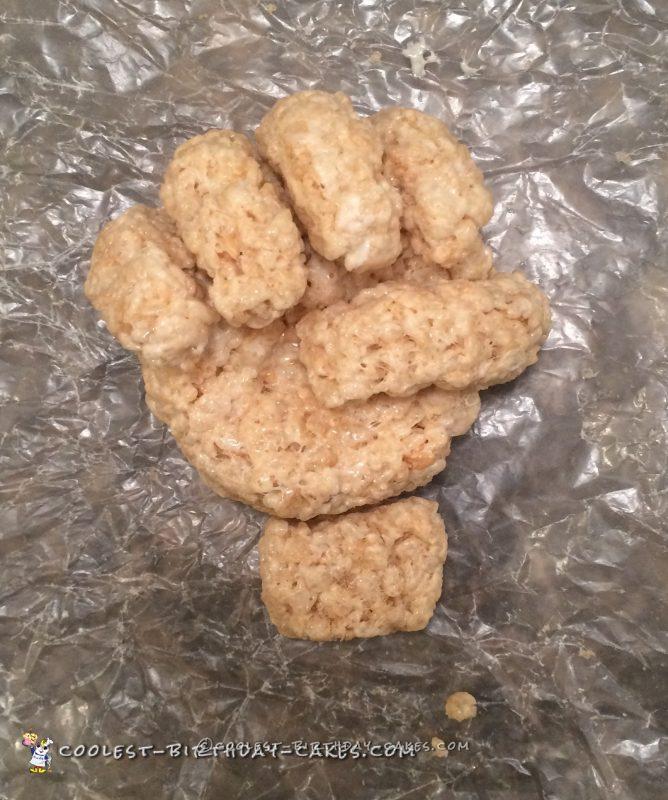
Hulk’s Rice Krispie treat fist
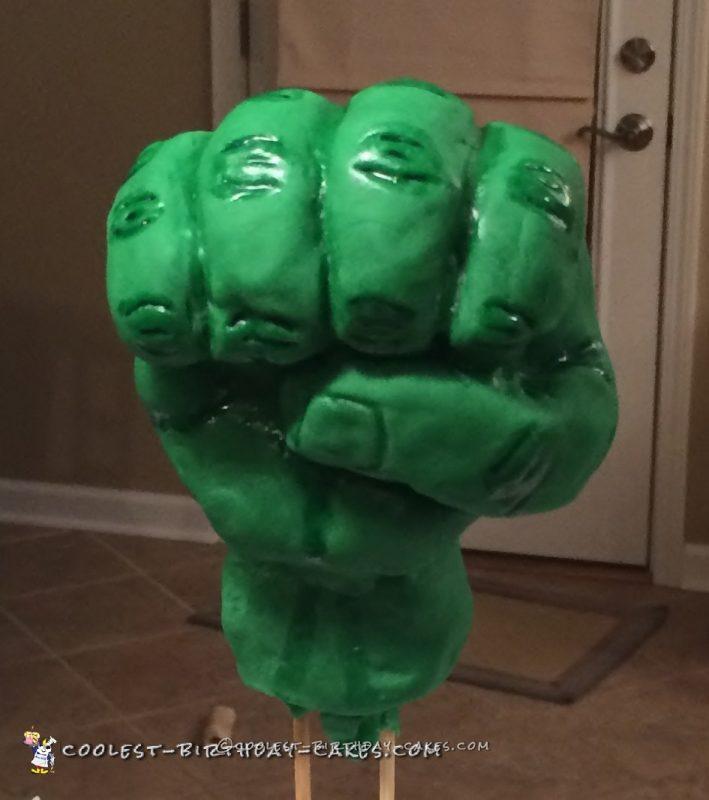
Hulk’s “Shiny” Fist
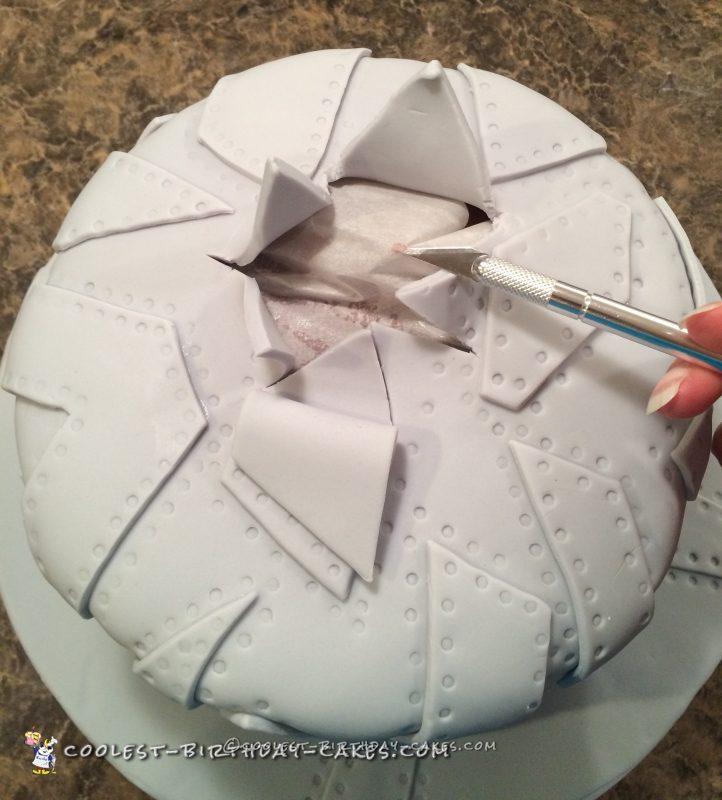
Pull out the parchment paper after making incisions in the fondant
Create Captain America’s Shield
Captain America’s shield was one of the easiest components. I purchased circle cookie cutters of various sizes. For the center, I picked out a star size that matched the inner ring. Then, I attached all the pieces together by brushing the backs of each piece with a little bit of water, making sure to brush all the way to the edges. And voila! A shield!
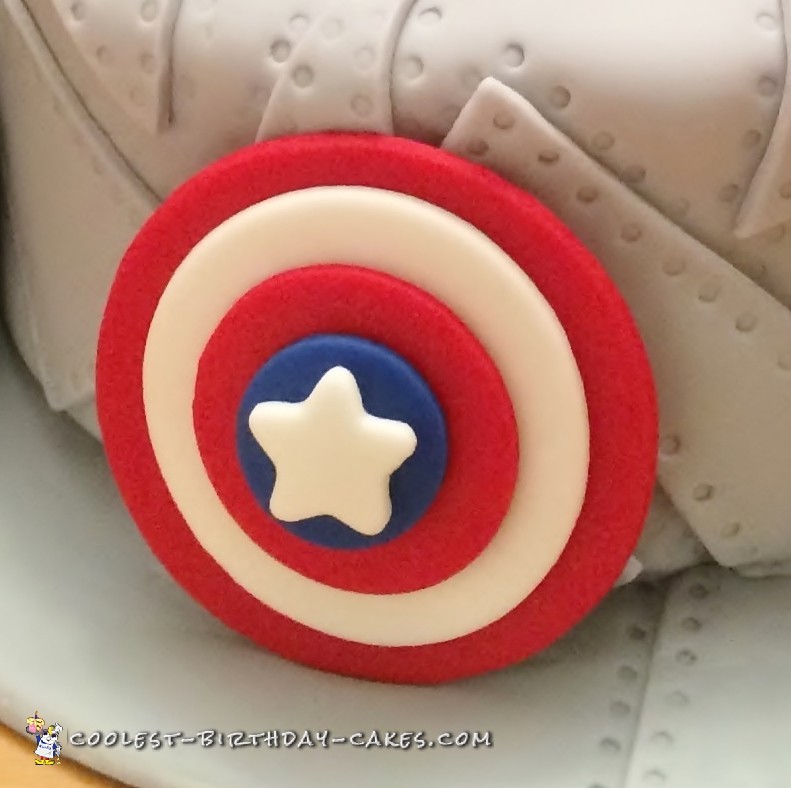
Captain America’s Shield
Create Hawkeye’s Arrows and Black Widow
The last two characters I debated about adding to the Avengers birthday cake, because let’s face it, they are kinda lame. Who’s heard of Black Widow or Hawkeye? But an Avengers birthday cake wouldn’t be complete without all the latest Avengers. And a true Avengers fan would notice! Since Hawkeye is known for his bow and arrow, I created two arrows for the cake. I wrapped two posts in black fondant and molded an arrowhead and feathers and placed it on top of the cake.
For Black Widow, I created a black widow spider out of fondant. I used a toothpick to help secure the head to the body. The legs are made out of black licorice that I poked into the body and secured with black royal icing I had lying around. To make her shiny, I mixed corn syrup and water and painted it on for a glossy finish. I used a toothpick to keep the spider from falling off the cake. I love the way she’s positioned like she’s crawling over the edge of the cake!
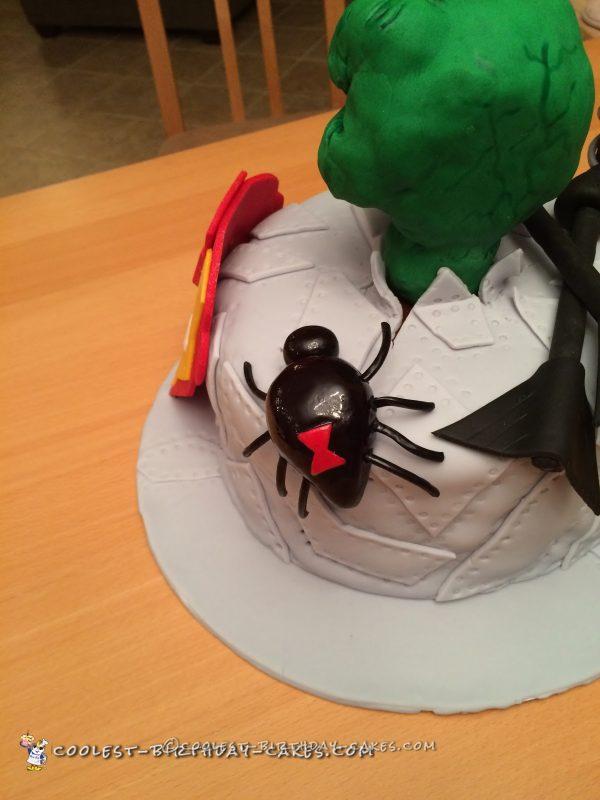
Black Widow
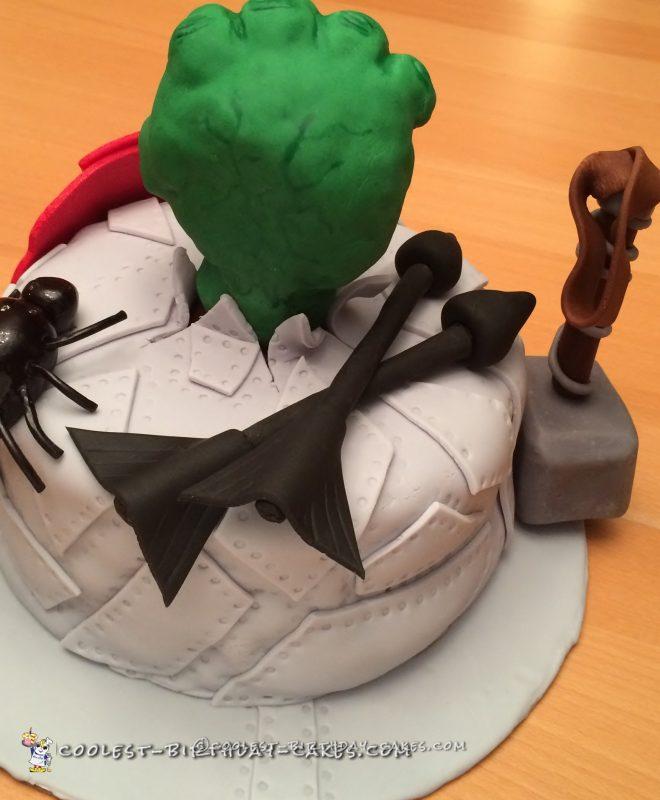
Hawkeye’s Arrows