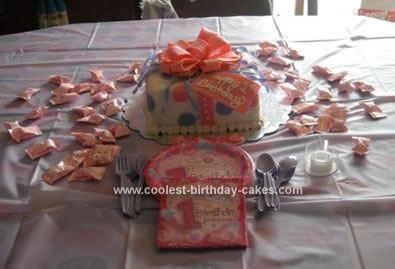
This First Birthday Gift Box Cake was surprisingly easy to make. This was also the first time I decorated with fondant. It was however, somewhat time consuming. The fondant decorations can be made a day in advance, but since I never seem to remember to be that prepared it took about 4 hours.
For the cake itself I used two square 8″ cake pans (each pan took 1 box of cake mix). Once cooled, I trimmed the tops of the cakes to make them level. I then placed the cakes in the fridge to let them firm up a bit before frosting.
Once cooled and firm, I used buttercream frosting for the center and frosted the rest of the cake with a crumb layer. Put it back in the fridge for about half hour to let the frosting firm up again and then frosted with another layer of buttercream. This layer I made as smooth as possible and made sure the corners were rounded so the fondant wouldn’t catch and rip.
While baking the cakes, I prepared the loops for the bow. I used Wilton pre-made fondant and used the instructions enclosed for the bow and ribbon strips. I suggest warming the fondant in the microwave on high for 10 seconds to make it easier to work with before coloring it. I took a toothpick to apply color to several places before kneading the fondant. Use powdered sugar or cornstarch to keep the fondant from sticking to your fingers. I also suggest making an additional four loops about 2″ smaller than directed in the Wilton instructions and a round loop for the center of the bow.
For the curlys I cut thin strips of fondant and twisted them like you would a streamer. For the tag I just cut a rectangle about 2″ x 4″ and punched a hole into the corner with a decorator tip. Once the tag was firm, I thread a thin piece of fondant through the hole to make the tag look like it was attached. For the dots, I used the tops of the Wilton coloring gel to trace and cut out. Once the fondant had firmed up enough, I used scissors to cut off any loose fondant pieces and give the dots a cleaner look.
For the pearls on the bottom of the cake I used buttercream frosting, but didn’t like the way it came out. I would suggest making small fondant pearls for the bottom of the cake, much easier to apply and more uniform in appearance. To apply to fondant itself I rolled a white sheet (about 18oz) until 1/8 of an inch thick (slightly see through) and centered over the cake. I suggest viewing several YouTube videos before attempting, they were extremely helpful. I just used my hands to smooth the fondant, I don’t have any fancy tools yet. I did prop the cake on an upside down Tupperware container that was slightly smaller than the cake itself to get a clean look around the bottom of the cake.
That was it!
Related cakes:
 12+ Coolest Disney Princess Cake Ideas – Awesome DIY Cake Decorating!
  12+ Coolest Castle Cake Ideas – Awesome Homemade Castle Cake Designs!
  12+ Pretty Homemade Princess Cakes
  Coolest Baby Shower Cake
  12+ Inspiring Homemade Princess Birthday Cake Ideas
  Coolest Gift Box Cake
  Lovely Gift Box Cake
  Coolest Gift-Wraped Box Birthday Cake
Your comment has been sent successfully.