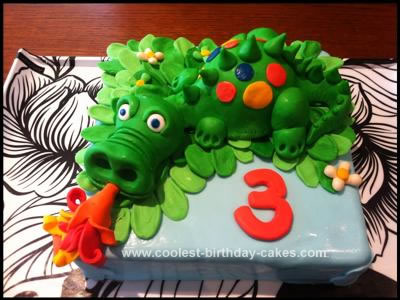
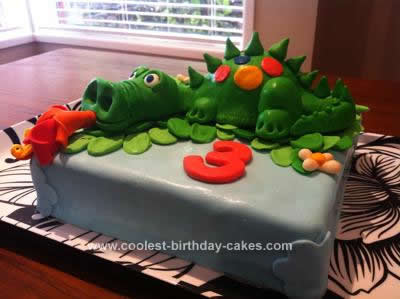
This green fire breathing dragon cake was for a boy’s 3rd birthday cake, HAS to be colorful and bright. It was a choice between a fire engine or a dragon, and I chose dragon because I thought that sculpting with fondant would be FAR MORE FUN. And it was.
I did a practice run a week before the party, made a dragon (only) out of (500g packet) white fondant, and it looked great and I played around until I was happy with the sculpture. I popped it in the fridge to use as a reference.
Four days before the party, I colored my fondant and made the final green dragon. I used a round measuring cup (half a sphere) in it’s belly, as I didn’t want to make it out of solid fondant. The head and body are separate pieces. Body and tail were made first, and the legs and “spines/spikes” were added. For the head I used “shaping tools” to mold the nose and eye sockets. I based the dragon sculpture on my own design – seriously it’s not that hard once you get started – getting the shape of the head and nose was the most important and it’s pretty hard to get wrong.
I added the colored spots, and popped it (uncovered) in the fridge to dry.
The following night I made all the leaves as separate pieces (in varying shades of green). For the flames, I used my imagination to stylize the fire – curves were easy to make and given the sat up off the cake, had great impact. I supported the flames position by laying them over a spoon, and popped them and the leaves into the fridge to dry uncovered.
Hint – make more leaves than you think you’ll need. Use this opportunity to make a few flowers or something out of left over bits of fondant. Make a NUMBER (mines was “3”) as well… it all dries beautifully in the fridge – but not concrete solid, the fondant can still bend and crack. Handle with care!
Two nights before the party, I made two BUTTER cakes (in a 25cm deep square tin). Baked separately. I wrapped them well, in glad wrap and froze each cake. The night before the party I assembled the lot.
I cut/leveled my two cakes, while frozen, and stuck them together with icing, and gave them a crumb coat, all using Better Crocker pre-made icing (stuff you buy in a tub, I had too much else to do to worry about making icing as well). I popped back in the freezer for about 20mins, and then took it out and started assembling.
Assembling took about 1.5 hours. I smoothed/perfected the crumb coat layer as much as I could. I made/rolled out blue fondant, and covered the cake. The corners where the fondant didn’t want to smooth out well, I covered with flowers cut out using a cookie cutter – just a sweet cover up.
I chose the position for my dragon, and started to layout his bed of leaves. Then placed the dragon on top – using a bit of icing to stick him down.
Note – because my cake was frozen, and all bits and pieces were cold from the fridge, they began to sweat. No biggie, however I’m sure a professional would have advised you to simply leave all items out in the open in a dry place… but not sure. The sweating did NO harm. I carved out a hole in his mouth, to push the fire end into. I stuck down the “3” and additional flowers with icing.
End result – WOW – huge success. HUGE.
Used:
500g fondant for practice dragon
500g for final dragon
500g for leaves, number and blue base covering (may have had a spare pack around just in case for the blue backing base.
1 tub of Betty Crocker icing.
2x butter cake packet cake mixes.
GEL icing colors (not the liquid, so I got intense colors – though doesn’t matter what you use really).

Related cakes:
 12+ Coolest Castle Cake Ideas – Awesome Homemade Castle Cake Designs!
  Coolest Homemade 3D Blue Dragon Cake
  Breathtaking Homemade Dragon and Castle Cake
  12+ Coolest Disney Princess Cake Ideas – Awesome DIY Cake Decorating!
  Cool Homemade Puff the Magic Dragon Birthday Cake
  Cool Golden Birthday Dragon Cake
 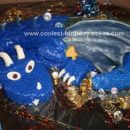 Coolest Dragon Birthday Cake
  Coolest Pink Dragon Birthday Cake
What a fabulous cake. I’ll give it a go for sure.
My son has seen it and requested it.
Love the sculpture, something to aim for.