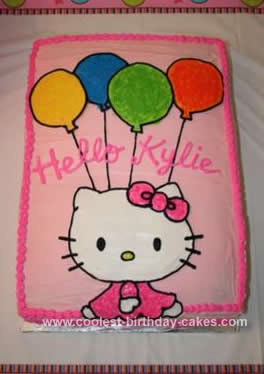
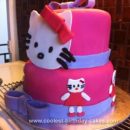
For my daughter Kylie’s 4th birthday, she wanted a Hello Kitty theme so I decided to make the Hello Kitty Birthday Cake myself! We were expecting over 40 people, so I wanted to make a large, double layer cake….but I only had a 9X13 pan. Instead of buying a larger cake pan, I just baked four strawberry flavored cake mixes (Pillsbury). The flavor is the BEST EVER and it is pink! I made the four 9×13 cakes the day before, let them cool, and wrapped in plastic wrap to freeze overnight.
The morning of the party, I took two cakes out of the freezer and laid them next to each other on the cake board so the long sides touched to make an 18X13 sized cake. I used white icing to cover the sides (crumb coat) and added a thick layer of icing on top. Next, I removed the other two cakes from the freezer and placed them on top of the iced layer, again side by side. I finished a crumb coat on the whole cake with the white icing. Once that crusted over, I iced the whole thing with Pillsbury “Funfetti” pink vanilla flavored icing (3 cans). I let the pink icing crust over so it would be easier to decorate the Hello Kitty design.
Using a Hello Kitty birthday napkin as a rough template for the design, I enlarged the image and cut it out. I traced the balloons first with a toothpick – using only four since it was her 4th birthday. Neon food coloring gel works great with white icing to get the bright colors. I then added sprinkles in matching colors to make the balloons more interesting. Hello Kitty’s face and body were traced next. I added white icing for the face, tail, hand and foot. To get the smoother finish, I dipped my spatula in a small amount of milk while spreading out the icing.
The dress and bow icing were made by mixing the pink neon food coloring with white icing. Then pink sprinkles were added for the sparkly effect. I bought Wilton’s black icing in the tube to trace all the black outlines. The last step included using the rest of the neon pink icing to write “Hello Kylie” and to decorate the edges.
It took about 3 hours from start to finish to decorate it on the day of the party and I used probably 6-7 cans of icing (I stopped counting!) – It took longer than I expected and was very heavy, but I received many compliments and had one happy little birthday girl! It was worth it!!


Your comment has been sent successfully.