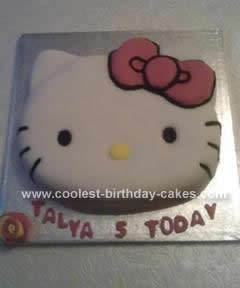
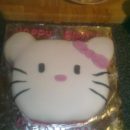
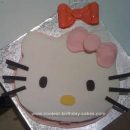
This Homemade Hello Kitty Birthday Cake was requested by my youngest daughter for her 5th birthday. I hired a Wilton cake tin from the local cake shop and made a 4 egg cake mixture and a 2 egg chocolate cake mixture. I just used basic cake recipes I had from one of my recipe books.
The chocolate mixture had 1 tbsp of cocoa and 2 tbsp of drinking chocolate. I used a canister of spray oil that I found in the supermarket on the baking isle. It’s one specifically for cakes and really stops the cake from sticking to the tin. I poured in the basic mixture and then the chocolate mixture.
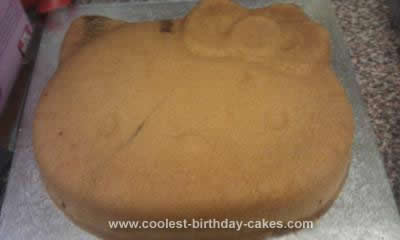
I then used a knife to gently mix the two cake mixtures slightly. I just pulled the knife through horizontally and then vertically. Once the cake was done I let it cool a little and then whilst it was still in the tin I took a very sharp knife and gently sliced along the top of the cake so that it had a flat surface once overturned. This is where we all get to proof test that the cake tastes OK.
I then put the board over the cake and flipped it over. To release the cake from the tin I gave it a couple of bangs all around the tin and gently lifted it from the cake. Perfect. No breaks.
Once cool I made a small batch of buttercream up and covered the entire cake with a thin layer. I often use warmed apricot jam but I forgot to buy more and many people prefer the buttercream. I then rolled out some white fondant icing. My friend recently bought me a large fondant icing mat and advised me to grease it and the rolling pin with butter. This was only the second time I used the mat and if you’ve never used one before I highly recommend it. I have always struggled to place the fondant on the cake without it cracking, tearing or sticking together.
This made icing the cake so easy and the butter really did stop the fondant from sticking to the rolling pin or mat. I used a silicone rolling pin. Another good buy when it was reduced in the local supermarket.
I lifted the mat and carefully placed it against the cake and then flipped it over onto the cake. I then carefully peeled of the mat. By lifting the board with the cake on with one hand I used the other hand to gently lift the edges of the fondant and smooth it over the sides of the cake so that the fondant didn’t crease. I then placed the cake tin over the iced cake and gently pressed it down to leave a good impression on the icing.
I made all the other additions like the eyes, nose, whiskers and bow out of fondant. For the bow I placed the pink rolled out fondant into the tin to make an impression so that I could then cut round it before placing it onto the cake.
I used metal cutters for the letters, again a layer of butter when rolling out the icing stopped the letters from sticking to the cutter which kept happening the first tried I used the cutters.
Your comment has been sent successfully.