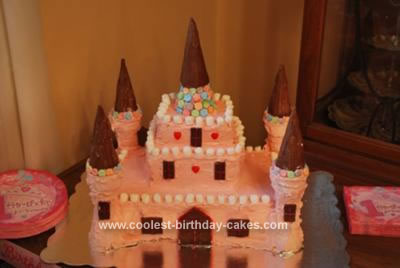
I made this Castle Birthday cake for my daughter’s first birthday party which was princess-themed. I took many different ideas from this site, which is wonderful, and put them together for my own cake. If you are interested, this is what I did:
I bought and baked:
-two boxes of chocolate cake in two 9″ x 13″ pans for the bottom layer
-one box of yellow cake in two 9″ x 9″ round pans for the second layer
-one box of yellow cake in two 9″ x 9″ round pans for the top layer
I also bought:
-8 cans vanilla frosting
-one tube of red food coloring
-one box of 12 cake ice cream cones
-one box of 12 sugar ice cream cones
-one bag of melting chocolate
-two bars of Hershey’s chocolate bars
-one tube of pink decorating icing
-one bag of mini marshmallows
-large sweet tarts candy
-small sweet tarts candy (could also use smarties)
-runts candy
-one cardboard tray
I baked the cakes two days before the party and put them in the freezer. I cut the curves off the round cakes to make them square. I made two squares of equal size for the second layer and two squares a little smaller for the top layer. It turned out that I only used one smaller square for the top as, otherwise, I think it would have been too tall.
The day before the party, I took the frosting out of the cans and whipped it. By doing this, I have found you get a larger quantity of frosting and it’s also easier to spread. I then stirred in a few drops of red food coloring to make it pink, although store-bought strawberry frosting would do as well.
I took two cake cones, put frosting on both bottoms, stuck them together to create the base of the turrets and then frosted them. I made four of those, using eight cones. I melted chocolate, dipped the sugar cones into it to create the top of the turrets and stuck them on upside down with icing. I made four of those using four cones. For the top, or center, turret, I frosted one cake cone, put the topside down on the cake and put one chocolate-covered sugar cone over it, as far down as it would go.
I took the first 9″ x 13″ cake out of the freezer and put it on a piece of aluminum foil on top of the cardboard tray. That way, if I dripped any frosting on it, I could just rip the foil around the edges of the cake and the tray would be clean for the presentation. I then put a crumb layer of frosting on the top and another layer of frosting over that.
I then took the second 9″ x 13″ cake out of the freezer, put it on top of the first cake, put a crumb layer on that and then frosted both cakes all over.
After repeating these steps with the square cakes, I frosted the whole cake to fill in any gaps and smoothed it out; gaps can also, by the way, be filled in by the curves cut off from the round cakes mentioned above.
I cut a wedge out of the four corners of the first layer to fit the turrets in. Then I used frosting to blend them in.
To decorate the cake:
I stuck large sweet tarts around the four corner turrets, large sweet tarts around the large bottom of the top turret and small sweet tarts to fill in the gap where the cones meet.
I used the Hershey’s chocolate bar and pink decorating icing for the door and windows. I stuck mini marshmallows along the edges of each layer and stuck three heart-shaped runts in the front.
This was time-consuming but fun, and surprisingly easy! It’s the first cake I have ever made like this and, although it’s not perfect, I am very happy with the result! I hope this helps you in some way; I have learned lots of great tips from this site and am happy to add any I might have!
Related cakes:
 12+ Coolest Castle Cake Ideas – Awesome Homemade Castle Cake Designs!
  12+ Original Homemade Princess Castle Cake Ideas
  12+ Coolest Disney Princess Cake Ideas – Awesome DIY Cake Decorating!
  12+ Inspiring Homemade Princess Birthday Cake Ideas
  Coolest Princess Castle Birthday Cake
  12+ Pretty Homemade Princess Cakes
  Coolest Princess Castle Cake Idea
  Cool and Fun Homemade Pink Castle Cake
Your comment has been sent successfully.