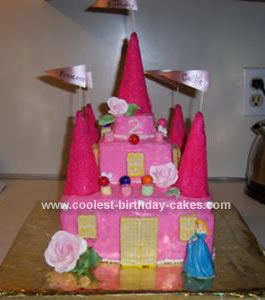
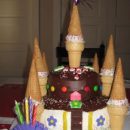
I found the idea for this Homemade Princess Castle Cake from a Betty Crocker video on a video website and made it for my niece’s 2nd birthday. It gives a short video showing exactly how to make it. Just run a search for castle cakes there. I had to adjust this a bit, since I couldn’t locate 8inch pans. I used 9inch square pans. I made 5-9in cakes.
I did as follows:
1. Bake the cakes, cool completely, then freeze for 30min
2. Cut the domes from the cakes
3. Invert the first cake onto your board and ice the top.
4. Stack the next on top (smooth side up), then ice.
5. Repeat step 4 twice more until you have 4 layers.
6. Take your last cake and cut it into fourths.
7. Stack 3 on top of each other in the center icing between them like before.
8. Take your fourth piece left and cut it into fourths again.
9. Stack 2 of these on top of each other icing between.
10. At this point, i stuck two dowels down the center to keep the entire cake nice and sturdy.
11. Crumb coat, then freeze for 30min or longer
12. Place your final coat of icing on. To get a smooth finish, after I ice the cake, I dip my spatula in hot water then run it across the cake.
13. Ice your five waffle cones and roll them into sanding sugar or sugar crystals and add them to your cake. *If you intend to use flags in them, make the holes in the ends BEFORE icing them*
14. Decorate the castle to your liking :)
I made my own buttercream icing (it took two batches). The cake wasn’t really that hard to make, but it is very time consuming. Everyone loved it and it looked very pretty cut since it had 4 layers with pink icing between. I did make this cake 4 days prior to the party and kept it refrigerated until then and it help up wonderfully.
I wouldn’t recommend making it the same day, as, well it will take most of the day to make. Good luck and have fun.


Your comment has been sent successfully.