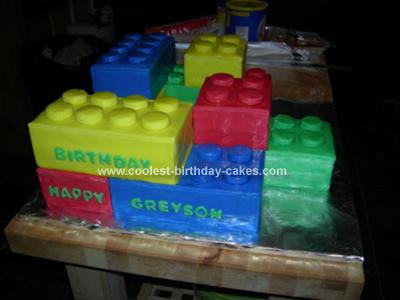
My son wanted a Lego Birthday Cake for his 6th birthday. After looking around I was inspired by a fondant Lego cake I saw online. Our design is comprised of 6 large (4″x8″)Lego blocks and 3 small (4″x4″) Lego blocks. The blocks fit together to form a large ‘G’ when looking down at it (my son’s first initial).
The cake was a modified chocolate cake mix (from a box). We added pudding and an extra egg to the mix so it would be dense enough for the fondant. This worked fabulously. The fondant was made from marshmallows and powdered sugar. The “dots” on top of the cake are cut out of thick fondant. We brushed water over the finished cake to get the plastic sheen. This took a long time to dry. But it was a convincing effect.


AWESOME CAKE!
Could I please ask how much and what kind of pudding you added to the cake mix. Also, how much of the marshmallow fondant did you use? Did you make the cakes a couple days early and decorate as you would with reg fondant? TIA!
MY SON WANTS A LEGO CAKE FOR HIS BIRTHDAY…AWESOME IDEAS! CAN’T WAIT TO MAKE HIS CAKE IN APRIL.
This cake is just awesome. My son is also turning six, and asked for a Lego cake. I was wondering how did you get the coloring so vibrant, I always have issues with colors coming out too subdued. Thanks.
Your cake looks great!
For those who asked questions – here are my thoughts…
The color is best gotten through gel food colorings found in a cake decorating isle or craft store and not food coloring. Food coloring may change the consistency of the fondant and probably wont give you vibrant deep colors.
As far as how much: that depends greatly. I would suggest making two full size batches of fondant, or three just to be safe. You’d rather have too much than not enough. Besides, fondant will last several weeks in the fridge, so you can use it for another project later.
I would also suggest starting a week in advanced. You want lots of time in case you mess up and have to start back from scratch. Also, more time allows you to have better art and better planning. I would start with the cake and let it cool for a whole day in the fridge.
Pudding: any pudding will do, just make sure chocolate pudding with chocolate cake and vanilla with vanilla, or mix it up. It really doesn’t matter too much.
I wanted to say What an awesome job on your cake! I also loved that you gave it the “plastic look” by brushing the fondant with water. Did it stay shiny like that or did it dry?
My son loves Lego’s, so I’ll be making his birthday cake in January…i can’t wait.
Very nice work! Love your sharp, clean corners.
Didn’t dawn on me that there would be follow up questions. But Brandie was spot on in everything she said.
1. Gel coloring for vibrant colors.
2. Made large batches of fondant (you’ll never match the color if you have to make another one).
3. Work a week ahead.
I baked these cakes a week in advance and froze them. But just be sure they cool completely before you wrap and freeze them or you’ll get condesation inside the plastic wrap. You don’t want a wet cake.
Two days before the party I iced the cakes with buttercream and regrigerated them for a few hours. Then, I made the fondant one color at a time (big batches) with gel coloring. I then cut and applied the fondant. I had to trim all sides of the cake to get nice square sides. I bought a nifty cutting tool to make the top perfectly flat.
The shiny water trick started as an accident. The fondant looked dull except where a little water had hit it. I brushed more on and wanted to see if it stayed. It did stay shiny. But it took over 24 hours to completely dry. I even put a fan on it to help it dry. In the end it was no longer sticky and stayed nice and shiny. Just don’t do it unless you have lots of drying time.
Best of luck to all.
I saw on a show that to get a shine to your fondant to throw some steam on it! you get the same shine but it dries faster.
I’m currently working on LEGO cakes right now for this weekend and have gained a lot of tips from everyone’s great ideas! Thanks for your post!