
The cake was approx. 15” tall and 13” wide. Bottom layer was 5” tall, top layer was 4” tall and towers add the remainder of the height. Everything was edible with the exception of the pennant sticks, smoke from dragon’s nose and drawbridge sticks. Cake board was wrapped in fancy foil then covered with buttercream. Front of cake had pet dragon chained to tower. Back side of cake had back door open with dragon tail sticking out. I call this a 360 degree cake in that it had fun elements on all sides.
One week in advance of party:
Made dragon head & tail from fondant 3 weeks in advance. Made fire from marbled gumpaste and shaped around small rolling pin to give a rounded look. Made dragon collar, chain, teeth and torches from gumpaste. Smoke from dragon’s nose is cotton wrapped around toothpicks which were inserted into the nose before the fondant dried.
The Drawbridge door and back door were made from marbled gumpaste and used a wood grain plastic mold to give wood pattern. I made turrets and towers using premade rice krispie treats and shaped into oblong cylinders. Press treats around a dowel rod to shape towers and provide strength. Wrapped all towers in 1 layer of fondant. Dimples from krispie treats show through but can be covered with brick pattern.
Brick pattern made on towers and cake by pressing small square cookie cutter into fondant and in a staggered pattern. Large towers (4): 6” tall, 1 ¾ in base, 5 rice krispies, medium towers (4): 4 ¼ in tall, 1 ½ in base, 4 rice krispies, small towers (1): 3 ½ in tall, 1 ½ in base, 3 ½ rice krispies.
Note: You can size out the height & width of towers by building a model of cake using paper diagrams.
I made pennants using gumpaste. Pennants laid out on wire racks to create the wavy (blowing in the wind) look. Attached to toothpicks with gumpaste glue and small strips of fondant to hide toothpick.
Day before party:
Used graham crackers wrapped in fondant for bottom of turret. Slightly dampened the graham cracker with gumpaste glue so the fondant would stick. Sides of turret made from gumpaste. Adhered sides and attached bottom of turret with gumpaste glue and small balls of fondant which were placed in all four corners of the square.
Attached rice krispie towers to turrets (square pieces). Added transition or finishing trip of rolled fondant (rock fascia) to bottom of tower to hide seams.
Made red bunting from gumpaste. Allowed to dry on tower so that bunting would have a slight curvature. Made battlement squares from fondant, rolled slightly thick, using small square cookie cutter. Attached to top and sides of castle using gumpaste glue.
Day of party:
Used sugar cones wrapped in fondant for tops of towers. Applied gumpaste glue to sugar cone and wrapped fondant. This could have been done in advance. Made drawbridge ropes with lollipop sticks wrapped in black fondant. Window and door silhouettes were made from fondant and attached with gumpaste glue. Rolled small balls of fondant for rock fascia around doors and windows and attached with gumpaste glue.
The cake was stacked using dowels inserted into first layer and leveled with the fondant. The top tier towers/turrets were positioned on dowel rods to keep them from sinking into the layer they were sitting upon.
Related cakes:
 12+ Coolest Castle Cake Ideas – Awesome Homemade Castle Cake Designs!
  12+ Coolest Disney Princess Cake Ideas – Awesome DIY Cake Decorating!
 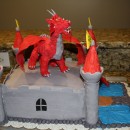 Breathtaking Homemade Dragon and Castle Cake
  Fabulous, Built-to-Travel, Rainbow Castle Cake
  12+ Original Homemade Princess Castle Cake Ideas
  Coolest Homemade 3D Blue Dragon Cake
  Coolest Green Fire Breathing Dragon Cake
  Cool Homemade Puff the Magic Dragon Birthday Cake
I actually saw this cake in person because I was at the party. You wouldn’t believe the details that the picture here doesn’t show. It was an incredible masterpiece and we hated to cut into it! Not only was it beautiful but it tasted great too!…
omg seriously impressive!! Good on you x
I just got started making cakes and love all the ideas.
Thanks for creating a nice castle!