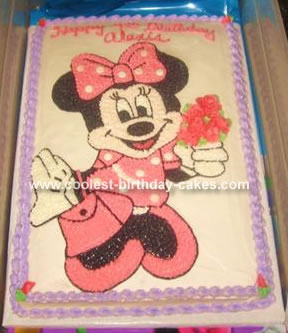
I first took a small picture of Mini Mouse that I liked, cut that out, took to print shop and blew up to a little less than the size of a half sheet cake pan for this Minnie Mouse Cake.
Once I iced the cake and let the icing crust over, I cut out the Mini Mouse then I positioned her on the cake where I wanted her then I used a wooden skewer to outline the shape.
Once I got that, I cut-out the ears, the face and so on using the skewer to out line every detail, shoes, purse and so on. After that , I started to fill in each section with the color of icing it called for with a star tip, then I made a bundle of roses for Mini to hold in her right hand and topped them off with a few green leaves here and there.
I then trimmed out with lavender trim and the pink message.
Related cakes:
 12+ Coolest Minnie Mouse Cake Ideas
  15 Cool Minnie Mouse Birthday Cakes
  12+ Coolest Mickey Mouse Cake Ideas
  Cool Homemade Minnie Mouse 2nd Birthday Cake
  Awesome Mickey Mouse Crazy Cake and Cupcakes
  12+ Coolest Peppa Pig Cake Ideas
  Coolest Minnie Mouse 2nd Birthday Cake
  Cool Buttercream Minnie Mouse Cake
Oh I would love to have this cake for my daughter’s 1st b’day.. where do you live? Where can I order the same cake.. I live in Folsom CA. :)
I can’t find a cute pic like this! Where did you find it???
And awesome job!
Your cake is the best of all the Minnie’s!
Next time you do something like this, you don’t need to cut out pieces of sections to outline. There is a simple wax paper transfer you can do:
simply put a piece of wax paper over your picture, trace with a pencil. Turn over the wax paper picture and trace the picture with thinned down icing using a #2 writing tip. Turn over the thinned down icing side onto a cake that has been frosted and the icing is crusted over. Press lightly to transfer the thinned down icing onto your cake. Now you have a pattern on your cake!
would u bake this cake for my daughter call (918)933-2682
i would like have this cake for my daughter’s second birthday
<3 cute make me one please :)