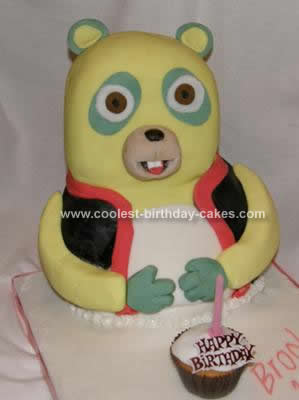
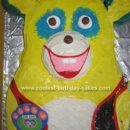
My granddaughter was 1 year old, she love Oso the bear off the Disney channel. I decided to make her an Oso Cake.
I baked a 10inch and a 8inch Madeira cake and sliced in half and filled with jam and butter cream icing. I then covered the cake board with a thin layer of white icing for display and pressed flower shapes all around the edge of the iced board. I then set this aside to harden slightly.
Meanwhile I sliced a piece off the base of the larger cake to stand it on it’s end and cut a small semi circle out of the base cake to slot the second cake into placing 3 dowel rods through the cakes to hold them together then I crumb coated the whole cake with butter cream and placed in the fridge to harden for about an hour.
Meanwhile I colored some roll out icing in yellow for the body, head and arms of the bear and then colored a small amount in black for Oso’s jacket, colored a tiny amount in green for his ears and around the eyes and hands and colored some red for the edging of the coat.
I then colored some in light brown for the muzzle of the bear these were all placed in separate plastic bags so they didn’t dry out.
When the cake had hardened I rolled out the yellow icing large enough to cover the whole cake( this was the most difficult part of the decorating). I started on the top of the head and smoothed it over the cake there were a few bulges in the icing so I cut these off with the scissors and I made sure these were where the jacket was going to cover it up. I smoothed over the blemishes in the icing before adding the jacket. I trimmed off any excess icing around the edges and with the rest of the yellow icing I made the arms.
Using a circle of white I attached his white tummy
I then rolled out the black icing and shaped the jacket and with a little water I attached it to the cake and then I added the arms using a piece of dowel rod, then I rolled out the red for the edging of the coat and attached this.
I then shaped the muzzle and used my modeling tools to give definition. I made a mouth and colored a tongue with color paste and attached some white teeth I then attached a brown nose I attached this with some icing mixture and supported it underneath until dry.
Using the green icing I made ears and oval shapes for the eyes I then used some white for another part of the eye and then used some brown for the color of his eye. The rest of the green I made his hands.
I then piped all around the bottom of the cake and iced my granddaughter’s name to the white icing on the cake board.
I placed a cup cake with some roll out icing on the top and stuck a happy birthday sign and a candle in it to finish off.
Every one loved it (I would make it differently if I make it again). The cakes slipped slightly and I had to support them by leaning the against a board, so I would NOT cover cakes placed on there sides I would bake more cakes and layer them and then cut out the shape, you learn by your mistakes.
Even so the cake was lovely.

Your comment has been sent successfully.