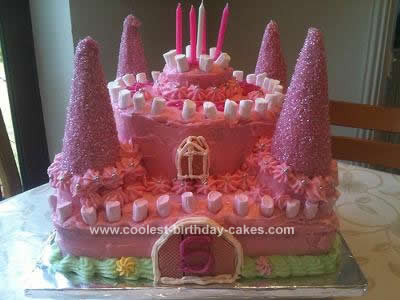
I made this Pink Castle Birthday Cake for a friend’s daughter – she was leaving the country and it was a birthday/leaving present. It took about 3.5hrs intense decorating time, plus the time to bake the cakes. Thanks to Coolest Birthday Cakes, I had a really good idea of what I wanted to do before I started, though did change a few plans as I realized some things just wouldn’t work.
I first started with 4 separate cake mixes (my own recipe – a yogurt based recipe that I modified for this particular cake – this was a chocolate toffee cake). 1 cake mix makes approx a large 9″ cake. I made 2x 10″ square cakes (one mix per cake). I also made 2x 7″ round cakes, and 10 cupcakes (each mix made 1x 7″ round cake, plus 5 cupcakes).
I used a fine-serrated breadknife to cut the tops off the cakes so they were really flat. I sandwiched the two square cakes on a foil-covered cake board with boiled seedless raspberry jam. I then painted the top of this with more jam, and put the 7″ cakes on top in the centre, sandwiched with more jam. I then chose 5 of the most even cupcakes, put one in each corner of the 10″ square cake, and one on the top of the 7″ round cake. I secured them with wooden barbecue skewers with about 3″ to support the ‘turrets’.
I made the buttercream to my own recipe, it was approx 500g unsalted butter, 2kg icing sugar, and enough milk to make it soft, and beat it with an electric beater. I reserved about 2 cups for later decorations, and dyed the rest pink with gel colouring (Wilton’s Rose). I used the teeniest bit, and it was still pinker than I intended!!
I then did a crumb coat. As it was a chocolate cake and I’d had to butcher it with a bread knife, it really needed this. The chocolate crumbs were a real pain! I did a rough job, then let it set. Whilst it hardened, I spread the icing evenly on the ice-cream cones (they were waffle cones, and NOT even at the top. I rescued this by putting the ‘gaps’ on the inside of the cake). I then rolled these ‘turrets’ in pink glimmer sugar and put on baking parchment to dry.
I then iced the cake. I used a hot palette knife to smooth the edges after doing a ‘rough’ cover. I used an icing gun to hide the joins between cakes, using the star tip (topping each star with a silver bauble). Once I had a nice even coat, I then used mini marshmallows for crenelations, pink sugar wafers for door/windows, ready-made white & dark pink tube icing for writing the birthday message & girl’s name on the top turret, and details for the windows and door. I used icing to ‘glue’ the turrets to the cupcakes, then the star tip again to cover the joins. Again I used silver balls to accentuate the star detail, they really ‘made’ the cake.
The reserved icing I dyed pale green (Wilton’s Leaf Green) and used the Half Moon Shell tip to make ‘grass’ around the base of the cake – this hid the ‘join’ of the cake to the base. I put a few sugar flowers onto this green ‘grass’ to decorate it.
I am really pleased with this cake – I used ideas from this site and then changed them as I went along. I have to say that I wouldn’t do it with chocolate cake again unless I was using a chocolate frosting, and I would make my own ‘detail’ icing as the tubes were really stiff and hard to work with. But it looked and tasted wonderful. And the birthday girl was VERY happy! And that’s all that counts.
Related cakes:
 12+ Coolest Castle Cake Ideas – Awesome Homemade Castle Cake Designs!
  12+ Coolest Disney Princess Cake Ideas – Awesome DIY Cake Decorating!
  12+ Original Homemade Princess Castle Cake Ideas
  12+ Inspiring Homemade Princess Birthday Cake Ideas
  12+ Pretty Homemade Princess Cakes
  10+ Coolest Princess Cake Ideas
  Pretty Pink Princess Castle Cake
  Coolest Pink Princess Castle Cake
Your comment has been sent successfully.