I decorated my first cake last summer as an anniversary gift to my parents, it was terrible, but they loved it anyway! This developed into a bit of a hobby of mine and I began making cakes as gifts for family and friends at any opportunity I could find. Due to numerous requests, I have now started making cakes to order, purely for family and friends as I already have a full time job. I’d been selling my cakes for 3 months and had only ever created a handful of standard 8 inch round cakes with fairly basic decoration, when a friend asked me to make a princess castle cake for her 4 year old daughter. It came as a complete shock to me and I was very nervous about doing it but just couldn’t resist the challenge!
I began the cake by looking for inspiration online and found hundreds of castles in various styles. I picked a selection of my favourite ones, used a little something from each one and added my own little touches too. I had about 2 months notice to do the cake so I was fortunate enough to have plenty of time to research it and gather some ideas first.
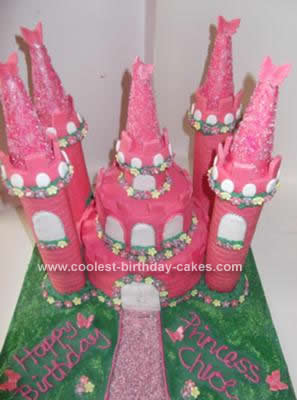
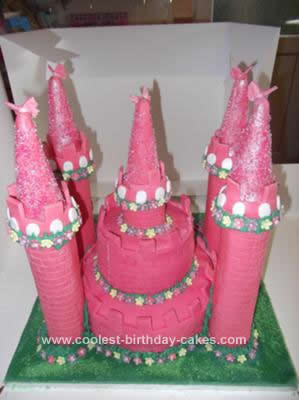
The base of the cake is an 8 inch round sponge cake, with a 5 inch sponge cake on top. I used a standard Victoria sandwich cake recipe and filled the cake with raspberry jam and vanilla butter cream. Once the cakes were baked, I left them to cool completely before wrapping them in cling film and placing them in the fridge for 1 hour. I then unwrapped them and cut off the dome tops in order to level the cakes out.
I filled the cakes as detailed above, covered the outside of the cake with butter cream and again popped it back into the fridge. Once the butter cream had became a little firmer, I iced both cakes with thinly rolled supermarket bought icing and smoothed it all over. I then placed 5 wooden dowels in the bottom cake, cutting them to size and making sure they were perfectly level with the top of the cake. I placed a 5 inch thin cake board on top of the dowels, securing it with some royal icing as a kind of “glue”, before placing the 5 inch cake on the top, again securing this to the 5 inch cake board with a little royal icing.
Once the 2 tiers of the cake were assembled, I then rolled out some thicker icing and using a brickwork cutter, created a lovely detailed brick work design on the icing. Using a small square cutter, I cut square shapes out of the top of the icing to create the castle shape along the top edge of the two cakes. I used my paint brush to dab the edges of the iced cakes lightly with some water and then very gently wrapped the bricked icing around the edge of each cake, gently pressing it onto the cake allowing this to mold itself to the existing icing. I was very careful to ensure I did not damage or smudge the brick design.
My towers were made using the insides of kitchen rolls (8 inches tall). I had made these a few days in advance by covering the kitchen rolls with royal icing and then applying the ready to roll icing. I then placed ice cream cones on the top, securing them with more royal icing and covered them in icing and pink glitter. I secured them to the cake by piping royal icing up the side of the cake and the side of the tower and then pressing them into place. I also put cake dowels in the center of each tower, and stuck them to the cake board with a BIG blob of icing. The cake was really very sturdy and was transported to the party venue easily and in one piece, although it was very heavy!!!
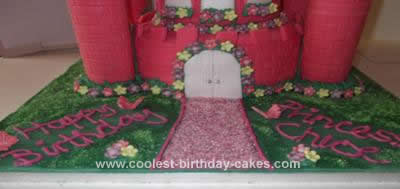
I cut the windows and doors out of icing, covered them in white lustre dust to add some sparkle to them and then placed them on the cake. Using green royal icing I piped grass/leaves around the edge of each cake, around the door and below the windows. I then added the pink, yellow and purple flowers that I had made a few days in advance, using a mixture of icing and modeling paste. (Almost 300 in total!!). I used white royal icing to place the white dots in the center of each flower and I decorated the cake board with green icing. I then completed the look by adding butterflies to the spires, a pink path made purely from sugar crystals and glitter, a birthday message piped in pink royal icing and finally I added more green sugar crystals to the cake board to give more of a grass affect. (I again dabbed the icing with a little water using my paint brush to ensure the sugar crystals stuck).
The Homemade Princess Castle Birthday Cake was a huge success and everyone loved it, so much so that I had an order placed for an identical princess castle the very next day after another family member saw a photo of it!! I’ve got another month to wait before I start all over again and I can’t wait!!
Related cakes:
 12+ Original Homemade Princess Castle Cake Ideas
  12+ Coolest Castle Cake Ideas – Awesome Homemade Castle Cake Designs!
  12+ Coolest Disney Princess Cake Ideas – Awesome DIY Cake Decorating!
  12+ Pretty Homemade Princess Cakes
  12+ Inspiring Homemade Princess Birthday Cake Ideas
  10+ Coolest Princess Cake Ideas
  1st Birthday Princess Castle Cake
 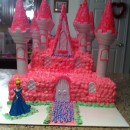 Coolest Pink Princess Castle Cake
Hi Mandapanda
your cake has turned out lovely, i hope you get plenty of orders from now on,
hope you gained a bit of knowledge from ccworld
good luck with future orders Pearl xx