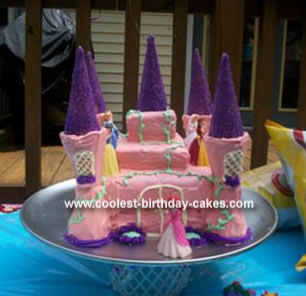
All my daughter wanted for her 3rd birthday was a Princess Castle Cake. Where she got the idea? Who knows! But I knew I had to make it for her and I didn’t want to spend a fortune so I started looking online and came across this great website. From this website I looked at, well, I believe every castle cake there was and tried to make my own version that was a mixture of several cakes.
Here are the items and ingredients I used:
2 boxed cake mixes, my little princess wanted chocolate and strawberry, (baked according to box instructions)
3 containers of white buttercream icing,
regular food coloring,
1 8ounce bag white chocolate chips
1 Lavender Sugar Sprinkles (for tops of towers)
1 Dowel Rod
8 regular ice cream cones
5 sugar cones
1 9×13 pan
2 8inch square pans
a few toothpicks
I started on the towers two nights before the party by melting the white chocolate chips and dipping the 8 regular ice cream cones, placing them on wax paper to cool. I did this so the cones would have a flat surface which would make them easier to decorate with icing. The night before the party I baked both cakes and let them completely cool before putting them in the freezer overnight.
The morning of the party I got the cake baked in the 9×13 pan and cut an 8inch square cake out of it. Now I had 3 8 inch square cakes. I layered them chocolate, strawberry then another chocolate. I cut the smaller square layers that were on top of the castle out of the remaining 9×13 cake. After stacking them accordingly I placed one single dowel rod down the middle just for some stability.
I then mixed 2 containers of the white buttercream icing with red food coloring to create the shade of pink I wanted and put a crumb coat on the cake. A crumb coat is simply a thin layer of icing that will hold any loose crumbs so you don’t have speckled icing on your final product. Then placed the cake back in the freezer for 45 minutes. This hardens the crumb coat. Don’t forget to at least refrigerate your remaining icing so it doesn’t get too soft.
Finally, I put the final coat of icing on the cake and the 8 regular ice cream cones (you may have to shave some of the hardened chocolate off the cones in order for them to sit evenly). Next I stacked the ice cream cones on top of each other and placed them at the four corners pressing them into the cake so it looked connected and put a little extra icing between the cones and the cake to smooth it all out.
I placed 2 toothpicks in between each cone tower for stability. I put a thin layer of pink icing on the sugar cones and rolled them in the purple sugar sprinkles and placed them on top of the four corner towers and one in the middle on top of the dowel rod. I used the last container of white buttercream icing and divided it into 3 parts, one with very little white for the door and windows, one mixed with green food coloring for the ivy, and one mixed to make purple for the flowers and border.
Then I used a piping kit to decorate (well, try to decorate) the cake. Then I placed 5 princess figurines around the cake and it was ready to eat.
I hope this has helped you out! Just have fun and be creative and I’m sure your little princess will love it!
Related cakes:
 12+ Coolest Castle Cake Ideas – Awesome Homemade Castle Cake Designs!
  12+ Original Homemade Princess Castle Cake Ideas
  12+ Coolest Disney Princess Cake Ideas – Awesome DIY Cake Decorating!
  12+ Pretty Homemade Princess Cakes
  12+ Inspiring Homemade Princess Birthday Cake Ideas
  10+ Coolest Princess Cake Ideas
  1st Birthday Princess Castle Cake
  Fabulous, Built-to-Travel, Rainbow Castle Cake
Your comment has been sent successfully.