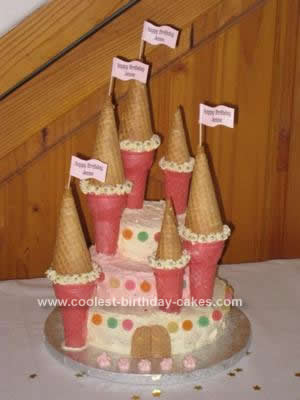
I made this Princess Castle Cake Design for my daughter’s 5th birthday party. She asked for a Fairy Princess party so I made a Fairy castle cake. She loved it and kept telling me how beautiful her cake was. I got the original idea from the Disney Family Fun website (their Towering Sand Castle cake) and modified it to make it a princess castle.
This is what I used:
1 x 20cm diameter round vanilla cake
2 x 15cm diameter round vanilla cakes
butter icing (I coloured half pink and left the rest white)
piping bag and nozzle
wafer biscuits
6 flat bottomed ice cream cones
6 wafer ice cream cones
sweets to decorate (I used silver balls, jelly tots and edible glitter)
tooth picks
Flags (made with cardboard and tooth picks)
Method:
Ice the 20cm cake with white icing and place on a cake board. Ice one of the 15cm cakes with pink icing and place off centre on top of the 20cm cake. Trim the 2nd 15cm cake to make a 6cm circle. Ice this with white icing and put it on top of the 15cm cake. Sprinkle with edible glitter.
Secure 4 of the flat bottomed ice cream cones onto the cake with tooth picks punched though the bottom of the cone (one cone sits on the cake board and can be secured with a blob of icing). Insert the flags into the top of the wafer cones. Spread some icing around the top of the cones and place a wafer cone on top of the flat bottomed cone to make the roof.
To make the smaller towers cut the top off of 2 of the flat bottomed cones with a serrated knife. Cut the base of 2 of the wafer cones off with a serrated knife and attached to the flat bottomed cones with icing.
Pipe icing rosettes around the cones to hide the join.
Decorate with sweets and glitter as you like. I put a silver ball in the middle of each icing rosette and put jelly tots around the edge of the 3 layers. I trimmed a couple of wafer biscuits to make the doors on the bottom layer.
Related cakes:
 12+ Coolest Castle Cake Ideas – Awesome Homemade Castle Cake Designs!
  12+ Original Homemade Princess Castle Cake Ideas
  12+ Coolest Disney Princess Cake Ideas – Awesome DIY Cake Decorating!
  12+ Pretty Homemade Princess Cakes
  12+ Inspiring Homemade Princess Birthday Cake Ideas
  10+ Coolest Princess Cake Ideas
  1st Birthday Princess Castle Cake
  Coolest Pink Princess Castle Cake
Thanks for sharing the idea! This will be perfect for my daughter’s birthday.