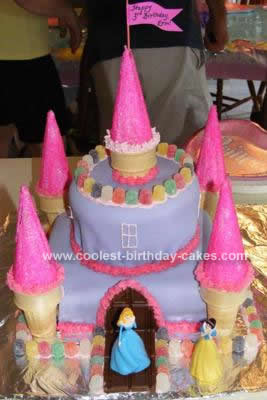
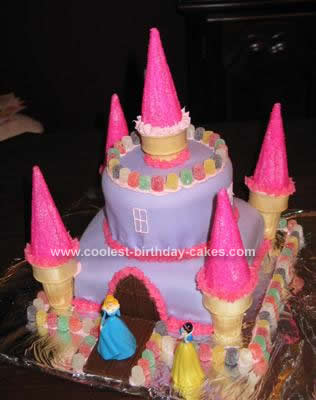
I saw a Princess Castle Cake Design in the movie “Knocked Up” and thought, I want to try that! So I planned a princess-themed party for my daughter’s 3rd birthday just so I could try making the cake. I knew Wilton had a castle kit, but I thought the idea of using ice cream cones looked fun so I wanted to do it all without a kit. So I came to this website and of course found plenty of other great ideas for my cake.
I was trying fondant for only the 2nd time – I wanted the cake itself to be smooth. As you can see, the top round layer’s fondant didn’t quite lie right at the bottom, but that’s my only complaint so otherwise I’m very happy how this turned out.
This cake probably took me 7 hours total to make, but I spread that out over 3 days. I baked the cakes 5 days before the party and froze each layer separately. I used boxed mix, the bottom is one box making two 9-inch squares, the top is another box making two 6-inch rounds (with enough batter from that box left over to make 6 cupcakes, which you could use for the towers instead of the bottom ice cream cones).
Then 3 days before the party I took the cakes out and iced them with buttercream while they were still frozen. I then refrigerated them for a day until I was ready to do the fondant. Also 3 days before, I prepared the pointy ice cream cones…I iced them with store-bought strawberry frosting (just because it was pink) so they would be sticky, then rolled them in hot pink sugar.
Two days before the party, I did all the rest. I bought pre-made Wilton white fondant and colored it using the Wilton purple coloring. I put the fondant on the bottom layer, then on the round layer, then after trimming the fondant, placed that layer on top of the other. That was hard, I think I have to learn a better way. Also, this round layer was 4 inches tall, and the bottom fondant didn’t lay nicely…more learning to do.
I then decorated with the pink icing all around the edges. I cut a hole in the top to fit the ice cream cone. I also cut out small portions of the corners so those ice cream cones would fit nicely. I used toothpicks in the lower cake cones to hold them in, but also iced between the cone and cake to help them stick.
I used a Hershey bar for the door and bridge. I planned on using licorice strings for the drawbridge chains (like several other cakes did on this site), but it was curved and wouldn’t sit right so I nixed that idea. I iced where I was placing the chocolate and the gumdrops so they would stick. I got the princesses at the dollar store. I recommend putting the hole in the ice cream cone for the flag toothpick before icing/sugaring it, I didn’t do it until the end and pieces of the cone broke off, I almost had a heart attack.
I got so many compliments on this cake. It was a lot of effort, but worth it I think! The princess guest of honor and all her little princess friends loved it, as did their moms!
Related cakes:
 12+ Coolest Castle Cake Ideas – Awesome Homemade Castle Cake Designs!
  12+ Coolest Disney Princess Cake Ideas – Awesome DIY Cake Decorating!
  12+ Pretty Homemade Princess Cakes
  12+ Original Homemade Princess Castle Cake Ideas
  12+ Inspiring Homemade Princess Birthday Cake Ideas
  10+ Coolest Princess Cake Ideas
  Coolest Princess Castle Cake
  1st Birthday Princess Castle Cake
Your comment has been sent successfully.