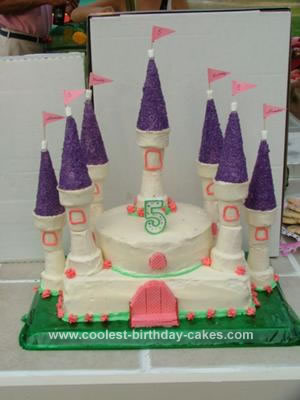
My daughter wanted a princess castle cake for her 5th birthday party, so with the help, tips and ideas from many cakes on this website, I embarked on my own adventure to make this cake. I used 2 13×9 pans for the bottom layer and 2 8 inch round pans for the top.
A few days prior to the party, I baked the cakes and once fully cooled, I froze them. Then I started to make the turrets. I dipped into vanilla wafers all the cones. I dipped the wafer cones in white melted wafers (from Michaels or AC Moore) and the sugar cones in purple melted wafers. I used purple for the top so that it was less noticeable if I had an imperfection as I was covering the top with purple sugar (Wilton). Once I dipped them, I put them on a piece of wax paper and let them dry. Given that they weren’t perfectly smooth, I took a very sharp, small knife and shaved any imperfections that I saw. It wasn’t perfect, but close enough. This took about 2-3 hours as I had to dip 24+ cones. I made extra in case I broke one.
Then two days prior to the party, I made little flags with her name and her age – I used construction paper for this and taped them onto toothpicks. This took about 30-45 minutes to do.
The day of the party – I defrosted the cakes and cut them so that they were perfectly sized and had no bumps. I made my own butter crème frosting. I make 5 batches of white butter crème frosting which allowed for various layers of frosting to ensure as smooth a layer as possible. The key to frosting this cake is to be patient and have a freezer big enough to put the cake into in between frosting layers.
So I frosted the 13×9 and made a crumb coat. I put this in the freezer for a few minutes. Then I frosted the round ones and did the same as the above. I did this about 3 times each. Then I put the round cake on top of the oblong cake. Now the fun begins.
I purchased wooden dowels (Walmart, Michaels or AC Moore has these). I drilled a hole in every wafer cone in the middle of the bottom. I put one wafer cone upside down, then one right side up on top of that. Then I put the dowel through both of them and stuck the dowel through the cake. This secured the two cones onto the cake and made them very straight. I then ‘glued’ with melted white wafers the two cones. Then I ‘glued’ the purple sugar cone on top of the top wafer cone. I did this 7 times. Two on the tray/base, four on the corners of the 13×9 cake and one on the top layer. The cones on the tray were also ‘glued’.
I then ‘glued’ a miniature marshmallow to each top of the sugar cones and then put a flag on each. I used pink wafer cookies for the doors and windows and licorice for the drawbridge sides. I also colored my white butter crème frosting green and pink and made grass, windows and flowers around the perimeter of the cake. The assembly took about 4 hours.
Overall this cake took about 7-8 hours to complete and it was a HUGE success and the talk of the entire day. And the cake was delicious and super moist. It was well worth it and I am up for my next challenge. Best of luck!!
Related cakes:
 12+ Coolest Castle Cake Ideas – Awesome Homemade Castle Cake Designs!
  12+ Original Homemade Princess Castle Cake Ideas
  12+ Coolest Disney Princess Cake Ideas – Awesome DIY Cake Decorating!
  Coolest Princess Castle Birthday Cake
  Coolest Princess Castle Cake Design
  12+ Inspiring Homemade Princess Birthday Cake Ideas
  Coolest Homemade Castle Birthday Cake
  12+ Pretty Homemade Princess Cakes
Your comment has been sent successfully.