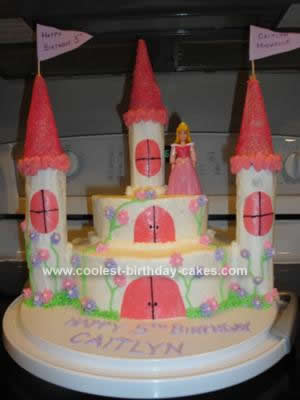
This is the Sleeping Beauty Castle Cake I made for my daughter’s 5th Birthday. She wanted a Sleeping Beauty Castle cake. Having 2 other daughters I was not looking forward to doing yet another castle cake (I find them difficult). Until this one. I am most proud of this one. I searched online and found a cake on flickr by Simply Sweets that I made my cake from.
I baked a traditional 9 inch layer cake for the bottom with one box of cake mix and the top is a 6 in cake. It’s a Wilton cake pan. I’m not sure how much batter I used as I just used what was left after making mini cupcakes (that were sent to school). I filled it about 1/2 – 2/3 full. I made a delicious buttercream frosting.
I frosted the 9 in cakes and 6 in cake and allowed them to “crust”. Then from a tip I got from a cake decorating class I took, I used a very smooth papertowel (no print indented in the towel) to put it over the cake and lightly rubbed it all over to make the cake look real smooth. I put the 6 in cake on top and smoothed that one out too. I tinted my frosting the appropriate colors.
I then took sugar cones and dipped them in melted pink wafer chocolates and sprinkled them with pink Wilton sprinkles and set them aside. I took 2 empty paper towel rolls and cut them down to the size I liked and one toilet paper roll. I wrapped them all in packing tape making sure to fold the ends in so no frosting got on the paper rolls. I then frosted each roll with the buttercream frosting let them crust and smoothed them out. I placed the rolls next to and on the cake.
Then I had strawberry Laffy taffy candy that I put in the microwave for a few seconds to get it soft. I kneaded it in my hand to “mix” the color well and then rolled it out using a rolling pin. I cut the shapes for the windows and door and placed them on the cake and piped black frosting for the decorations. I then placed the cones on top of the rolls (carefully) and piped the pink frosting around the cones and rolls to “seal” them together. I piped white frosting in the spaces between the rolls on the sides of the cake to seal it to the cake and around the tube on the top of the cake where the cake and tube meet to make sure it held in place as well.
I then piped flowers using a star tip with pink & purple frosting and then green frosting for the grass and vines. The doll, which is not proportional to the cake (oh well) is just a doll my girls had (it’s like a Polly pocket but a Princess Aurora). When I was done she said “thank you for making my special cake mom.” And that’s all I needed to make up for the backache of standing for 4 hours to decorate it all.
Related cakes:
 12+ Coolest Castle Cake Ideas – Awesome Homemade Castle Cake Designs!
  12+ Original Homemade Princess Castle Cake Ideas
  12+ Coolest Disney Princess Cake Ideas – Awesome DIY Cake Decorating!
  Breathtaking Homemade Dragon and Castle Cake
  1st Birthday Princess Castle Cake
  Coolest Pink Princess Castle Cake
 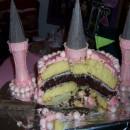 Coolest Sweetpea Beauty Veggie Tales Princess Castle Cake
 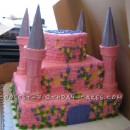 Pretty Pink Princess Castle Cake
Your comment has been sent successfully.