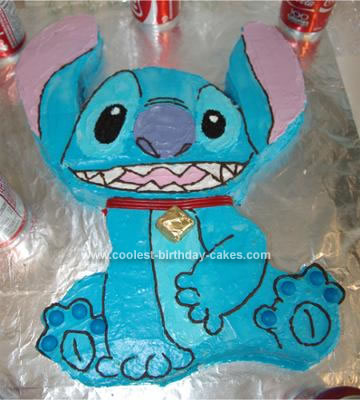
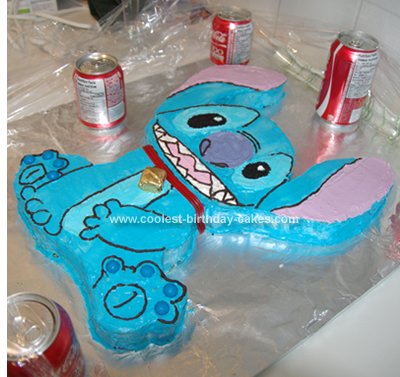
I made this Stitch Birthday Cake for a friend’s birthday. It was my first attempt at anything other than a regular pan shaped cake with one color of icing.
I really had no idea how much of anything that I needed for this cake, so I bought four regular tubs of icing, three vials of blue coloring, and one each of green and red colouring. I also bought Cake Mate chocolate icing in the tube, and a nozzle to regulate the flow.
I used cake mix with the little colours in it, and made two 9 x 13 cakes. When they were done, I chopped off the middle part of the cake that rose during baking, and flipped the cakes over to get a level surface to begin decorating on.
Before cutting and icing the cake, I froze the cake for approximately 36 hours. I doubt you need to freeze it that long, but this really helped with both the cutting and the icing of the cake.
I found a picture that I liked of Stitch before I started this process, and simplified the picture a bit. You’ll notice that I removed his claws, and left the notches out of his ears. With my final design for the cake, I took a knife and marked areas of the uncut cake to ensure I could fit the proportions of the drawing.
If you gently draw on the top of the cake with the knife, you can make as many mistakes as you want, because the icing will cover it up. When you have the shape you want, make your final cuts. Make supporting cuts from the outside of the cake, so you can easily remove the pieces you are trying to cut off.
I made the left ear from a large piece of scrap cake that was cut off from the top. I also had to use a small piece of scrap to support part of the cake near the left ear to keep it level.
With the cake cut (it took about 20 minutes), I threw the cake back in the freezer for a few minutes while I mixed the icing. I had never mixed colored icing before, so I was a bit unsure of what I was doing. As you can see, there are a number of colors of icing for this cake. I made most of the colours from two bases.
I started with the light blue, which is found on the middle and around the eyes. When I had mixed in enough to get a color I was happy with, I took out a bunch of icing and set it aside. I then continued in the same bowl to get the darker blue. This took a lot more blue coloring, and some red (not much, but it helped darken the blue a bit). Worried that I had used too much coloring, a quick taste test confirmed that the icing still tasted fine.
I did the same thing with the two colours of pink (mouth and ears). I started with the color for the mouth, and then portioned some for that, and added some blue for the ear color. I was fortunate that my first mixings yielded the colors I ended up using.
I finally finished with the nose color, using the dark blue, and continuing to add red and blue until I got the shade I wanted.
To ice the cake, I started with the light blue (which later proved to be a bit of a mistake – keep reading). After the light blue, I finished up the dark blue, followed by both pinks, and the white for the teeth. The nose was iced last. If I had to do it again, I would start with the parts which required the most amount of detail (the mouth and belly). Precision icing is easier without having to worry about the rest of the cake.
With the icing completed, I went on to the line work, which I used the Cake Mate chocolate icing for. The nozzle wasn’t as good as I had hoped, but after a bit of practice, it wasn’t too bad. The weak spots were the hands (I’m not very good at drawing hands without using a pen or pencil), but overall I was happy with the way the line work turned out.
For the actual eyes, a bit of white icing was layered on top, along with more light blue icing, and then two paper tubes were constructed for each eye. One paper tube would go around the white icing (to preserve the color), and the other paper tube was the shape of the outside of the eye. With the tubes in place, oreo cookie crumbs were sprinkled in the large tube, being careful not to drop any in the smaller tube. This process was repeated for the other eye, and light blue icing was used to touch up around the eyes.
The toes are blue Skittles, from a pack of the Tropical kind, I believe. Smarties were the first choice, but the new color scheme does not include blue. The Skittles were a better size anyways. Three strands of Pull and Peel licorice are the collar around the neck, with a single piece of chocolate wrapped in gold foil as the medallion on the collar.
Please note that the soda cans in the picture were there to keep the plastic over the cake. The picture could not be taken exactly above the cake, and so the ears look a little shorter than they are.
I think I’ve included it all.. Hope that you enjoyed the explanation and the picture of this Stitch Birthday Cake!
Related cakes:
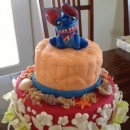 Coolest Stitch on the Beach Birthday Cake
  12+ Coolest Peppa Pig Cake Ideas
  12+ Coolest Minnie Mouse Cake Ideas
  12+ Coolest Mickey Mouse Cake Ideas
  12+ Coolest Frozen Birthday Cake Ideas for the Ultimate Frozen Theme Party
 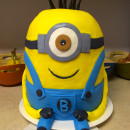 Coolest One Eyed Minion Cake
 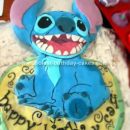 Cool Homemade Stitch Birthday Cake
  Coolest Yo Gabba Gabba Birthday Cake
adorable where did you find the stitch cake pan????