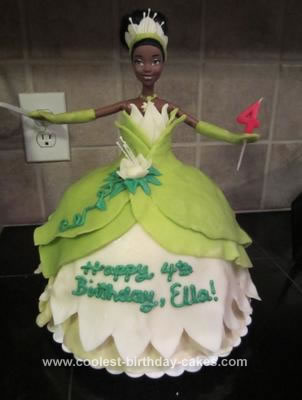
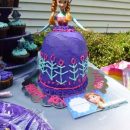
For my daughter’s 4th birthday she requested a Tiana ice cream cake and I’ve always wanted to do a doll skirt cake. I also had been wanting to try using candy clay as an alternative to fondant, as it tastes much better. For the candy clay I melted 13 oz (1 bag) of the Wilton candy melts in the microwave for 1 min, stopping to stir every 20 seconds, then stirring in 1/3 cup light corn syrup at the end. You cover it and let it sit for at least 1 hour. The longer it sits, the less oily it became and the easier it was to use.
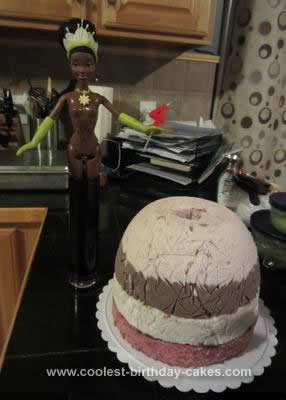
I lined a stainless steel bowl with plastic wrap, then wrapped a cardboard paper towel roll loosely stuffed with aluminum foil (to hold its shape once the ice cream filled the bowl) with plastic wrap and stood it up in the middle. I did 3 layers of ice cream in the bowl; strawberry, chocolate, and vanilla, freezing each layer for a few hours before putting the next one on. I also drizzled caramel and chocolate between each layer. I also did a layer of strawberry cake on the bottom to give it some stability – I baked a 9 inch round cake, put it in the freezer for an hour, then cut a matching hole in the middle and cut the cake to be the same size as the ice cream base. When everything was solid, I removed the cardboard and unmolded the cake, used more caramel and chocolate between the ice cream and cake layer, then let it hang out overnight to get ready to be decorated.
For the doll, I started by covering her arms and hands with green candy clay. I found candy melts in my desired colors, but it is easy to tint it using food coloring. Using ample amounts of powdered sugar to keep it from sticking to the rolling pin or rolling surface, I rolled it out to about 1/4 inch thickness. It was hard to get it around her arms and fingers very well, but I used a small pair of scissors to cut around the border once I got it to stick to itself and used a toothpick to better mold the hand shape once it set up a little.
The candy clay was really easy to smooth and spread by hand, too, kind of like real clay. I stuck in the number candle so it would stay in place easily once the clay hardened. I made the crown by rolling a tiny green “snake” for the part that went around her head, then cut out white leaves that I attached with a little water and smearing the ends together. I let it rest on a portion of an egg carton while I was working on it to make sure the head shape was preserved.
I found some flower stamen decorations at Michael’s that I cut and stuck into the crown in the middle. The crown was a pain, as it kept falling apart, but luckily the clay was very forgiving and was easily repaired! Finally I made the flower by cutting 6 petals, arranging them in a flower shape and putting a ball of clay in the middle into which I stuck more of the cut flower stamens. I sprinkled a lot of powdered sugar in an egg carton cup and set it to dry in there to hold its shape overnight.
The next day, I rolled out a large circle of yellow clay and draped it over the cake for the first layer of the skirt. It fell mostly in a way I liked, which was good because the instant it hit the ice cream it hardened in that exact shape. I cut around the base with scissors and figured that it would be mostly covered by everything else so it didn’t matter too much. I poked a hole in the clay and stuck the plastic-wrapped doll legs and torso in, using the extra fondant to attach the doll to the skirt/cake more securely.
Then…back in the freezer while preparing the next layer. I did the white over lay in 2 sections to improve my efficiency, cutting a wax paper stencil out first. I did 2 curved rectangles, cutting the petal shape across the bottom, then put them on with some water and swooshed it onto the yellow clay layer. I used a toothpick to make some lines in the middle of the petals, too.
I cut 3 longer petals to do the front and back of the bodice, drawing lines on those as well. After a little more freezer time I did the green dress layer, cutting 2 large petals for each side, the top one slightly smaller than the bottom, and pressing and smearing it as needed to get it to stick. I used water to attach the flower, then after letting it refreeze for a bit I piped the green leaves, vine, and words.
The decorating part didn’t take as long as maybe it sounds, it just required some advance planning and time for freezing. My daughter loved getting to help with rolling out some of the clay, doing some of the cutting on the gloves, and generally supervising and offering suggestions. When she saw the finished cake she was speechless…and just jumped up and down, flailing her arms excitedly. It tasted really good, too – that’s basically a given when you use your favorite ice cream and coat it with white chocolate and corn syrup!


Your comment has been sent successfully.