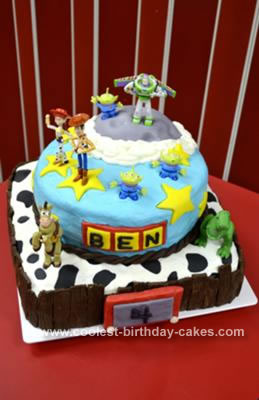
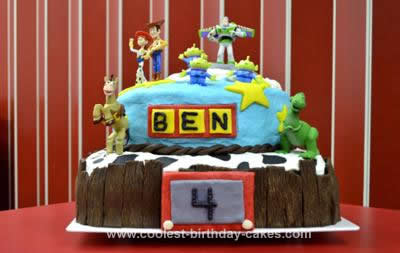
My son requested a ‘Buzz and Woody’ party/cake for his fourth birthday this year. I was happy to oblige. I employed the help of my amazing sister-in-law and between the two of us, and several hours of work, we constructed a totally awesome Toy Story cake!
I used a 12 inch square pan and baked two chocolate cakes. This took three cake mixes, so 1.5 cake mixes per pan. I mixed them all three up at the same time in a stand mixer. After the first cake was done baking I let it cool, removed it from the pan and then washed it to cool it off, then baked the second cake. The top layer of the cake was made with two 10 inch round white cakes. I used one cake mix per pan for those.
Once I had all of my cakes baked and cooled I made up a double batch of butter cream frosting. I use the recipe from Wilton.com, it tastes good and works great for decorating. I put one of the square cakes on a 14 inch plastic separator plate because I knew the cake was going to be heavy. You will most definitely need something sturdy. I spread some frosting on top of that layer and then added the second square cake. At this point I made another double batch of frosting. I then frosted the entire two layers with white frosting. The bottom layer was made to look like a cow.
For the cow spots I used a black sugar sheet. These are available at Wal-Mart, Hobby Lobby, JoAnn’s, etc. I simply used scissors to cut out random shapes and sizes of cow spots. At this point I starting applying the spots at random, about 1 inch down the sides and about two inches into the middle of the cake. You don’t need to cover the entire cake because there is a second round layer that will cover them up. They don’t need to go all the way down the sides because the ‘fence’ will cover that.
Next I put the first round cake centered on top of the square ones. For this layer I used sky blue frosting. I again made a double batch and tinted it sky blue. I spread some on top of the first round layer and then added the second round cake on top of that and proceeded to frost the entire round layer with the blue frosting. Be careful not to drop any on your white cow layer below. There is a rope detail that goes around the bottom of the round layers so it doesn’t have to be perfect but get it as close and neat as you can to the top of the square layer.
At this point we stopped and got the edible modeling clay out. NOTE: You will want to make this ahead of time and have it in the refrigerator while you bake and start assembling cakes. To make the brown we used 3 bags of milk chocolate chips and for the colored we used 2 bags of white chocolate chips and then separated it and dyed it the colors that we needed. The ratio of chips to corn syrup is usually about 1 bag (10-11 ounces) and 1/3 cup of light corn syrup but can be adjusted slightly if the consistency isn’t right. Do a search for it and you’ll find a plethora of good information.
Basically you melt the chocolate chips and then let them cool way down before stirring in the corn syrup. Then just stir and stir until it’s all incorporated and no longer ‘soup’ like and put it in the refrigerator to firm up. When you take it out it will feel rock solid, you will have to knead it. Get it out of the bowl and work in small sections if you need to and knead it until it’s a nice working consistency. But don’t overwork it or it will become too soft. It should be very similar to a tootsie roll, and it also tastes nearly the same.
For the fencing that is around the bottom layer we rolled it out to about 1/4 inch thickness and then cut out various lengths of ‘fence boards’. Then we used a toothpick to drag through it and give it the textured look like you see in the picture. You can also rough up the top edge if you don’t want it completely squared off. We dusted cocoa powder on each piece to add a little extra and take away from the ‘shiny’ look. I then just leaned them up against the bottom layer of the cake and pushed them in toward the top into the frosting just slightly. Do this all the way around the cake. Some of the fence will overlap your cow spots, don’t worry about that. It looks much more natural if there are spots half covered by the fence instead of all being above it with blank space.
The ‘rope’ around the bottom of the round layer was also made from the same edible chocolate clay. We simply rolled out two long pieces and then intertwined them. My sister-in-law used her finger nails to give it a little detail and make it look more like a rope. Then just wrap that around the bottom layer and push it into the frosting just slightly. At this point we decided to insert four dowels into the cake because it was taller than we had expected with all the frosting and very heavy. If you are not going to be transporting the cake you can probably skip this step.
Next move on to the white modeling clay and separate it out for the colors you will need. A small amount of red, a small amount of gray, a tiny little bit of white and then the rest will be yellow. I don’t use food coloring drops for any of my frosting or this. I use the Wilton gel dye. After you knead it add some of the gel color and then knead it until it’s evenly distributed and colored. Your hands will be colored as well but it comes off.
My next step included making the ‘moon’ that Buzz is standing on. I had some scraps of white cake that I had shaved off to level them. I crumbled those up and added some frosting to make it thick and kind of able to mold it into shape. I made it into basically an oval shape and situated it toward the top right side of the round layers. I then smeared a very big glob of the blue frosting on top of that to build it up. Using some of the gray modeling chocolate clay roll out an oval just slightly bigger than that mound on top of the cake. Lay it over the top and trim any edges if need be. Using some left over white frosting from the bottom square layers, use a large round tip and pipe on some ‘clouds’ all around the moon. This will cover up the rough edge of the gray clay so don’t worry about that part of it being perfect. I used the back of a rubber coated baby spoon to make the indention’s that you see on the moon.
Using two small star cookie cutters of different sizes we cut out a few of the larger stars and then a bunch of smaller ones. I put small stars around the outside edge of the top round cake. Just push them into the frosting. As long as you were liberal with the frosting and it’s nice and thick on the cake they will hold just fine. I placed a few of the bigger stars on the top.
Roll out a piece of the red clay and make small yellow squares for the name that will be on your cake. Luckily for me my son has a short name so we only needed three squares. Situate those on top of the red and then cut the red just slightly bigger but make sure it’ll fit on the front of the round cake layer. Don’t make this part too thick or it will be too heavy to attach to the front. Just like the stars, just stick it in the icing and it should hold fine. But just in case we did put three toothpicks through the yellow squares where they would be covered up by the letters. Tint a little white frosting black and after attaching that piece to the cake pipe on the name that you’d like on the cake.
Use red clay to make the Etch-A-Sketch. We made this fairly thick to make it realistic looking. Then use a small amount of gray to make the screen for the front, this will need to be thin. Also make two little white knobs and assemble it all. The clay should be tacky enough to just push it all together, it will harden and hold together just fine. I piped on a ‘4’ because it was for my sons fourth birthday. This piece was left aside and I leaned it up against the cake after we got it to the party destination. Same with the figures.
At this point it’s basically complete. Pat yourself on the back and congratulate your hard work! I made the cake the day before so that I wouldn’t have anything to worry about on party day. Put it in the refrigerator overnight and everything will harden up. I did ‘cheat’ and use Toy Story figures to put on the cake. But my son also got to keep them and it will remind him of his cake every time he plays with them. Once you get the cake to the party destination (for me I had to travel with it…..that was a stressful ride!) you can add the figures. The thick yellow stars were perfect for Woody and Jessie as they had very skinny feet and wouldn’t stand up in the frosting alone. If you are having trouble getting them to stand up toothpicks come in very handy.
That’s it….a super cool Toy Story cake! The best compliment came from our host at the party venue when he asked if I made the cake. He was blown away and said it looked like a cake from a local VERY expensive bakery in my area. We got many, many compliments on it. It’s a really big cake and very heavy. I will forever be indebted to my sister-in-law for all her help. Even with both of us working hard it took nearly 9 hours from start to finish, included baking the cakes. But it was worth every ounce of laughter and frustration to see the smile on my little guys face.


Your comment has been sent successfully.