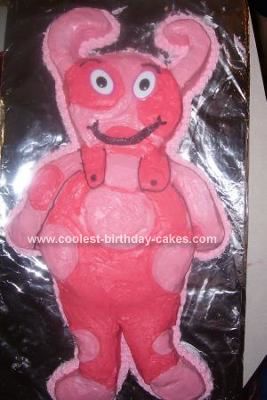
To make this Uniqua cake as shown, you will need:
Aluminum foil
14×20 piece of cardboard
3 boxes of cake mix (your choice)
10 inch round cake pan
2- 12 inch round cake pan
royal icing (stiff decorating icing)
red food coloring gel
black food coloring gel
stiff white card stock (for her eyes)
The evening before I made the cake, I covered a 14×20 piece of cardboard with foil. I reinforced the bottom of the cardboard with more cardboard because the finished cake is very large and heavy.
I also made the icing the night before. I used red gel to make 2 different shades of pink. I kept them separated and tightly covered until I needed them the next day.
I used 3 boxes of regular white cake mix. I followed the instructions on the box for making the cake, and baked the mix in two 12 inch and one 10 inch round cake pans. I allowed the cake to cool completely and smoothed off the top humps with a serrated knife. (Set the extra cake aside because it can be used as a filler if you make a mistake or have an empty space).
It is very, very important that you allow the cake to cook all the way through and then cool all the way through. Otherwise it will fall apart and collapse when you start to build it.
I used one 12 inch cake as Uniqua’s abdomen and the 10 inch for her head. The last 12 inch cake was used to make her antennae, arms and legs. To do this, I hand sketched and cut out from stiff card stock one each of her antennae, arms and legs.
To make sure both sides of her limbs were even, I turned the limbs that I just drew and cut out over and traced them onto another piece of paper. Now you should have stencils for her opposing antennae, arms and legs.
Place the patterns on top of the 12 inch cake pan and very carefully cut them out with a sharp knife. Don’t worry if you mess it up, icing can cover a lot of tiny mistakes.
Place the 10 inch cake pan onto the cardboard top-side-down, so that the part you shaved off is to the bottom. Be sure to leave enough space for her antennae. Beneath that, place the 12 inch.
Refer to a picture of Uniqua and correctly place her antennae, arms and legs. Use the royal icing to hold the different pieces together. If needed, use the extra cake to fill in spaces, then add icing to the top of that. Allow at least 2 hours for the icing to set.
Next, use a large ziploc bag (with the corner cut out) full of icing to fill in the spaces that might occur between her body and limbs. Add a crumb layer of the lighter pink icing (very thin layer). Allow this to set for at east another hour.
After the crumb layer sets, refer to a picture of Uniqua to figure out where to put her darker colors. I found it easier to once again use a large ziploc bag with a smaller corner cut out of it. I made her darker pink circles, filled them in, then smoothed the icing out with a wet butter knife. I used the same technique for the rest of her body.
For her eyes, I used the same technique as I did for her limbs. The only difference is that I used the actually card stock for her eyes- they were placed directly onto her face. I also used a pink marker to highlight the circumference of each eye. For her pupils, I used the black icing.
I finished up by using the black icing to trace out her overalls, eyebrows and smile. I used a caned strawberry icing (as a last minute detail) around the entire bottom of the cake.
Good luck and I hope your kids enjoy the Uniqua cake.
Related cakes:
 12+ Coolest Peppa Pig Cake Ideas
  Coolest One Eyed Minion Cake
  12+ Coolest Minnie Mouse Cake Ideas
  Cool Homemade Uniqua Birthday Cake
  Coolest Sponge Bob Square Pants Birthday Cake
  Coolest Monsters Inc Cake
  12+ Coolest Frozen Birthday Cake Ideas for the Ultimate Frozen Theme Party
  Coolest Uniqua Birthday Cake
Your comment has been sent successfully.