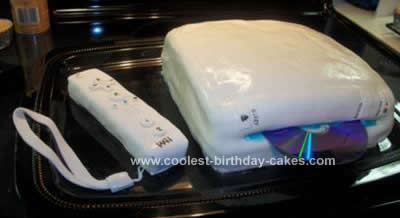
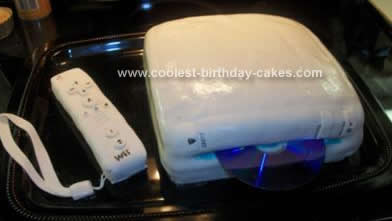
I made this Homemade Wii Birthday Cake Design for my son’s 10th birthday party, and it received amazing reviews! It’s truly easier than it looks. First, bake two 9-inch square cakes. After they cool, trim the top of each to make a flat surface. Then, add a filling of choice to the top of one layer; I used simple vanilla frosting. Carefully stack and do a thin crumb coat with vanilla frosting; this will ensure that the fondant has a smooth finish and adheres well.
Then, make a batch of simple marshmallow fondant using miniature marshmallows and confectioner’s sugar. You can find many simple recipes online. Roll to about ¼-inch think and transfer to the stacked cakes. You might find it easier to roll the fondant loosely on a rolling pin dusted with powdered sugar and transfer it that way. Gently smooth the fondant and neatly fold the corners. Be sure to smooth out large air bubbles. Trim the access from the bottom. To get a shiny finish, use a pastry brush to lightly brush water on the fondant.
For the remote, I did the same process but with Rice Krispie treats instead of cake. Now for the fun part: decorating! I used a Wii for my guide. Turquoise decorating gel works for the disk slot; you can add a real CD for the full effect. Cut the small shapes out of fondant for all buttons and affix them with a light drop of water so they will stick. I also used fondant to model the wrist strap for the controller. For the detailing, I used watered-down cake gel and a toothpick, carefully lettering the buttons.
Start to finish, this cake will likely take 90 minutes, and the impressive results will astound your guests.


very nice job! my son would love that too! I too, have become a fan of marshmallow fondant!!