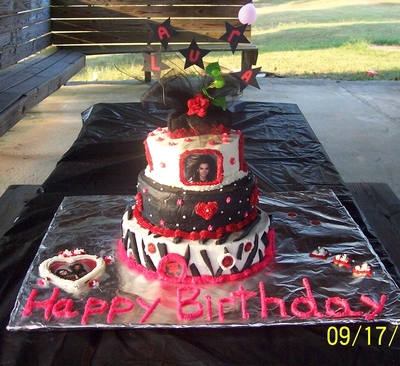
I made this cake for my daughter, Laura who wanted a Tokio Hotel cake with her own personality put into the cake. Little Miss Emo! She wanted a zebra stripe but with the band Tokio Hotel somehow mixed into the cake and using stars and hearts. Her favorite design. With a little help from one of my fellow cakers, we came up with a design that would satisfy my daughter. So, the first thing I did was look up some pics on the internet of this musical band. I did the early preparation for things inedible. I found and printed pics of the following:
Each band member (4)
Tokio Hotel logos (in large and smaller sizes)
I laminated and cut around the edges leaving a small edge of laminate that I will later cover with buttercream without covering the pics. I made the “Laura” Stars on top with black posterboard, red lettering and thin wire taped to the back. I made the black tulle bow using a small piece of Styrofoam and the black tulle. However, the small silk rose and greenery are fake. I stuck the wires down into the Styrofoam so they wouldn’t be inside the cake. However, later I had to find a way to attach to the cake so it wouldn’t fall off. I used wires sitting inside of coffee stirrers. Only the coffee stirrers were inside the cake. NEVER put wires directly into a cake. They are NOT food safe!
I needed some extra height for each layer so I used what I call an extender/enhancer recipe. I used 2 Duncan Hines French Vanilla cake mixes and added the following as extra. Using this much gives it better balance and even heights of each layer. You have to double in this particular case as I used 2 cake mixes. Otherwise, you would cut this in half if you prefer to use 1 cake mix. Just make sure that you put in your mixing bowl everything you need for the cake mix and then add the rest.
2 c. flour
2 c. sugar
2 eggs
1 8 oz. container of sour cream
2 tsp vanilla
1 small box of dry vanilla pudding mix
½ c. water
Beat for approximately 4 to 4 ½ minutes until fluffy. It’s a lot of cake mix.
To make this 3 tier cake I used 10, 8 and 6 in round pans. I baked my cakes a week ahead of time, wrapped and double wrapped and put them in the freezer. I prepared a batch of marshmallow fondant in black. Use the below recipe but as you are melting the marshmallows add cocoa powder and black gel coloring. Then, proceed with the remainder of the recipe.
Ingredients
• 16 ounces mini marshmallows
• 2 pounds powdered sugar
• 4 tablespoons water
• shortening for greasing.
(This makes 3 lbs)
1. Put the marshmallows and water in a large microwave-safe bowl. Microwave on high for about 30 seconds, stir and put back in microwave for another 30 seconds until the marshmallows are all melted. The mixture will expand. Stir to incorporate.
2. Grease your work surface. I usually use a large cookie sheet.
3. Put about 3/4 of the powdered sugar on the cookie sheet and make a well in the center and add all of the melted marshmallows.
4. Grease your hands very well and then mix using your hands and knead the dough. It usually takes me 4- 5 minutes. Check the consistency of the fondant. It will probably still be a little sticky at this point. If it is, add some of the remaining powdered sugar and mix and knead again for a minute or so. Repeat this step until the fondant is firm and neither dry or sticky.
5. Make sure there are no flecks of dry powdered sugar remaining. Wrap in plastic wrap and let the fondant rest for at least 30 minutes before using.
Later, I rolled out my fondant and using a pizza cutter, I cut odd shaped stripes for the zebra stripes. I kept in an airtight container (to keep them soft and pliable enough to move).
I allowed the frozen cakes to thaw still wrapped until they came to room temperature, then iced the bottom and top in white and the middle in black buttercream. Laid the zebra stripes at different angles on cake attaching with a bit of water to the crusted buttercream. Using a Wilton #18 tip, I piped shell borders in hot pink around the zebra layer, red shells on the black layer and white on the top white layer. Then, using a Wilton #16 tip, I piped the hot pink stars on the black layer. I piped the white dots using a Wilton #3 tip and added red hearts using the same #3 tip.
Then, I added all the laminated Tokio Hotel logos/medallions around the zebra stripe layer and attached by piping with buttercream using a Wilton #18 tip. Did the same with the photos up top. Added the topper and piped a large heart around a picture of my daughter and the lead singer (photoshopped by a friend) and a few extra hearts on the other side of the cake board for balance. Needless to say, my daughter was absolutely ECSTATIC and jumping up and down for JOY when she saw the finished cake!! I really put a lot of work into this but it was well worth if for the reaction she gave!!


i friggin’ LOVE tokio hotel…and i friggin LOVE this cake…it almost looks like the one for my sweet 16