My name is Amy Cady, I am a self-taught, in home baker. I have a full time job, two kids, and currently a 160 mile round trip commute to work. I only make a couple cakes at max a week, and even that keeps me pretty busy. I finish most of my cakes Friday night and forgo my much coveted sleep to do so. I come from an artistic background. I studied art from the time I could hold a pencil or brush basically; and I believe it comes through in my cakes. I have previously submitted a few of my other cakes on here, but this one is unique. Now on to the details and process of making this cake…
About the cake:
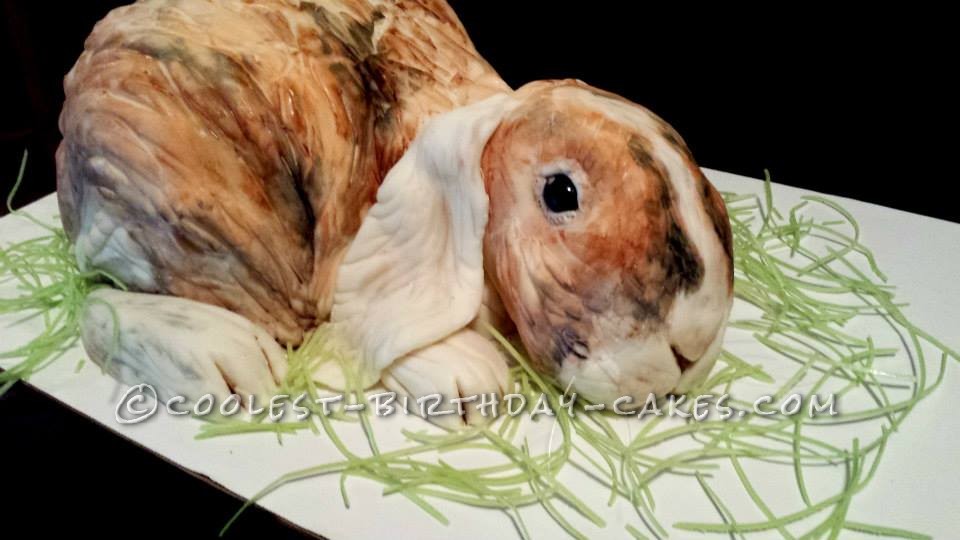
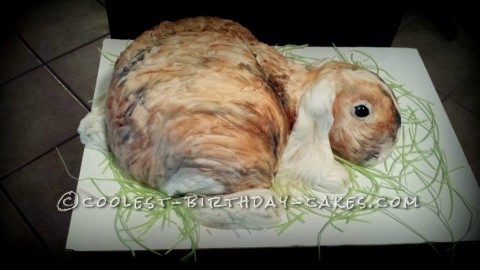
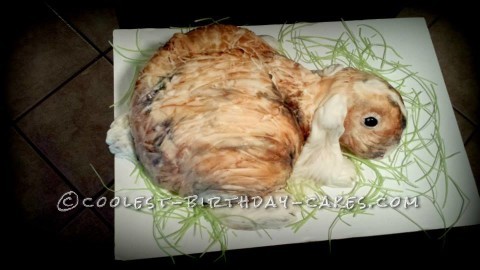
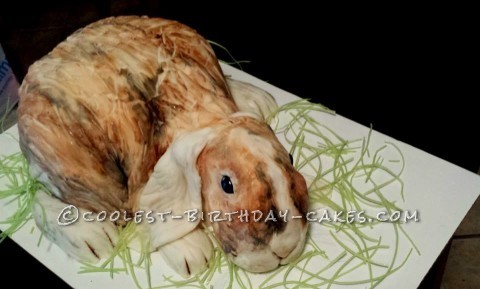
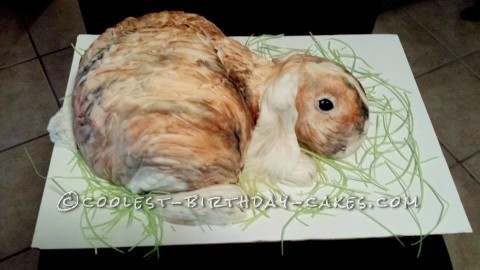
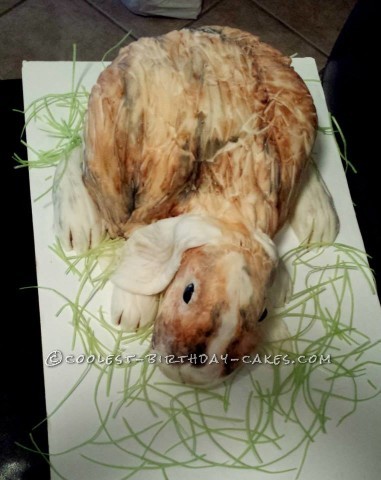
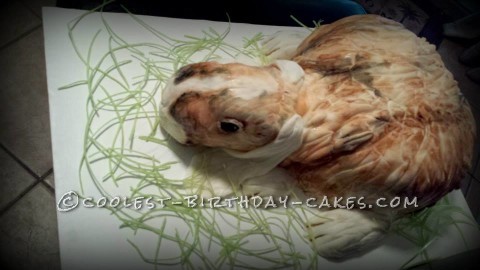
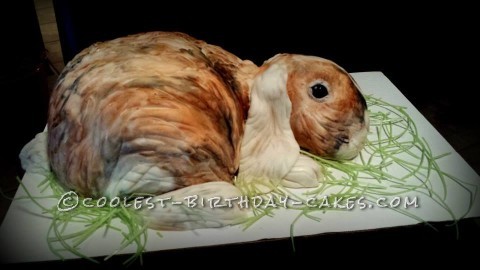
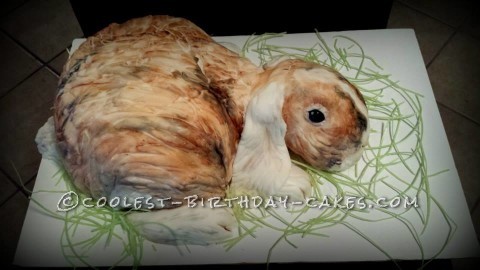
First off the entire cake is edible including the grass, except for the hard to see whiskers I added. The head and feet are both rice Krispy treat sculpted and cover with fondant. The body is sculpted white cake with a layer of butter cream then fondant. The color is painted on with food coloring and the eyes are black fondant painted with water to add a shine. All of the fondant used is my sometimes testy homemade marshmallow fondant.
The process:
I wish I would have taken pictures of this cake during the process, but I was in a hurry and didn’t stop long enough to do so. Therefore I will just have to describe in detail the process I used. First I baked 4 9×13 sheet cakes, cooled them, then layered them. I then put them in the freezer for about an hour. I used a long serrated knife to sculpt the shape of the body from the sheet cakes then crumb coated with butter cream. While the body sat I began working on the head and feet. I smashed together multiple rice crispy treats then sculpted them into the general shape of a head and feet.
Then I covered the head, feet, and cake in a normal smooth layer of fondant. To make the fur, I layered on small thick sections of fondant over the original fondant layer and cut into it using my clay sculpting plastic knife tool. I repeated this process until the entire body, head, and feet were covered with a fur like texture. I used that same knife to separate the bunny’s “toes”, and also to cut in the bunny’s nose. For the ears I rolled out the fondant, cut it into the general shape of an ear, and then used the same process as previously mentioned to make a fur like appearance on the ears.
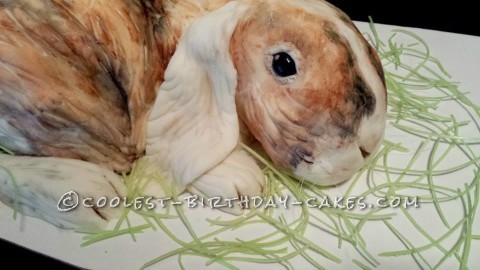
After attaching the ears I began painting the rabbit. I used a Wilton brown and black gel food coloring mixed with vodka to paint the color patterns on the rabbit. I used a picture of a real flop ear bunny to get a more realistic type pattern in the coloring. I also used a mix of black and brown to create depth between the bunny’s toes and nose. After all the painting I added black fondant eyes and a subtle eyelid of white fondant to add to the realism. I painted the black fondant with pure water to make it shine, and added a speck of white fondant to also represent the reflection in the eye.
To remove the sheen that the food coloring and vodka left on the “fur” of the body and head, I dusted the entire thing with cornstarch. Finally after some thought, I hunted down fishing line to add some realistic looking whiskers to finish it off. The edible grass around the outside is edible Easter grass that can be purchased at Wal-mart.
Tip:
My biggest tip in making characters or animals is adding eyelids, it makes the characters more realistic.
Related cakes:
 Coolest Bunny Birthday Cake
  15+ Cool DIY Monkey Cake Designs for the Birthday Cake Enthusiast
  5 Dinosaur Cake Ideas of Jurassic Proportions
  Coolest Bunny Cake
 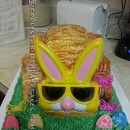 Coolest Homemade Bunny Cake
  Coolest Easter Bunny in Basket & Cupcake Cake
  Coolest Bunny Birthday Cake
  Sweet Homemade Easter Bunny in the Grass Cake