
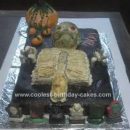
I made this skeleton cake for my 9 year old grandson for Halloween. The skeleton is made using the frozen buttercream transfer method. I love the FBCT method to decorate. I have made a few cakes thus far using this method and it is so easy. I love the fact that I only need buttercream to decorate a original cake. As you know cake decorating can be expensive so this is a low cost way to make a cake.
Just find a picture of what you want to make. You may need to copy the picture and then reverse the image and copy the reverse image. I did not do this with my pic because I think he looks fine looking the other way. Just remember when you’re making your transfer that you will be flipping it over to put it on the cake. This is why you may need to reverse your image, especially if there are numbers or letters on the transfer.
To make it, you…
- Put the picture on a hard surface
- Tape wax paper on top of the picture
- Outline the picture
- Then, place it in the freezer to harden so the colors won’t run and so you don’t accidentally move the outline of your picture when adding other colors.
There are a lot of video tutorials out there for you to watch on how to do this. I pop the picture in freezer between colors, just to firm it up. It is really just like coloring.
I made the tombstone and ghost by placing a cookie cutter on top of the cake and then outlining it. Then, I just filled it in. So easy!!!
In the picture the true colors did not come out on my cake, the skeleton top hat and jacket were a royal purple.
You have to try this method at least once and I know you will love it. Just think of all the endless cakes you can create without having to spend a lot of money to decorate them. I am already thinking of Christmas cake ideas. I hope you will try this method. Good luck!!


Your comment has been sent successfully.