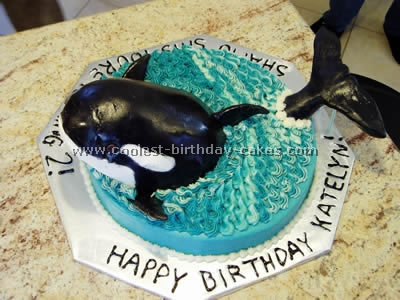
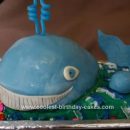
My niece wanted a Shamu cake for her birthday. I mentioned this to someone I know who told me that her friend made a killer whale cake for her sons’ birthdays and sent me a link to photos. The photos were amazing but I decided that I could do it! It required working with fondant which I’ve never done before but I love a new challenge!
Here’s how I did it: The base of the cake is a 12″ round (it would have been even better with an oval but I used what I had). It’s frosted with butter cream tinted with blue and just a hint of green for that turquoise water look. I put on a base coat of frosting in the blue and smoothed it. The whale’s head is made of marshmallow cereal treat that I formed into the right shape while still warm (but not hot). I frosted it in butter cream and then covered it in marshmallow fondant (made from a recipe that I found online and colored with black).
Because I’ve never worked with fondant before I’m not sure I got it quite the right consistency so there was some cracking but it looked great anyway. I cut away the fondant in the proper shape for the whale’s coloring and cut out holes where you see the white spots on the side. Then I smoothed out the white butter cream with a Viva paper towel where there was no fondant. I added bits of frosting where necessary to help the transition from black to white look clean and seamless.
I placed chocolate chips pointy side in for the eyes. (They’re hard to see, black on black but that’s how it is on the real whale). The whale’s tail and fins are made from molding the black fondant. The tail was molded around a wooden dowel so I could stick it in the cake. The tail needed either more time to dry out (I gave it a couple of days) or it needed to be not so thick and heavy. I ended up breaking it as I assembled the cake and it was held together with a toothpick. And then the tail was much much too heavy for the cake to support so it was held up by two pieces of plastic straw. (Moral: either make the tail much less massive or make it out of cereal treat and cover like the whale’s body). An added touch was to rub Crisco on all the fondant whale parts to make them look wet!
Next I took a frosting bag and striped it with white buttercream and filled it with the blue from the base cake. After placing the whale’s parts I piped on “waves” on the top portion of the cake around the whale and the white striping in the bag made the water look foamy. It was hard to keep the amount of white consistent but this ultimately ended up looking great on the cake! (In the end I ran out of blue frosting and used just white around the tail which I didn’t put on until delivered to the party site and that ended up looking great too).
If you’re going to make a cake like this one leave yourself lot’s of time. I made the fondant one day, the tail another day, the fins another day, the body form another and then completed the body another day. And that’s before I even baked the cake part! It was quite time consuming but fun and rewarding! My two-year-old niece loved it! She sat with her elbows on the counter staring at it for quite a while!

great job!
I love it looks great. You are very talented
This is incredible. I made a Jaws cake (also on this site) and would also say you could use caramels to mold the tail and it would be a bit lighter weight than the fondant. But I can’t tell the tail was damaged. This cake is insane it is gorgeous!
That’s an amazing cake! I’m going to try to make it!
This was so helpful. My five year old wanted a Shamu cake and when I saw this it was the best! The fondant wasn’t too hard to make for my first time. I never would’ve tried it if I hadn’t seen this cake! Thanks for sharing!!
Wow I think i will try this for my best friend’s birthday! She is turning 13 and after we take her to Sea World it will be in the hotel room! Thank you again so so much. She is GOING TO LOVE IT!
Impressive and beautiful!
Keep up the great work, you can never tell it
was your first time working with fondant.
GREAT JOB !!!!!
she is cute I wish I can see her but I live some where in Arlington tx . i want to send her a cake on her birthday
WOW THAT’S SO COOL I LOVE THAT CAKE ITS AWESOME ITS SO REAL I WOULD LOVE TO HAVE THAT CAKE IF I WERE THE BIRTH DAY GIRL OR WOMEN I WONDER WHO DID THE CAKE
My daughter has been requesting a Shamu birthday cake for about the last nine months so I am going to have a try at making one for her third birthday. I thought the cake you made was fantastic but hoped you might be able to tell me what a marshmallow treat is in order that I can see if we have anything similar here in the uk. I had been planning to make the Shamu body out of cake but something I could mould sounds a much better plan. Also is marshmallow fondant icing similar to fondant icing?
Many thanks for any help you might be able to offer.
this cake is awesome
Thank you all for your wonderful praise! I do have to say that after all the cakes I’ve made (for my kids and nieces and nephews — not professionally) this is my absolute favorite.
Alison (UK), rice crispy treat is made with breakfast cereal mixed with melted marshmallow and usually some butter. You can find recipes online. I used cheerios cereal rather than rice crispies cereal for this cake and it worked well. Normally you can just melt the marshmallows in the microwave and then mix in the cereal. (Grease up your hands to help prevent sticking.) Mold it right away because as it sets up it becomes hard to work with. Marshmallow fondant is just like regular store-bought fondant to work with (although I’ve never actually used store-bought) and you can find recipes for that online. It’s sometimes called MMF.
Recently, I’ve also purchased gum-tex powder which, when mixed in with the fondant, makes it easier to work with and dries hard more quickly.
Thanks again for all your wonderful comments.
My daughter sent me the link to your cake. I think it was modeled after one I did. Nice job! The original one was formed totally in cake and buttercream. If you want to learn even more cake decorating techniques, check out this local organization http://www.massices.org
that cake is so amazing it look like buddy from cake boss made it.it looks like the real shamu,too.
my daughter has to have a whale cake i have never messed with anything like this so my only question at this point is how did you get it black???