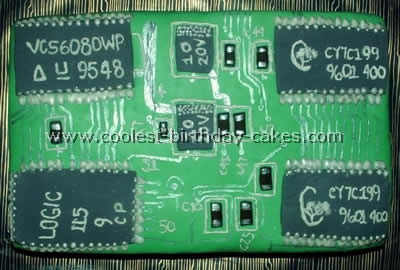
This amazing cake design was made for a woman’s boyfriend who is an engineer. It was a rush job [only one and a half days notice] but I think it turned out really well. I wasn’t exactly sure what a circuit board looked like so the woman sent me a few photos and I just copied one of them.
I baked a chocolate/yellow marble cake in two 13 x 9 cake pans. After they cooled I carved all of the sides to make them straight. I iced between the two layers and then placed on the wrapping paper covered cake boards [two cake cardboards]. Next I crumb-coated the cake with buttercream icing. I then covered the cake with white chocolate fondant. Ahead of time I had made the circuit board pieces out of fondant. I attached the pieces to the cake with a little bit of water brushed on the back. After the pieces had set I painted the silver parts with silver fondant glaze. Then with royal icing I piped the prongs on the pieces and also painted with the royal icing for the white parts.
The woman said that the amazing cake design was a big hit at their party and that it tasted fantastic.
More Circuit Board Cakes
Cake by Gala D., Tel-Aviv, Israel
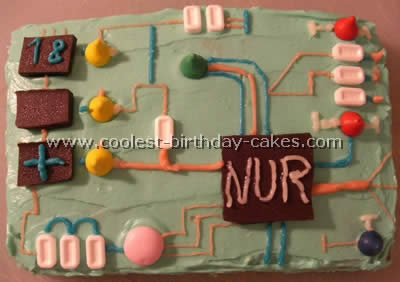
I was inspired by a circuit board cake submitted on this web site! I, just thought this amazing cake design was so original I had to do it! I made this cake for my
boyfriend’s 18th birthday and due the fact he was an electronic enthusiast- it was perfect!
I used a basic frosting (sugar, butter, milk) and colored it green (for the cake base), blue and pink (for the connecters), and before coloring the frosting I left a small amount of on the side so I would also have white for the writing on the chocolate.
The pink candy on the cake is a strawberry Mentos, the white bricks are PEZ candies, dark chocolate for the batteries, the colorful bits are Hershey Kissables. To pipe the frosting I used a paper baking sheet rolled together, after rolled you cut the tip in the wanted size.
A nice personal touch could be to add the name and/or age of the receiver of the cake. In my case I did both.
Cake by Jennifer B., Round Rock, TX
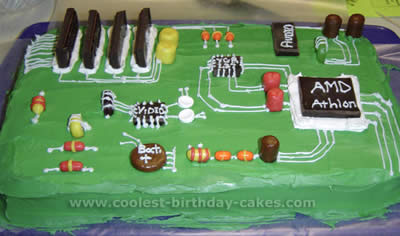
For my husband’s birthday, I wanted to come up with an amazing cake design and do something really creative and original. I always try to make each birthday cake an original creation to help mark the occasion. My husband is a “techie” so I was thinking about computers/computer parts. I came up with making a sheet cake that looked like a circuit board from inside.
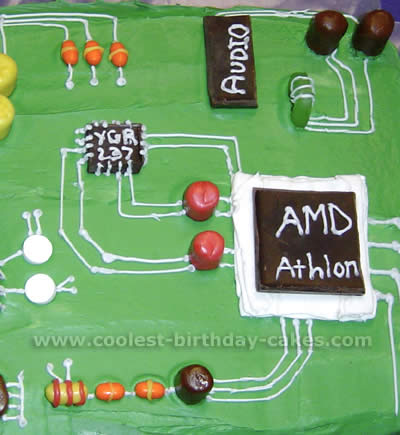
I went on Google and did some searches on “circuit board” images to give me some idea of how they look, so I would know what to begin with. I then went to the grocery store and stocked up on different candies to make the resistors (horizontal cylinders) and capacitors (upright cylinders). The best medium I came up with for reshaping was TicTacs, Starburst candies, and Tootsie Rolls.
I softened up the Starbursts and portioned them out to make the cylinders of different sizes, as well as the little “bands” that went around the resistors. I also softened up the Tootsie rolls (I was using the microwave) and reshaped those into flat discs (batteries) and cylinders.
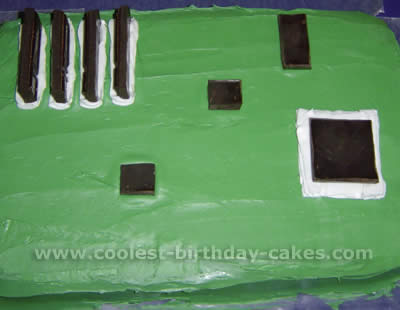
I then took a bar of Hershey’s Special Dark and scored it on the backside to make my memory chips, Athlon chips, and Audio and Video chips. I started with a 9×13 sheet cake (I chose a marble flavor). After the cake cooled, I iced it in a bright green – to represent the plastic base of most circuit boards (I was told they also come in bright red and electric blue).
The next step was applying some white icing as “ports” and putting the candies in place. I made 4 long slots for the memory cards, and a big white square for the processor chip. With both items, I laid on three layers of icing to give depth. NOTE: with the memory slots, I added a bit of white icing post-install because the chips pushed the icing down too far for it to look like the slots were holding the chip in place.
I put the cake in the fridge to firm up the icing for about 20 minutes, and then went back in to add the “traces.” Traces are the tracks where the wiring goes through the circuit board to connect the various parts. I tinted white icing to make a pale gray, and made some freehand lines to represent the traces.
Most of the chips needed connectors – hence the dots all along the sides of the audio and video chips. This was not done to be accurate, but rather representational. After the traces were on, we were done! I received many compliments, and a few friends at the local AMD office in Austin even asked permission to post the cake on their bulletin board.
My husband was thrilled with his amazing cake design and I’m proud to share it here! Good luck with your own amazing cake design ideas!