
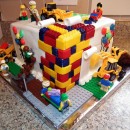
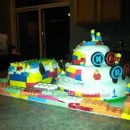
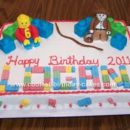
I made this homemade birthday Lego cake for a boy who turned 5 and adores Legos. Everything about this cake was homemade. I used two 9×13 moist yellow cake from scratch. I made homemade buttercream for filling. This is not the best icing to color if you want a vibrant color. Then to frost the cake, I made vanilla buttercream frosting with powdered sugar added, to stabilize the icing for warm weather and for the gel paste to work.
I then cut the cakes into 3 rectangles and I cut the 1 rectangle into 2 so I end up with 2 squares. I tinted the icing with blue, yellow, red and green. I crumbed coat all the cakes and refrigerated them for 30 minutes so the icing sets.
I took out one cake at a time, put a lot of icing starting from the top. Make sure to put a lot so the icing slides down the sides of the cake. Then work the sides first. While doing this, you will end up with a lifted icing on the top edge. Slide your metal spatula from the edge going in the middle of the cake. It helps to have a hot water, dip your spatula in the hot water and wipe with a towel. The heat on the spatula will melt the icing a little bit so you end up with smooth and shiny icing.
For the round things on top of the bricks, I cut jumbo marshmallows in half. It helps to refrigerate them as soon as you buy them and after you’ve cut them as well. Using a fork as a handle, apply a heaping tablespoon of icing and remove the excess. Again, dip your spatula in hot water and wipe. Using a pair of scissors, remove the iced marshmallow from the fork and lay it on a baking sheet with parchment paper and refrigerate until ready to be put on top of the cake. Do the same thing with other colors.
I covered the cake board with green paper and using the icing as glue, I put some underneath the cake to keep the cake from sliding. Then I also “glued” the marshmallows around the board to make it look like a Lego base.
For the greeting, I melted Wilton melts using 50% power. Pour in a mold and refrigerate until set. Using the same icing, I piped the borders with blue icing, the greeting in red and the name in yellow first and red on top. The greeting is just leaning on the cake.
It was a lot of fun making this cake especially it was my first homemade birthday Lego cake.

Love the idea of making the Lego board!!
I love the Lego cake you made!! I was a bit intimidated at first, I haven’t tried something like this before, but yours made me think, wow I can try that!
Better start now, though, his b/day is in 2 weeks!