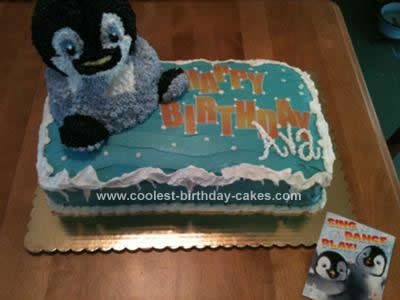
I made this Homemade Happy Feet Cake for my friend’s daughter. She wanted a “Happy Feet” party, and her mom had trouble finding a cake. The birthday girl was turning five.
This was a butter yellow cake with a chocolate filling. The icing was homemade butter cream and the black portions of Mumble’s body were Wilton’s chocolate icing with added black food coloring.
For the base of the cake, I simply used a 9 x 13 pan and made 3 cakes. Once cool, I cut off the edges as they were a bit tough from the Baker’s Joy. The filling was a homemade whipped chocolate genache (Google a recipe, SO simple!).
After layering the cake and leveling, I did a crumb coat in white butter cream icing and put it in the fridge to set (I find it easier to ice on top of a layer if the base layer is cold).
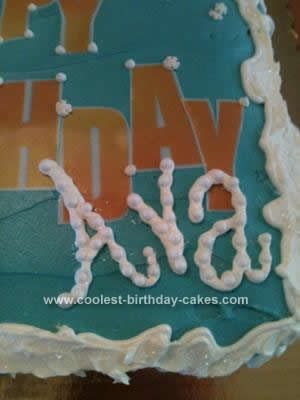
To decorate the base, I covered the entire cake in a teal buttercream, then added touches of white down the sides to mimic snow and icicles. I piped the birthday girl’s name, added white candy balls to look like snowballs. I topped the “snow” with edible iridescent glitter to give it some shine!
For the letters, my local bake shop printed “Happy Birthday” onto edible paper. I used WordArt to make the orange/red letters and chose the one that closest resembled the “Happy Feet” logo. Then, when I applied it to the cake, I staggered the letters up and down, as in the logo. Finally, I added candy snowflakes.
For Mumble the penguin, I used Wilton’s Teddy Bear 3-D cake form. I simply removed the ears, then saved them to use them at the bottom to make his happy, little feet. He was put on a cardboard circle which I put 2 holes in, to later put sticks through for support. He was piped almost entirely using a star tip.
I used a picture of Mumble to do the colors of his down, then on the iris of his eye added the same white candy ball as I used for the snowballs to look like reflected light in the eye. It was a great touch. It made him look “cartoon-y”. I swear it made the cake really pop.
Prior to placing Mumble on the cake I inserted 2 chocolate lollipop sticks about halfway through him. When I placed Mumble on the base cake, I secured him with the two lollipop sticks by sliding the other ends through the teal cake, then piped over the cardboard circle to hide it.
I finally added the removed “bear ears” and used them to make the feet, which I adhered with icing and piped around.
The cake was a big hit, and he survived a bumpy 20 minute drive to my friend’s house. I was very happy with it, and most importantly, the birthday girl LOVED it!


Your comment has been sent successfully.