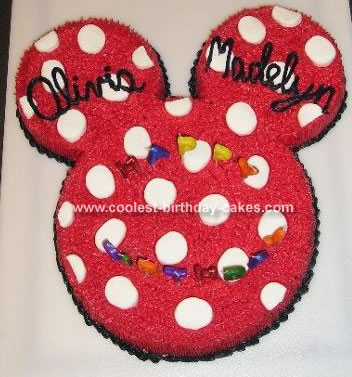
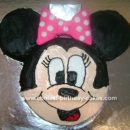
We had a joint party for my daughter and her best friend’s 3rd birthday. (Their birthdays are 4 days apart.) There wasn’t a whole theme to the party but the friend wanted a Minnie Mouse cake. It’s hard to come by good ideas for Minnie Mouse and I’m no artist when it comes to working with icing so I created this idea.
I used a 10″ round and two 3″ rounds, Wilton’s “red red” and “black” icing colors. (I had heard that the “red” can have a funny taste.) How I cut the three pieces to fit together, I used the empty 3″ round tins (I have 2 of them) upside-down. Place them where you’d like and then press it gently into the 10″ cake–just enough to make an impression and then you can cut the shape out and fit the “ear” cakes in place.
I piped the icing on with a tip, but not being any kind of baker, I have no idea what tip or how to describe correctly what I did. I dabbed (dotted?) the icing on the top and sided and then made a black outline to define the shape better.
The polka dots are marshmallows cut into thirds. I used only the top and bottom thirds but seemed to have no trouble finding someone to eat the middle thirds.


what did you use for plates and stuff I can’t find anything that isn’t the pink Minnie mouse
I WISH I HAD SEEN THIS IDEA SOONER! WHAT A GREAT CAKE! IT IS UNMISTAKABLY MINNIE!
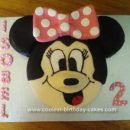
I immediately fell in love with this cake and made it for my daughter’s 2nd birthday! Here is a more detailed description of what I did.
I used a 9 inch round cake pan. I didn’t have 2 small 3 inch cake pans so I used a round casserole dish that was about 3 inches. I only had one so I had to bake it twice. I followed the directions for the cake and split them up evenly. With the 3 inch pans makes sure you bake it for a shorter time. I did 17 minutes and it was perfect. I did normal time for the 9 inch pan. Let them cool for about 30 minutes and then put them in the freezer for at least an hour. This helps to make it easier to frost. After its been in the freezer I would cut a layer off the top of the bigger cake to make it even.
Than layer the entire cake with a very thin layer of white frosting using a spatula (I used store bought frosting for this). Than I would make a thick buttercream frosting. Make sure frosting is thick! Always use Wilton’s to dye for colors. I used about 2 cups of red frosting and 3/4 cup of black frosting. When mixing dye you will need to use the entire red Wilton container to get a good red. Than I used a number 16 tip and dotted the entire cake in a circle fashion. I did red first and than black. Than I cut large marshmallows into 4 pieces so they were very thin and placed them all over cake.
I wanted her to look more like Minnie so I used ribbon and made a bow. I will just take off the bow before I serve it. You could also make a bow out of fondant. I also wanted more of a clean look so I didn’t add any lettering! Turned out better than I imagined!!
I am 11 years old… and I want this for my 12th birthday party!! I LOVE MINNIE MOUSE!
Thank you for this, definatly doing this for my twins 1st birthday…thank you!!
This is so cute. I knew I couldn’t make Minnie’s face on a cake myself, but I can do this! My daughter will love it for her 2nd birthday next week. Thanks for sharing.