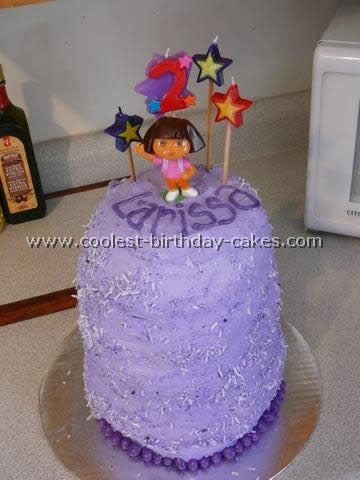
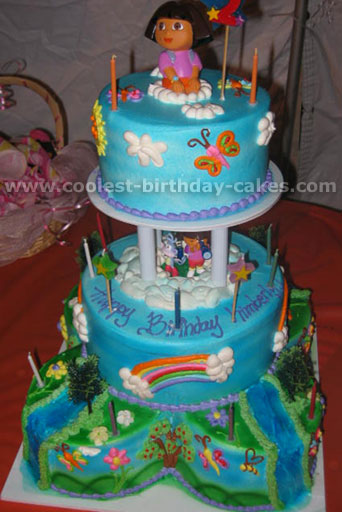
After looking at all the cakes on this website I came up with the idea of doing the Tall Mountain of Dora birthday cake for my daughter’s 2nd birthday. My daughter loves Dora and I didn’t feel comfortable doing an actual Dora. I had so much fun making the cake!
First I baked four cakes (vanilla Betty Crocker) in Anchor Hocking bowls that are oven safe. I already had them as I use them for mixing bowls… on the bottom it says oven safe. I put the cakes in the freezer for the night since I read a tip that said that made the cake better. The icing is made from real whipping cream. I always use this because I find icing too sweet.
I used 4 cartons of whipping cream (500ml each) and whipped them up and added whipping cream stabilizer vanilla sugar and icing sugar until it was sweet enough. I found all those items at the local bulk store where they sell a lot of cake supplies.
After all the cream was whipped I added violet paste to tint it. I piled the cakes on top of each other and went to town with the whipping cream!! I made tinted coconut for on the outside of the cake. I put a bit of violet paste in a Ziploc bag with some coconut and rubbed it until it was tinted. Then I added the coconut to the cake. Then I added purple jelly beans to the bottom of the cake to make it look finished. I used Wilton gel to write Larissa’s name on the cake.
The Dora figurine actually came with a container of Play Dough. It was perfect since the base was disk shaped which I was able to hide underneath the whipped cream and the disk helped to stabilize the figurine. I made one fatal error – I underestimated the will of this particular cake to lean!! I should have put something down the center of the cake (a dowel perhaps?) to stop the cake from sliding… the sheer height of it combined with the delicacy of whipping cream was just a perfect combination for disaster! Once I noticed the cake was leaning and doing so at a very rapid rate we served it and sang Happy Birthday.
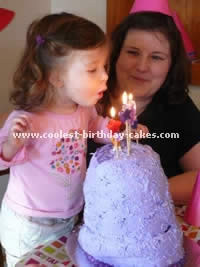
My daughter and our guests loved the dora birthday cake even it was a bit lop sided.
More Dora Birthday Cake Ideas
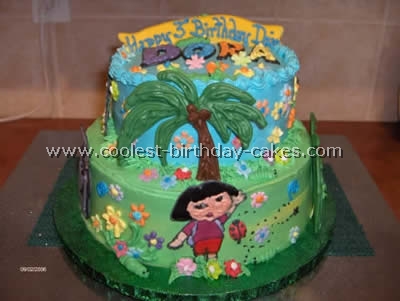
Dora Birthday Cake by Kim B., Hilliard, OH
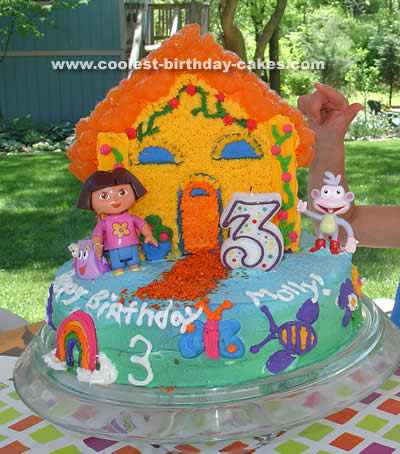
My three year old daughter wanted a cake that was “where Dora the Explorer lived” I was slightly stumped, how to create such a Dora birthday cake?
I decided to use the Wilton house cake pan and tweak it slightly. It turned out to be very easy to do. I baked a 10inch round for the base and used the aerosol food coloring to give it a vibrant cartoon effect. I then piped in rainbows clouds etc. The house itself was made to look like Spanish architecture.
I used orange slices snipped in half for the “Mexican tiled” roof. I also cheated by looking at pictures of the toy Dora doll house. I used these pictures for the inspiration and piped in the details. I then used the Dora and Boots figurines for an extra touch. The cake was slightly top heavy and although I put dowel rods in to support it the house started to lean and we had to move the cake up to the beginning of the party. I don’t think anyone but me noticed. Lots of fun!
Dora Birthday Cake by Lyndsey F., Humble, TX
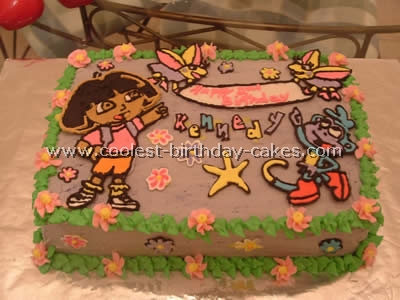
For this Dora birthday cake, I started with a 13×9 pan. I made 1 chocolate for the bottom and a white cake for the top. I iced the cake with purple buttercream. I used green buttercream and made green leaves as the top and bottom border of the cake. I placed pink drop flowers along the border.
I took a page from a coloring book and traced it onto parchment paper. I drew the piece out with royal icing. I also made some stars and some flowers with the royal icing. I scattered them along the Dora birthday cake.
I made the two little bugs and I drew a banner in between them that they were holding. I wrote Happy 2nd Birthday in the banner with pink. I used royal icing and drew out the little girl’s name.
This Dora birthday cake was very easy; the pieces were just very time consuming due to all the different colors.
Dora Birthday Cake by Laurel D., Calgary, Alberta, Canada
I used two tiers of cake for this Dora birthday cake; an 8-inch base with a 6-inch top. The figures are chocolate transfer figures. The palm trees, flowers, ladybugs etc. are cut out fondant.
Dora Birthday Cake by Janet H., Berkeley, CA
The cake base was baked in a deep 1/2 sheet pan used to make coffee cakes and available at restaurant supply stores. 2 layers of 1/2-sheet pans would also work to give you a large cake for the Dora birthday cake scene.
The figures were from a Dora set. The candy path Dora and Boots are on is outlined in M&m’s. The house and planks of the bridge are sugar wafer cookies. The sides of the bridge, and barrier around lake are yogurt-covered pretzels from the grocery. The door is part of a filled chocolate bar with a royal icing knob.
There are gummy frogs in the river and goldfish crackers in the lake. The chocolate mountains and horse are cookies and candies sold at Ikea! I put the snow on top with royal icing. The corral is made from pretzels.
The rocks around the mountains look like nuts in the photo but are candy rocks sold at a cake-decorating store. The palm trees are Pirouette cookies with sage leaves and fennel tops stuck in them. The trees behind Dora and Boots are mint sprigs. The bushes are spearmint gumdrop candies; one is raised up in a trio of candy gummy wreaths.
Dora Birthday Cake by Mary D., Mukwonago
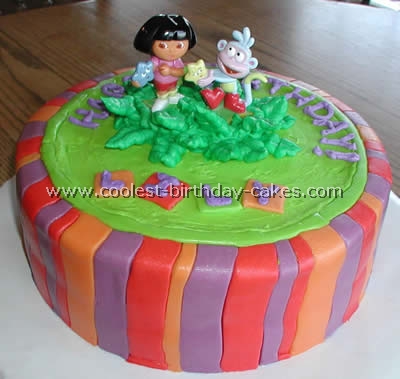
I made this Dora birthday cake for my niece Lily’s 3rd birthday. The idea came from the invitations and the plates. I used two 14″ circle cakes and frosted them LIGHTLY with butter cream frosting (light green on top). Next I used a leaf tip to make large leaf for the top on a wax paper covered tray and placed them in the freezer.
I made butter cream fondant and mixed the colors to match the stripes on the invitations and the green on top of the Dora birthday cake. I cut and placed different size stripes using the same pattern as the invitation and placed them around the outside of the cake.
Then using a strand of light green fondant I made a boarder between the frosting and the fondant. I found Dora and Boots stamps at a discount store and used them as centerpieces (wrapping and taping up the bottoms with saran wrap). Once the centerpieces were in place I peeled off the leaves and placed them on the Dora birthday cake starting with the ones closest to Dora and Boots and moving out and downward.
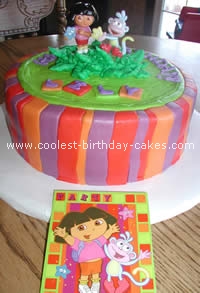
Last was the lettering, for Lily I used fondant cut into squares.
Dora Birthday Cake by S. Hopkins, San Ramon, CA
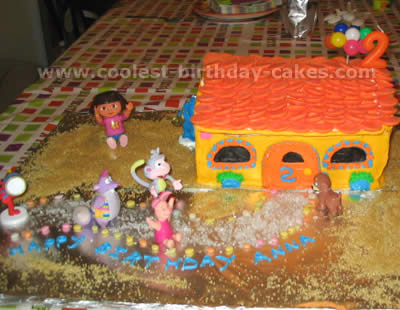
I wanted this to be a party at the house of Dora the Explorer (a house with all my daughter’s favorite characters there).
The Dora the explorer house is a two layer rectangular cake with the roof being another cake cut and pieced together to make the triangle. The roof tiles are orange candy melts and all the figures are from various toys (Swiper is even hiding behind the back corner of the house).
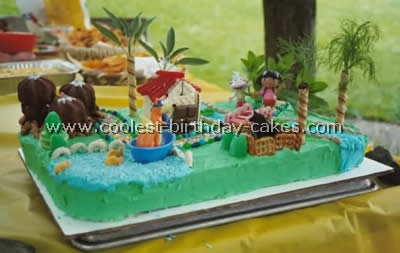
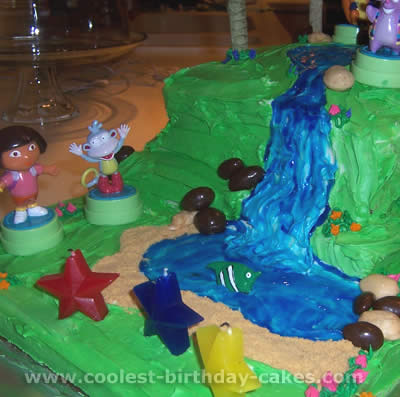
Dora Birthday Cake by Erika G., Milford, MA
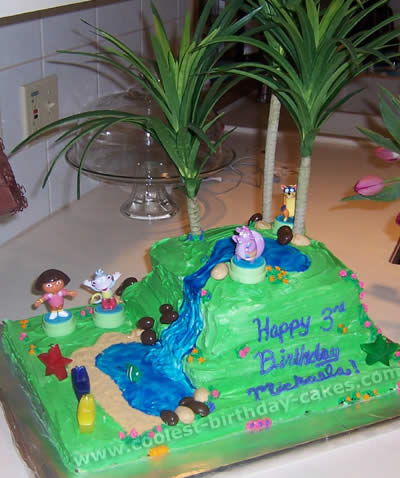
This Dora birthday cake is made from 4 cake mixes. I used two 13×9 pans for the base and three different size square pans for the mountains. I used blue gel for the two ponds and swirled it with white frosting for the waterfall.
I bought three “palm trees” from a craft store and cut them to size. The characters are stamps that I also got a craft store. The rocks are chocolate and maple covered nuts and malted milk balls and the beach is made from graham cracker crumbs.
Dora Birthday Cake by Nancy G., Los Angeles, CA
I started this Dora the birthday cake by buying Betty Crocker cake mixes. I used chocolate for my medium size cake and vanilla for the 4 small bottom ones and the top one. I baked 5 small vanilla cakes, sliced them down the middle, and filled with vanilla pudding and fresh strawberries. I used the same procedure for the medium one.
I then used Betty Crocker vanilla whipped icing and iced all my cakes. I used a color mist food spray that I purchased over the Internet and sprayed my Dora birthday cake with blue color mist so it could have an airbrush effect.
After all my cakes were iced and sprayed I inserted wooden rods to my 4 small bottom cakes and then put my medium cake on top of those and inserted wooden rods on the medium cake too.
I used ready to decorate Color icing that I purchased on the Internet (there is almost every color available and it comes with different style tips so there was no piping bag used). The bottom cakes got another color mist spray in color green along the bottom and top so it would look like grass then added little trees and butterflies to make the water falls.
I outlined the design with ready to use green and blue icing and then I used Ready to use gel (also available online). To the medium cake and the top one I used Betty Crocker vanilla icing put it in a piping bag with no tip. I used that for the clouds- I piped a lot of icing in a shape of a cloud (at the end of the rainbows and at the top of the medium cake). I added clouds to the top cake but smaller.
The Dora the Explorer I used for the top came from a bubble bath bottle purchased at rite aid and the bottom one I purchased at a local cake shop. At last I added lavender borders all around my Dora birthday cake and candles. Most of the things I used were purchased online.
Dora Birthday Cake by Felicia W., Port aux Basques, Newfoundland
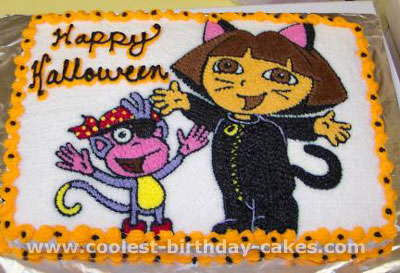
My little girl just started preschool, they were having a Halloween party and she wanted a Dora the birthday cake for the party.
I printed the Dora the Explorer picture and used a needle to poke holes around the outline for the picture, placed the paper on the cake and used coca to transfer the picture (connect the dots) onto the cake.
I outlined the Dora the Explorer picture in black with #3 tip and filled the colors with #16 stars. This works with any design, I have done literally hundreds of cakes this way, they always turn out wonderful and I get tons of complements!
Dora Birthday Cake by Nicole M., Litchfield Park, AZ
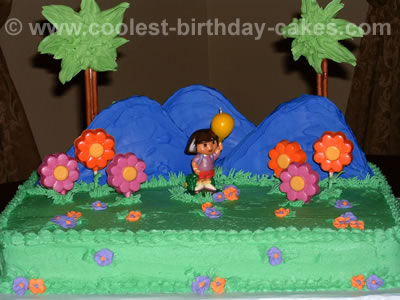
For this Dora the birthday cake, I made a 1/2 sheet cake, covered it in green buttercream icing, made roll out sugar cookie dough and freehand cut out the mountains and palm tree tops. Baked them and frosted them with royal icing.
I then painted three dowel rods (for each palm tree trunk) with a drop of brown icing color and a couple teaspoons of water. Then I made drop flowers in royal icing and let dry.
I placed the dowel rods behind the mountains and attached to the cookie with royal icing and did the same for the palm trees. I placed them into the cake and used a grass tip to put grass around the bottom of the mountains for extra stability.
I molded the flowers with white candy melts colored with icing coloring and placed a lollipop stick in each one. I cut them to different heights and placed them in the cake. I added the flowers and attached with buttercream and put Dora the Explorer in the middle and iced grass around her.
Dora Birthday Cake by Beth W., Newport, RI
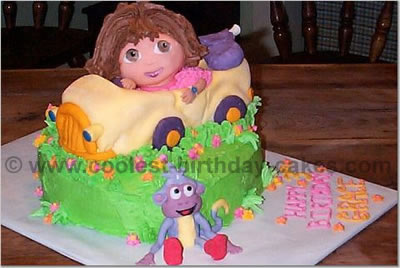
This is a Dora birthday cake with Boots. My neighbor’s little girl Grace was turning 3, and she just LOVES Dora! She wanted something 3-dimensional. I could not figure out how to make a 3-D Dora out of cake without her head flopping off, but I got an idea from looking at the party napkins and saw Isa the lizard’s yellow car.
I started the cake with a double layer round chocolate cake (Grace’s favorite!) and then covered that with green buttercream “grass.” I baked another cake in a loaf pan, and covered with yellow fondant and used fondant for wheels and other details on the car. Dora’s head is a cake baked in mini ball pan, with fondant skin, and chocolate icing for hair. I used wooden dowels to secure her in the yellow car cake.
I created the rest of her body out of buttercream and fondant, right down to her little hands and bracelet! Boots was sculpted completely out of fondant icing. It was a big hit at the party! No one wanted to eat the Dora birthday cake, they could not believe she was actually a cake!!
Related cakes:
 Coolest Dora the Explorer Cake Ideas and Dora Cake Inspiration
 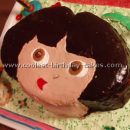 Cool Homemade Dora Birthday Cake Ideas and Decorating Tips
  Coolest Dora the Explorer Birthday Cake Ideas
  12+ Coolest Peppa Pig Cake Ideas
  12+ Cool Homemade Spiderman Cake Ideas
  Coolest Dora the Explorer Standing Birthday Cake 116
  Coolest Diego and Dora Birthday Cake for 4 Year Old Twins
  12+ Coolest Frozen Birthday Cake Ideas for the Ultimate Frozen Theme Party