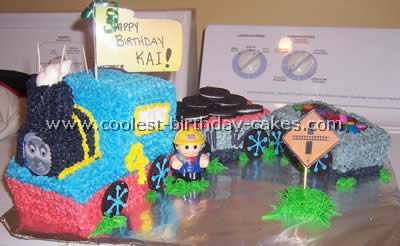
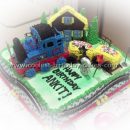
I used four loaf pans for the Thomas the tank cakes. The last two trimmed to square and the tank engine was formed using an electric knife (a great cake carving tool) and held together with skewers. You will need to use a pound cake recipe or the cake will fall apart when building.
The face of Thomas was printed off the computer and “laminated” with tape. The toothpicks in the photo were to hold the saran wrap off the cake when in the fridge!
More Thomas the Tank Cakes
Cake by Samantha B., Kokomo, IN
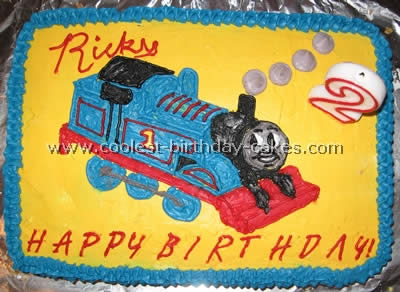
I used a butter cream icing on this cake and started with a crumb coat. After letting that sit overnight I started with a base of yellow. I then started to draw Thomas with blue. After I had the outline finished I filled in the body of the train. I then did my detail work with red, grey and black. I did the border and writing last.
This cake took a lot of time. It was a first try at Thomas the tank cakes and I did not finish until the guests had began to arrive for the party. It turned out great. My son is still talking about his Thomas cake and his birthday was months ago.
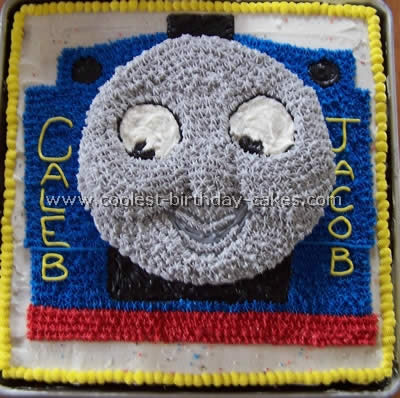
This was my boy’s first birthday party together. They both love Thomas so I decided to wing it with Thomas the tank cakes. The base of the cake is just a square wedding cake pan. I then baked another cake in a round cake pan and placed it on top to make Thomas’s face. I forgot the eyebrows but overall the decorating was just the simple star tip technique and the eyes were moistened to make them look glossier. Also to add dimension, glob icing to make cheekbones a nose etc and then decorate!
Hope this was helpful.
Cake by Sally S., Victoria, Canada
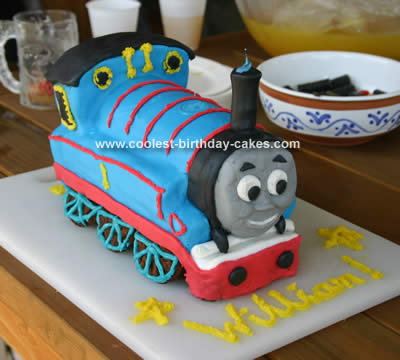
This cake was for my little boy’s first birthday. I got the idea for this cake from this website for Thomas the Tank cakes. I tried to get the Debbie Brown book that the design came from but couldn’t so I just copied a picture as best I could using tips I also got from here. The cake is chocolate mud a recipe I got from a friend. It made it easy to decorate because it’s so heavy and hard to break.
There are two log cakes, one standing upright behind the other which was trimmed to fit and a cylinder cake. I think you’re supposed to boil that cake tin but I didn’t and it spued everywhere but I just cut away the excess and it was fine. Next I cut a recess in the log cake to fit the cylinder cake in just to lower it a few centimeters. The rest is basically icing except the wheels. They are chocolate ripple biscuits cut in half with the pattern piped on. Because it was his first birthday I only needed one candle so I rolled it in black icing with a little sticking out the top, bulged it a bit at the top and turned it into the smoke stack.
I used white premade icing from the supermarket, microwaved a little and added the coloring. There was a little bit of mucking around because the more coloring you add the stickier it gets so you have to add icing sugar. The blue and the black we rolled out flat laid on the cake and cut to fit. There is also some red and yellow piping. The face was the hardest; my sister did that for me. She just played with it until she had it right then stuck the eyes on with sugar glue (two parts sugar one water dissolved on low heat).The secret was to put the face together then let it go hard in the fridge overnight then stick it on with the glue otherwise it sages out of shape.
Lots of fun, it took probably five hours the night before and one in the morning because we had to do things a few times to get it right but it was worth it. Thanks to all the Thomas the Tank cakes on this site, it made our work much easier!
Related cakes:
 Coolest Thomas the Tank Cake Ideas
  Coolest Thomas the Tank Engine Cake Photos and Ideas
 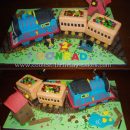 Coolest Thomas Birthday Cake Photos and Ideas
 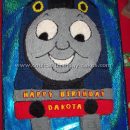 Coolest Thomas Cake Ideas and Cake Decorating Tips
  20+ Easy Spongebob Cake Ideas
 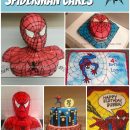 12+ Cool Homemade Spiderman Cake Ideas
 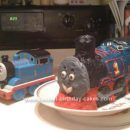 Coolest Thomas the Tank Engine Birthday Cake
 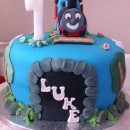 Coolest Thomas the Tank Cake