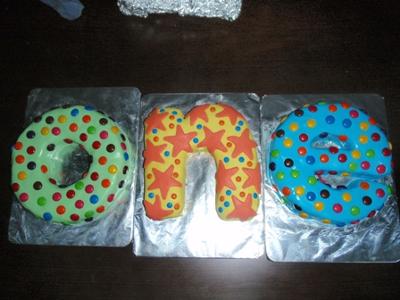
I recently made this cake for my son’s first birthday.
If you’d like to make it, you’ll need a round cake tin (I used a Wiltshire springform tin) and a small square tin the same size (also Wiltshire).
I mixed three batches of basic butter cake, though a denser cake like mud cake may be easier to work with and trim. I’d avoid sponge, as this would probably be difficult to cut to shape. Once baked and cooled, I trimmed the top off all three cakes with a serrated knife, making them flat.
I used a smaller serrated knife to cut out the ‘O’ by using a large, round, straight glass (any circular object will do to ‘punch’ out the centre). I then traced a template for ‘N’ and ‘E’, drawing the letters on baking paper. I used the cake tins to get the size right, and sat the templates on the baked cakes then cut the cakes into shape.
The icing in this version is ready to roll (ready made soft) icing. The icing comes in packs, and is kneaded with a few drops of food colouring to colour. Make sure you knead it well, even if you decide on plain white – it makes the icing more malleable. I used two layers of icing per cake (about 4 packs, or 2kg of icing).
When rolling the icing with a rolling pin, make sure you dust everything with icing sugar and pat the icing with icing sugar regularly, or it will begin to stick and you’ll need to roll again. The icing simply tucks in once draped over the cake. Wet your fingers to smooth if necessary (you can fill any holes with more icing – just use wet fingers to rub the icing until it fills the space).
I used Smarties to decorate (good for covering any nicks or lumps!), and more rolled icing cut out with a biscuit cutter.
Finally, make sure you ice and decorate on a board, if you want to display the cake – it will be too hard to move. You’ll also need to carefully cover the cake so it doesn’t dry out.


Your comment has been sent successfully.