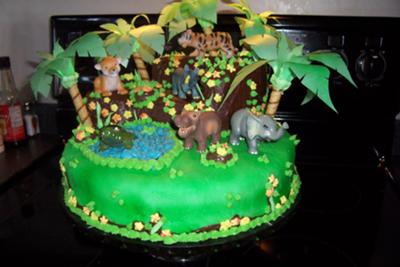
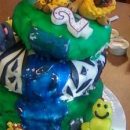
I wasn’t really sure what to make for my baby daughter’s second birthday. I guess I just followed her invitation theme (she picked the invitation card out herself while we were out shopping a month in advance). So, since the invitation had baby jungle animals, I went with it. I was inspired by the waterfall/Diego cake from this website and another jungle-themed fondant cake from another website. I had two sketches of what I was thinking the cake would be but it still turned out different — for the better!
Naturally, since I will use brown icing for some rock outcrops, I settled on making a chocolate cake. I got the baby jungle animal figures from a dollar store. Aside from the candle and some toothpicks, they are the only non-edible part of the cake. Yup, event the trees are all 100% edible! Speaking of which, I made 3 days in advance because I had to use homemade green royal icing to “paste” the leaves to the chocolate-wafer-stick trunks. I only made a fourth of a standard royal icing recipe (that is good to cover an 8 – 9″ cake). I used a few tablespoons of it and colored it green (the rest I colored yellow for the flowers) to match the leaves. I also had to hunt for some edible paper wafers (or rice papers) for the leaves; which I found out only comes in white. So, I had to get a green colored mist spray to color them before cutting out the leaf patterns. Since it was my first time working with paper wafers, I was not sure if it will do the trick. My plan B would have been green construction paper. I had to wait just under a minute for the color to dry a bit. I was glad that after cutting out the basic leaf patterns, and they were still a bit moist from the spray, I was able to shape them with the kitchen scissors (dull, rounded side) to curl. After curling them and making sure they are all really dry, I cut out several v-slits in each leaf to give them more angles. After which, I “glued” the little leaves first on the tip of the wafer stick with the green icing using a petal tip. I put another layer of green icing for the big leaves to stick on. And, finally to set them all close together, another layer of green icing. For the five trees, I only used two letter-sized sheets of rice paper. I had to dry them overnight sideways (rest them on cups or whatever works) so the leaves won’t droop to low while the royal icing is still soft. After that, I had to store them in a big tin can with popcorn to stick them into so they would stand up and retain the leaves’ shape. I used the little bit of green icing left to make some long leaf patterns (like tall grass or fern) with a petal tip instead of a leaf tip. I squirted them on a piece of plastic wrap so it would be easy to take them off 3 days later after drying without breaking them.
I used yellow royal icing for the little flowers. They were supposed to look like drop flowers. But since it is my first time to do anything like this, it took me a few tries to at least get a recognizable flower instead of just drops of icing. I was able to cover an entire 14″ pizza metal pan (with wax paper taped on it) with these flowerettes. They were also set aside to harden for 3 days.
The rest of the cake I made the night before the party. The bottom tier is made up of two 12″ chocolate cake layers. The upper two tiers are made from two 7″ chocolate cakes (cut, stacked and sculptured to get a rock formation outline). I used half a standard can of chocolate frosting for the filling in between the two bottom layers. And, one standard can of chocolate frosting for the upper tier to serve as both the filling and the outer frosting. The outer frosting for the bottom tier is fondant sprayed with the same green mist I used for the tree leaves. I actually made the fondant before I started baking the cakes. The fondant recipe I used is good to cover an 8 – 9″ cake (it’s 2lbs of confectionaire’s sugar!). The recipe called to set the kneaded fondant aside a few hours before using so it will be softer and easier to use. While waiting for that, I was baking the two 12″ cakes and two 7″ cakes. Once I had all cakes cooled and leveled, I started putting everything together directly on a heavy glass cake stand.
I placed one of the 12″ cakes in the middle. Frosted the top to serve as filling and to keep the upper 12″ layer in place. Once I had the second 12″ layer positioned on top of it, I carefully put the fondant over both layers. I was a bit frustrated that the fondant didn’t exactly go all the way down on some parts of the cake. But later on I found a way to cover it up. Before spraying bottom tier’s outer fondant frosting, I used some newspaper to cover my work area. I had to wait for the color to set and dry first before I could start stacking the second tier. While waiting, I thought of how to cover up the part without fondant. I used some more chocolate frosting to fill them in and shape some to look like roots or cave cracks all around the bottom of the cake. Add some yellow flowers and green royal icing pointed leaves and voila! It looked like it was meant to be that way.
As for the top tiers (rock formation), I placed one of the 7″ cakes to the side with the edge half an inch away or less from the bottom tier’s edge. I cut up the 2nd 7″ cake in two irregular parts. One to make an extension of the first layer and the other piece to put on top of the 1st 7″ layer aligning both edges. Once it has been filled and frosted all over with chocolate, I started decorating.
I placed the trees first in strategic locations to frame the scene of the cake. I used three round chocolate truffles, cut in halves, and placed them all over the cake. You might want to use a couple of toothpicks carefully inserted at the base of the wafer sticks. I realized later they were leaning sideways more than I wanted them to. And, it was because the cake and frosting started to soften the base of the wafer stick. I prepared some buttercream icing (using a fourth of a standard recipe) to make the pond using blue food color and a petal tip; and the additional “greenery” / miniature shrubs all over the cake using green food color and a star tip. I placed the baby jungle animals and started putting the yellow flowerettes all over the cake and around them, even on the truffles. Lastly, using a star tip with the green buttercream icing, I did a shell / scallop frosting design around the base of the bottom and the top tiers.
Whew! I was up until three in the morning and I still haven’t had the buttercream frosting decorations done yet. But overall, I think I spent around 8 hours on this cake (excluding shopping time for the ingredients). And, probably, I only spent $20 for the stuff I actually ended up using. Not bad for a cake that our guests thought was at least a $100 made-to-order cake. :)
I hope you enjoyed reading this write-up and inspired to go the extra mile if you have to. I had fun making it. My daughter really, really, really liked it. So did all the guests.


Wow, this cake is truly amazing. You are very talented!