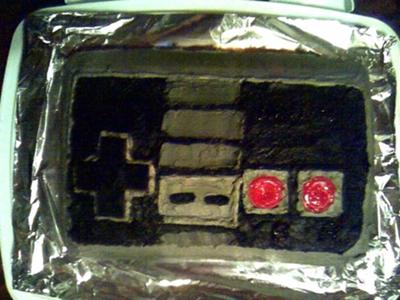
One of my younger sisters turned 21 about a year ago and I planned a visit to go see her (we live about 150 miles away from one another). I decided I wanted to make her a special surprise cake. I ended up going through multiple ideas before I realized that a Nintendo-themed cake was going to be perfect. I settled on the controller on it’s own because of the easy shape; it would be much more decoration-focused than shaping-focused. This is because the only other uniquely decorated cake I had done was a round baseball cake. (White frosting, gel icing for the laces)
To ensure everything was done properly, I printed off various references of the controller from a straight-on view (this was actually more difficult than expected).
I used a white cake mix for the cake itself, and made it in a normal 9×13″ pan. For the frosting, I used a homemade buttercream recipe(recipe easily found all over the internet) and colored it black and various shades of gray. To get the colors, I used black food coloring and some Wilton blue coloring to make it that classic bluish gray. Gray can be very difficult to attain, so I would advise having plenty of extra frosting on hand, and plenty of patience. Also, keep in mind that you can always add more coloring, but you can’t take any out. Lastly, in regards to the main frosting, I had to be very patient and take my time so that the frosting didn’t overlap or look terrible.
For the D-Pad, I used dark chocolate squares and carved the arrows and circle into them. They were placed onto the cake with frosting.
The red buttons were from Twizzlers cherry-flavored Pull-n-Peel. It was a bit tedious, but I coiled individual strings of the Pull-n-Peel, and then covered them with red decorating gel to smooth them out a bit.
Also, I know the picture is dark and you might not be able to see it, but I also used the red gel to write “Nintendo” on the top right corner and the “A” and “B” below the red buttons.
To do the “Start” and “Select” buttons in the middle, I just took a ziploc bag (since I didn’t have any icing bags) and cut a tiny portion of a corner off. I did not write the words “Start” and “Select” because my cake was not big enough.
I had only told my sister that I was coming with a surprise cake, but didn’t tell her anything else about it. However, I did ensure that she would like the flavor; that was why I didn’t use fondant. (I would like to re-do this cake some time with fondant and see how that turns out.) She was so thrilled to see this surprise cake and everyone else was very impressed by it, too. I was pretty proud of a first attempt at a uniquely-designed cake.


Your comment has been sent successfully.